Feeds:
Posts
Comments

Archive for the ‘Thai Side Dish Recipe’ Category

What is a Fruit, Eaten as a Vegetable, and Used as a Sponge?

Wait—you are eating luffa? Yes, in Thailand luffa fruit is eaten at a young stage as a vegetable. It is soft, sweet and aromatic after cooking, either in a stir-fry or a soup dish. We eat the whole fruit except for the skin.

When I have a craving for luffa as a vegetable, I only choose the youngest luffa available. As the fruit gets older, the fibrous veins becomes more visible and tough and the flesh gets more airy and dries out to become a sponge. Farmers leave many healthy-looking luffa fruit longer on the trellis in order to harvest seeds and sponges as the annual vine grows old, dies, and dries up. The last harvest for the plant is healthy seeds and luffa sponges for bathing or cleaning pots and pans.

บวบหอม

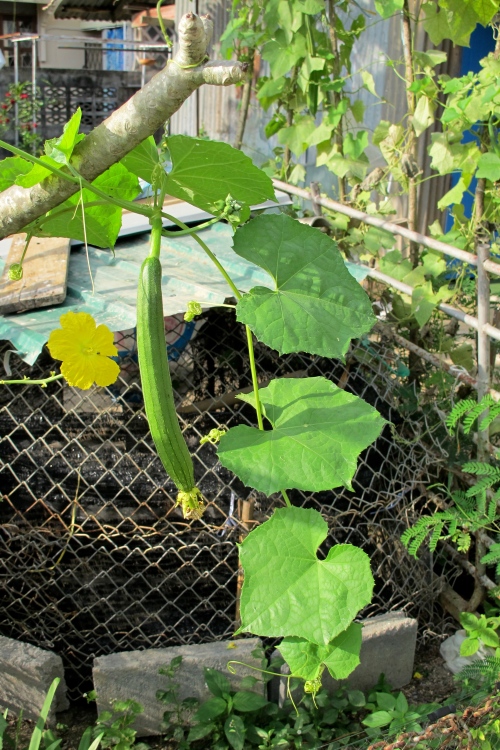
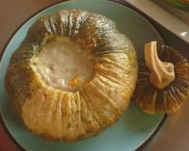
บวบหอม – Smooth Luffa – Luffa aegistiaca

We enjoy two species of luffa as a vegetable in tropical and subtropical countries. The above luffa is บวบหอม – buap homSponge Luffa or Smooth Luffa. Below is the บวบเหลี่ยม – bump liam –  Ridged Luffa or Angled Luffa.

Growing up in Thailand I felt that what makes a Thai village scene beautiful is walking around and seeing both kinds of luffa growing in and around granny’s home, either on the fences or the chicken penthouse or on a tree. And one doesn’t need a fancy vegetable garden to grow them, just two square feet of fertile ground, routine watering, then a bit of training to get the vine to climb up a twig or fence as it grows. After that it can take care of itself and all you have to do is admire the yellow flowers, harvest the luffa, collect seeds for the next season and enjoy a supply of sponges.

Angled Luffa on the arbor - Angled luffa - Luffa acutangula

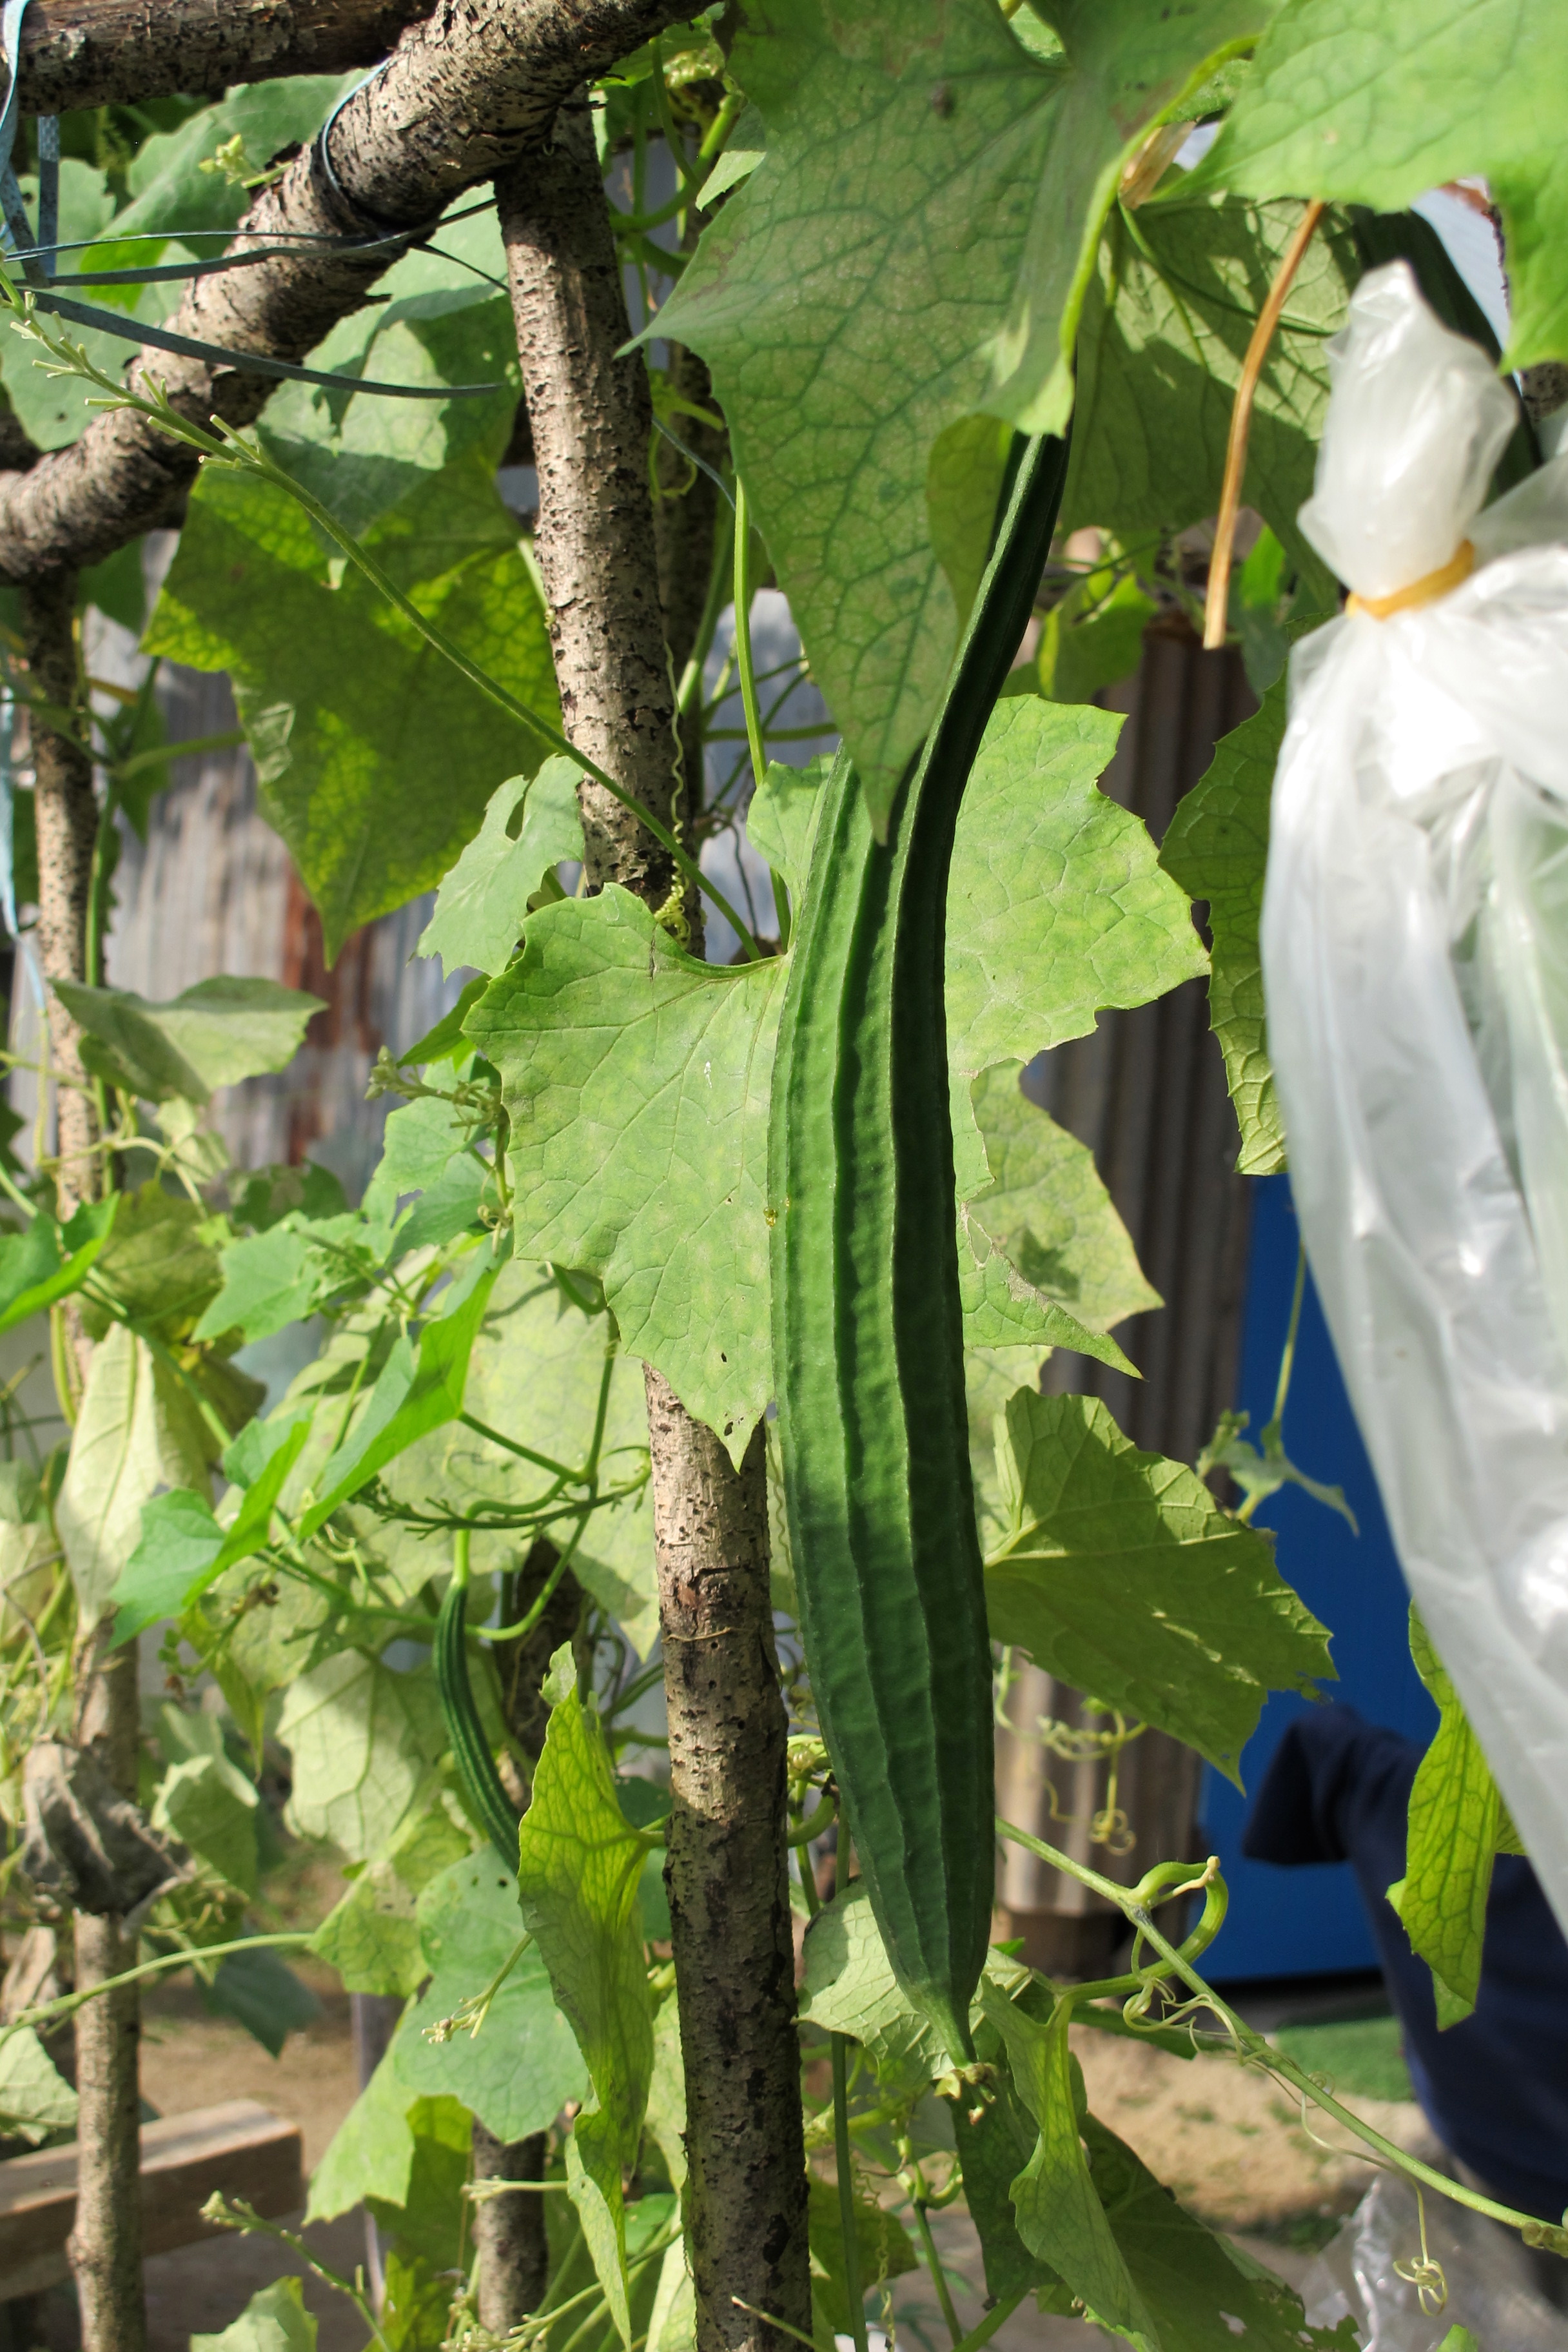
บวบเหลี่ยม – Angled Luffa on the trellis – Luffa acutangula

This picture was taken a few years back when I visited my mom and uncle and we walked around my village in a circle. The angled luffa is young, long, and round with ridges. This one is a perfect size for harvesting. It could be from 1 to 1 and 1/2 inches in diameter and 8 to 12 inches long. The yellow flowers were bright against the dark green guard hanging on the chicken coop to provide shade for chickens. I trust that the yield of luffas from this single plant provided many meals, stir-fried, in a country-style soup, or served with Nam Prik – Thai Chili Dip

Step-by-Step: How to Peel and Cut Luffa 

One year when I visited mom I found her in the kitchen just about to prepare stir-fried luffa with egg for lunch. Because I wanted to share the technique and recipe with you and all my blog followers, I asked her if she could do this in slow motion and let me interrupt her so I could take photos of her peeling and cutting luffa the way everyone from our Thai village always did. I want to share with you this treasured culinary moment in my mom’s kitchen.

how to peel angled luffa

How to peel angled luffa

The luffa is actually related to the cucumber family. They are alike in many ways but the luffa is softer. We use a cucumber peeler to peel the ridged skin.

IMG_0171

Angled luffa looks like a soft cucumber

After peeling and rinsing, we do the oblique cutting or roll-cutting.

oblige cut is a cutting style for stir-fried luffa

The oblique cutting style is used for stir-fried luffa

Please click here to see a video and the explanation from Simply Ming about how and why oblique and roll cutting is used in Asian Cuisine.

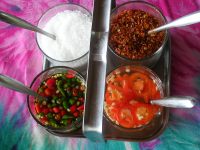
The reason we love luffa so much is that it is succulent, moist, sweet and tender. Therefore we don’t need many ingredients in this stir-fried dish. We often enhance the flavor with some protein like egg, prawn or pork, then a little fish sauce or soy sauce for salt. The taste has a hint of zucchini and cucumber. It has a delightful silky smooth texture that is soft, but firmer than a marshmallow.

Mom's style stir-fried angled luffa with egg served with steamed jasmine rice

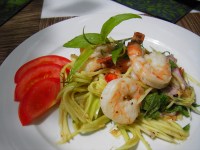
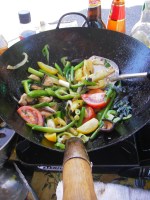
Mom’s style stir-fried angled luffa with egg, served with steamed jasmine rice

Both species of luffa can be cooked in the same way. There is not a big difference between the two, but I prefer angled luffa over smooth luffa as it is more succulent and sweet. This recipe, and the photographs were recorded many years ago in my mom’s kitchen in Phuket. It captured our fine day visiting and savoring real Thai home cooking.

Stir-fried Angle Luffa with Egg

Buab Phad Khai
บวบผัดไข่
Serves: 4

Like any Thai stir-frying dish, cooking on high heat is the key. Shrimp or pork are popular proteins used in stir-fried angled luffa, and almost always with egg, some soy and fish sauces and a pinch of sugar. It can be served as a side dish or a main dish with steamed jasmine rice.

3 tablespoons high heat cooking oil such as canola, peanut or soy bean oil

3 cloves garlic, chopped

2 eggs

3 large or 4 medium-size angled luffa, peeled and oblique-cut, about 1 and 1/2 pounds

1 tablespoon fish sauce

1 tablespoon soy sauce

1/2 teaspoon sugar

1/2 cup water or chicken broth

Heat a wok on high heat until it is hot. Pour in cooking oil and stir in garlic. When garlic is golden, stir in eggs and stir a few times. When the egg is cooked, stir in luffa. Stir for 1 minute and add fish and soy sauces and sugar. Add water or chicken broth and let cook for 1 to 2 minutes with the lid on. It should have a soft texture and some sauce like the recipe above. Serve warm.

I Love Thai cooking
Pranee teaches Thai Cooking classes in the Seattle area.
Her website is: I Love Thai cooking.com 
Lets connect on  Twitter,  FacebookYoutubeInstagram and Pinterest
For more in-depth in Thai ingredients and Hand-on Cooking Class please check out
Pranee’s One day Asian Market Tour & Cooking Class at Pranee’s Thai Kitchen
 

Related Links

http://www.kitazawaseed.com/seeds_luffa_angled.html

How to Grow Your Luffa Sponge

http://www.luffa.info/luffagrowing.htm

Roll-Cutting Video

http://www.howtocookmeat.com/techniques/howtorollcut.htm

Read Full Post »

The Best is on the Top and in the Middle

Like custard, caramel grated coconut has a goodness that has many uses and places in dessert creations. I have a place in my heart for this sweet coconut delight. I chose an English name for this coconut dessert topping and filling – Caramel Grated Coconut – Sai Maprow -ไส้มะพร้าว – Nah Maprow – หน้ามะพร้าว. Its caramel taste, either as a topping or as a filling, heightens other desserts. I hope you enjoy reading on to discover the uses of this delightful sweet caramel grated coconut in many Thai and Southeast Asian desserts. The recipe follows. It has carefree steps and just two ingredients: grated coconut and sugar (plus a little salt).

Stella's Caramel Coconut - Sri Lanka

Stella’s Caramel Grated Coconut – Sri Lanka

Last week I set aside a day to create just one dessert dish – Khanom Sod Sai – ขนมสอดไส้ – Steamed Coconut Cream Pudding with Caramel Grated Coconut Filling. This dessert involved many steps. The preparation, note taking, photographing, and final cleaning took over 6 hours. I love special days like this when recreating a dish reconnects me with my early learning experiences in my family’s kitchen.

มะพร้าว

In the middle. Sai Maprow -ไส้มะพร้าว Caramel Coconut ball is placed inside a sticky rice dough for Khanom Sod Sai and Khanom Tom

However, today I will share with you just one part of the recipe for Khanom Sod Sai, that is the Thai caramel grated coconut. It is a quintessential part of Thai desserts and for other Southeast Asian cuisines as well. There are many intriguing steps, but demystifying them will help you find ways to incorporate this treat in your cooking. Please share your experiences in the comment box below.

Caramel Coconut – Sai Maprow (filling) -ไส้มะพร้าว – Nah Maprow (topping) – หน้ามะพร้าว

Caramel Coconut Stuffing

In the middle. Caramel coconut ball with a purple sticky rice dough and coconut cream in Khanom Sod Sai

The above picture is of Khanom Sod Sai. The caramel coconut ball is placed in the middle of a sticky rice dough, which is then wrapped around it before being steamed with coconut cream pudding in a banana leaf. This is similar to Khanom Tom Khao, where the caramel coconut ball is placed in the middle of the dough, which is then boiled and rolled in coconut flakes.

Caramel Coconut is ready for spreading before rolling together with sticky rice before enjoying

On the top. Nah Maprow – หน้ามะพร้าว The caramel coconut is placed on top of sticky rice.

In Nah Maprow, the caramel coconut is placed on top of a small piece of banana leaf, which is then lifted up and used to spread the caramel coconut on top of sticky rice before savoring the combination. In Phuket, this dessert is called Khao Neow Nah Cheek – ข้าวเหนียวหน้าฉีก. I typically enjoy this for breakfast when visiting home.

Caramel Coconut as a filling for Sri Lanka Pancake

Caramel Coconut as a filling for Sri Lanka Pancake

In 2014, I visited the cities of Colombo and Galle in Sri Lanka and traveled to many beautiful places with a friend. Near Ratnapura we learned about Sri Lanka cuisine from Stella, our personal tour guide’s sister. We spent a half day with her family in their kitchen. For dessert, Stella showed us how to make caramel coconut to use as a filling for Sri Lanka crepe. I would like to express my gratitude to Stella for teaching and inspiring me and for sharing her techniques for creating this recipe again with ease.

Step-by-Step: How to Make Thai Caramel Coconut

There are two ways to make caramel grated coconut for Thai desserts. The first way is to mix—either by hand or with a utensil—brown sugar, fresh grated coconut and a touch of salt until they are well incorporated, then pan fry them until the sugar is caramelized and absorbed into the coconut. A second method is to add a little water to the sugar and heat it until it melts. Continue cooking until the sugar burns slightly and has a hint of caramel color, then add fresh or frozen grated coconut. Stir well until the sugar and coconut are well combined and the coconut is coated with the brown caramelized sugar.

My family and most home cooks in Thailand use the first method, whereas culinary professionals and merchant use the second one. The latter has a more intense caramel flavor, depending on how much you let the sugar burn, and it also has more affect on the color of the coconut. Personally I love the second version, show below, which is also the fastest and easiest.

หน้ามะพร้าว or

The final result of Caramel Grated Coconut – Sai Maprow -ไส้มะพร้าว – Nah Maprow – หน้ามะพร้าว~

What kind of sugar should you use? Both recipes work with all sugars. In many countries, cooks use white or brown jaggery, which is a more complex type of sugar. In Thailand, some prefer palm sugar, however, in Southern Thailand we are more flexible. My family uses brown sugar, whereas the rest of the Thai community uses palm sugar. Stella preferred white sugar. Combining two kinds of sugar should work as well.

photo 2-7

Stir brown sugar, water and salt together in a large pan. Bring to a boil, then reduce to medium heat. Allow mixture to cook without stirring until it is foamy, thick, and almost burnt, about 5 minutes.

Stella's Technique of making a caramel from the sugar first before adding coconut

Stella’s Ttechnique of making a caramel from the sugar first before adding coconut

The sugar should take on a thin caramel-like texture like the picture above, with a hint of caramel taste or more if desired, before stirring in the grated coconut.

มะพร้าว

มะพร้าว – Thawed Frozen Coconut

Young coconut – Marrow Num – มะพร้าวหนุ่ม (coconuts that are six to nine months old and lack the husk of the more well-known mature coconut) is preferred in Thailand, but in America my first choice would be frozen grated coconut, followed by shredded coconut from the bakery section.

หน้ามะพร้าว

Caramel Grated Coconut – Sai Maprow -ไส้มะพร้าว – Nah Maprow – หน้ามะพร้าว

Let it cook on medium-high heat, stirring often until the liquid is almost evaporated, about 4 minutes. Then reduce the heat to low.

หน้ามะพร้าว

Caramel Grated Coconut for Sai Maprow -ไส้มะพร้าว – Nah Maprow – หน้ามะพร้าว

Continue cooking until you can pull the caramel coconut to the side of the pan and no liquid remains, about 3 minutes.

Caramel Grated Coconut Filling – ขนมสอดไส้

Caramel Grated Coconut

Sai Maprow-ไส้มะพร้าว

Nah Maprow – หน้ามะพร้าว

Cooking Time: 30 minutes

Yield: 50 fillings or topping balls

3 cups brown sugar

1/3 cup water

½ teaspoon salt

3 cups frozen grated coconut, thawed (see note below)

Stir brown sugar, water and salt together in a large pan. Bring to a boil, then reduce heat to medium. Allow sugar mixture to cook without stirring until it is foamy, thick, and almost burnt, about 5 minutes. The sugar should turn into a thin caramel like the picture above with a hint of caramel taste. Now stir in grated fresh or frozen (thawed) coconut.

Let the coconut mixture cook on medium-high heat, stirring often, until the liquid is almost evaporated, about 4 minutes. Adjust the heat to low and continue cooking until you can pull the caramel coconut to the side of the pan and there is no liquid left, about 3 minutes.

Remove from heat and let the mixture set until it is cool enough to handle. With cold water by your side, moisten both of your hands. Drop one tablespoon of the caramel coconut into one hand, press it into a dense ball with your other hand, then place it on a plate. If the mixture is too hot, moisten your hands again with cold water to prevent burning. Repeat the process until all of the coconut has been rolled into balls. Makes 50 balls.

Cook’s Note: Fresh, frozen, or dried grated coconut can be used in this recipe but the cooking time may vary depending on the moisture in the coconut. Pay attention to following the steps after adding the grated coconut.

photo 3-7

Khanom Sod Sai – ขนมสอดไส้ – Steamed Coconut Cream Pudding with Caramel Coconut Filling

© 2015  Pranee Khruasanit Halvorsen

I Love Thai cooking
Pranee teaches Thai Cooking classes in the Seattle area.
Her website is: I Love Thai cooking.com 

Related Link: Cooking with Grated Coconut Recipes

~ Stir-fried Grated Coconut with Phuket Red Curry Paste (praneesthaikitchen.com)

~ Spicy Thai Coconut Chip (praneesthaikitchen.com)

~ Pinterest: Pranee’s Coconut Love Pin (Lovethaicooking)

~ Khanom Tom Khao (http://tankitchen-dessert.blogspot.com/)

Talking of coconut, Thai love all forms, all types. I put all my favorite links on my LoveThaiCooking Pinterest under Coconut Love.

Read Full Post »

A Journey of a Thousand Miles

Gelle, Sri Lanka

Gelle, Sri Lanka

The time machine has been playing tricks on me and preventing me from keeping you posted on where I have been and what I have been cooking since January. During part of that time I was traveling across the South China Sea and Andaman Sea on the MS Amsterdam, a Holland America Line cruise ship  (the 2014 Grand World Voyage), as a guest chef teaching Thai culinary classes. The ship traveled around the world and I joined the ship from Manila to Hong Kong, Singapore, Phuket and Sri Lanka. My full-month culinary experience on board the ship, plus my travels around Southeast and Central Asia, and the opportunity to explore the cuisine and culture of Sri Lanka were wonderful adventures which I will share with you at a later time.

The rest of the time here in Seattle I have been teaching, tasting delicious Thai foods around Seattle,  and keeping busy with my family and Seattle’s Thai community. Please visit my I Love Thai Cooking Facebook page, which I update often with photos and news. For the remainder of this year, I hope to share short recipes and techniques on my Pranee’s Thai Kitchen blog until I finally catch up with everything.

I hope you enjoy my recipe for Thai Egg Salad- ยำไข่ต้ม

Unpretentious

Summer in Seattle for me is about living a carefree life style, exploring nature and enjoying outdoor activities. Dining and entertaining are still important to me, but I try to stick with a nutritious and delicious cooking style that fits my summer style. The recipe I am sharing today reflects my cooking style at this time a year.

Hard-Boiled Eggs Salads - Yum Khai Tom

Hard-Boiled Egg Salad – Yum Khai Tom

When I had a potluck and Thai community gathering to attend one Sunday, I took the simple approach of deciding to prepare an impromptu dish using only those ingredients that I already had in my fridge or freezer, typically staple ingredients that one must have on daily basis. This hard-boiled egg recipe came naturally to mind. Eggs are a soul food for everyone, anywhere and anytime—breakfast, lunch or dinner. For me this week, I have eaten eggs at least one meal each day. I am proud to share this simple dish with friends and I hope you too will find this recipe suitable for your family, or to take to a party with ease. They are a food prepared with heart and nourishing value and the best fresh ingredients possible. Delicious, nutritious and unpretentious.

How to Prepare the Hard-Boiled Eggs – Kai Tom – ไข่ต้ม

Place 13 eggs (one more than you need in order to provide one for testing and tasting) in the bottom of a large pot; add enough water to cover them, plus two inches. Bring to a boil on high heat and then immediately lower heat to medium. Set a timer for 6 to 8 minutes depending how firm you want the egg. After 6 minutes, use one egg as a tester. Rinse the egg with cold water and peel to see how it looks inside. If the center is cooked enough for you, remove the pot from the heat, pour out the hot water, and rinse the eggs with cold water. Let them cool down completely—at least 30 minutes or longer. Once cooled, roll the eggs gently to crack and remove the shell. I learned over time that using older eggs or adding a splash of vinegar to the water makes the shells easier to peel.

The dressing below also works well with fried eggs. See Pranee’s favorite fried egg technique – Thai Fried Egg Kai Dao – ไข่ดาว

Thai Egg Salad

Yum Kai Tom

ยำไข่ต้ม

The hard-boiled eggs, dressing, and garnish can be made ahead of time and kept in separate containers until ready to use. It will only take about 15 minutes to cut the eggs and place them on the tray, randomly sprinkle sauce, and garnish the top. Then wait and see how many people say “Wow.”

12 eggs, hard-boiled, peeled and cut in half lengthwise
3 fresh Thai chilis–red or green, optional
2 large shallots, minced
3 tablespoons fish sauce
5 tablespoons lime juice
1 teaspoon roasted red chili paste, aka chili jam
1 teaspoon sugar
3 tablespoons cilantro leaves
 

Place cut, hard-boiled eggs on a deviled egg platter or a plate.

Make egg salad dressing by combining shallots, fish sauce, lime juice, roasted red chili paste and sugar.

Use a small spoon to spread sauce equally over each egg yolk. Garnish with cilantro.

Enjoy as an appetizer or side dish.

I Love Thai cooking
Pranee teaches Thai Cooking classes in the Seattle area.
Her website is: I Love Thai cooking.com 
 
Related Link
 
Thai Fried Egg (praneesthaikitchen.com)
 

Read Full Post »

The Holy Herbs

It has been a busy summer for me so far. This has kept me away from writing, but it doesn’t mean I didn’t cook up a delicious dish for my Thai Kitchen blog. I have a lot of photos and notes and testings that have been done but that are waiting for me to write them up. While waiting for those posts from my food experiences in July, I have a delicious, unpretentious and impromptu dish to share with you. From my garden and Thai kitchen to yours!

Oregano Buds

Why oregano? Ten years ago, oregano was widespread via self-sown seeds in my Seattle garden near Thai spirit house. That year, my niece was visiting from Thailand and I used oregano in place of Thai holy basil when I prepared Phad Kraprow Gai (stir-fried minced chicken with Thai holy basil). I didn’t tell her that I’d used oregano and she didn’t notice the difference. Later on, when I told her it was not Thai holy basil, but Greek holy oregano we laughed! Fresh oregano has a peppery and pungent taste that I love and which is similar to Thai holy basil. Try using oregano in place of Thai holy basil when oregano leaves and blossoms are abundant in your garden.

Oregano Blossoms

Yesterday was my day off from traveling on the road and I was hanging around home and working in my garden. My girlfriend and I were immersing ourselves in the sun, surrounded by flowers, herbs and weeds. All of a sudden I realized that most of my oregano plants were blossoming. As it got close to lunch time, I began to think about what I could cook with those blossoms. I decided to make Oregano Blossoms Fried Rice for lunch. I cut the stems down to six inches long so there were some leaves attached to yield more leaves until the end of the summer.

Oregano Blossoms Fried Rice

Does frozen cooked rice work for this dish? This is the first time that I have experimented with previously frozen rice from my fridge. I thawed the rice before using it to loosen up the cooked rice grains and it worked perfectly well for fried rice. Off course my passion is to share what is happening in my Thai Kitchen with you, so here is my recipe for oregano blossoms.

Oregano Blossoms Fried Rice with Tomato and Garlic

Khao Phad Dok Oregano Makrua Thet Kratiem

ข้าวผัดดอกออริกาโนกับมะเขือเทศและกระเทียม

Oregano is not a Thai herb, but it has long been a substitute ingredient for me in the absence of my beloved Thai holy basil. Both belong to the mint, or Lamiaceae, family. The flavor undertones of both herbs are alike, and as a gardener I love herbs that can grow wide and are easy to take care of. Now that I have discovered how great oregano blossoms taste in this recipe, I will enjoy the same dish often this summer! Cheers to the holy herbs!

Serves: 2 to 4

3 tablespoons canola oil
6 cloves garlic, peeled, crushed and chopped
1/2 onion, sliced
1 cayenne pepper, sliced (remove seeds if preferred)
1/2 cup oregano leaves and blossoms, stems removed
1 large tomato, cut into wedges
2 eggs
3 cups cooked rice, cooled or frozen
2 pinches of salt, optional
1 tablespoon soy sauce
1 tablespoon fish sauce
4 lime wedges
8 sting beans or cucumber or any fresh vegetable condiment, optional
 
Heat canola oil in a skillet or wok on high heat. Add garlic and stir until golden, then add onion, cayenne and oregano leaves and blossoms and blossoms. Stir until fragrant, about 30 seconds. Clear the center of the wok and scramble in eggs for two seconds before adding rice. Stir in soy sauce and  fish sauce. Serve with lime wedge, vegetable condiment and spicy fish sauce. (See recipe below).
 
© 2012 Pranee Khruasanit Halvorsen
I Love Thai cooking
Pranee teaches Thai Cooking classes in the Seattle area.
Her website is: I Love Thai cooking.com  
 
Follow Me on Pinterest
 

Read Full Post »

Grilled Bok Choy for Minimalist Cooking

Bok Choy – ผักกาดใบ

I want to share with you my tips and techniques for making quick and easy grilled bok choy, something I did last weekend to celebrate the first warm sunny day when I spent a lot of time outdoors gardening. Cooking in the summer is about minimalism, and I like the idea of a few ingredients on the grill at one time.

Bok choy, also known as Chinese cabbage, is my favorite Asian vegetable. To me it is like vegetable-candy. I love its crunchy texture and light mustard flavor and the fact that I don’t need to be concerned about calories when I eat it. Even in large portions, I can just enjoy its delightful nutritional benefits. There are many ways to stir-fry bok choy with seasonings in a wok, but my favorite way to cook it is on the grill. This is in part because I don’t like to cut up a beautiful bok choy before I cook it; I would rather do that with a knife as I eat it. With baby bok choy, however, I can avoid cutting it all together and there are many other delicious Asian vegetables that I can cut up and stir-fry—such as choy sum, morning glory, and dozens of other greens. So when summer comes along, bok choy becomes a regular on my grill. It goes with any main dish.

This recipe is a great way to enjoy beautiful, low-fat, crispy, grilled bok choy. I typically cut regular bok choy in half lengthwise. This makes for easy grilling and a very appealing natural pattern. To quote Georgia O’Keeffe: “Colors and line and shape seem for me a more definite statement than words.” Sliced bok choy makes a beautiful pattern indeed. You can appreciate the look while grilling and eating them, and it only takes a little effort. You can dress the bok choy up to accompany any type of cuisine by adding a vinaigrette or sauce after grilling.

Grilled bok choy as a side dish

A perforated grill pan is ideal for grilling vegetables or seafood

Technique

First cut the bok choy in half lengthwise, then soak it under ice cold water for 15 minutes or longer for a crispy texture. Drain well, but do not spin. Drizzle a tablespoon or more of grape seed oil (or any vegetable oil) over the bok choy then sprinkle with 1/2 teaspoon sea salt; using tongs, mix well. (This technique is easier and uses less cooking oil than brushing it with oil.) The water bath, cooking oil and salt will keep the vegetable green, shiny and tasting good. Crushed fresh white or black pepper adds a great accent.

Grilled bok choy, grilled beef and steamed jasmine rice

This is a perfect dinner for a minimalist. Except for the rice cooked in a rice cooker, each dish is cooked with just three ingredients out on the grill. I rub fish sauce over my steak and pierce it with rosemary from my garden. The steaks are 1/2 inch thick, so both the steak and the bok choy cook in less than 15 minutes. The total time to prepare and to cook is about 30 minutes.  Minimalist cooking is a perfect approach for summer to come!

Grilled Bok Choy

ผักกาดใบย่าง

Pak Gard Bai Yang

Serves: 4

 
1 pound bok choy, cut in half lengthwise
1 tablespoons grape seed oil, canola oil or any vegetable oil
1/2 teaspoon fine sea salt
1/4 teaspoon freshly ground black or white pepper
1/4 cup Thai Chili-lime vinaigrette, optional

Pre-heat the grill to high heat. Place perforated grill pan on top of the grill.

Soak bok choy under cold water for at least 15 minutes, or longer for a crispy texture. Drain well but do not spin. Drizzle on a teaspoon or more of the oil and sprinkle 1/2 teaspoon sea salt over the top. Use tongs to mix well.

Place bok choy on perforated grill pan in a single layer and let it grill for 3 to 5 minutes on each side until it is translucent but still firm. Serve as is, or use tongs to mix well with Thai Chili-lime vinaigrette. Serve warm or cold as a side dish.

Pranee’s Note: Measure the first seven ingredients from the Thai Chili-Lime Vinaigrette recipe into an 8-ounce mason jar, close the lid tight and shake well. Pour over grilled bok choy.

I Love Thai cooking
Pranee teaches Thai Cooking classes in the Seattle area.
Her website is: I Love Thai cooking.com  

Follow Me on Pinterest

Read Full Post »

Home Sweet Home Cooking

I am happy to be home again. I have been away for two weeks, first to New York City to attend the International Association of Culinary Professionals 34th annual conference. The theme this year was The Fashion of Foods. After the conference, I took a train ride down to Washington DC. It was an incredible trip. I learned so much from the many workshops I attended related to foods, cocktails and writing, and had a chance to reconnect with many colleagues in the culinary world. And, most importantly, I had a chance to check out the local food scenes, including five Thai restaurants in the New York area. I plan to share my restaurant reviews and photos with you soon.

Beautiful spring is finally here

As much as I enjoyed eating out and tasting foods while on my trip, I am so ready for home cooking and something healthier. So I have set aside my fine dining experiences in favor of my down-to-earth, easy, and healthy, with a clean and refreshing flavor, steamed rice, fried organic egg, and stir-fried local vegetable. I am happy and content to just eat these for now.

My every week purchase – Swiss chard from the farmers market

I love fresh vegetables from the farmers market. I love to stir-fry them with garlic and fine sea salt.

Please see my Stir-fried Choy Sum Recipe

My first Saturday back home I visited the University District Farmers Market and stocked up with the freshest vegetables and salad greens. I routinely purchase at least three kinds of vegetables at the market. They are so fresh that they keep well in the fridge and often farmers will  give a discount for buying two bunches of vegetables that cost the same price.

I cook my eggs the way many Thai like their eggs cooked – a crispy egg white with the egg yolk just set, as in the photo below. We say it is like “Yang Matoom” – cooked just enough so that the yolk is “sticky” like the sap from the bael fruit tree. I hope you can enjoy this quick, easy and low-fat fried egg recipe! This is a typical fried egg that I have for lunch almost everyday. With a few drop of fish sauce from prik nam pla and warm steamed jasmine rice, I feel so at home now.

Fried egg Thai style

Thai Fried Egg

Kai Dao

ไข่ดาว

My Thai family never worries about the amount of oil used to prepare fried eggs – Kai Dao. We pour just enough oil into the pan to fry the egg, about 3 tablespoons. Some of the oil will be left in the pan after the egg is cooked. But for myself and my health conscious fans, a tradeoff for this recipe is to use a well-seasoned wok or cast iron pan to get a very crispy texture to the egg. I am happy to have just one side crispy instead of both.

This Kai Dao can be served with steamed jasmine rice, or any Thai fried rice dishes, with just a few drops of fish sauce or soy sauce on the egg, and served along with a stir-fried vegetable.

Serves 1

1 tablespoon canola oil
1 egg
 
Heat a well-seasoned wok or cast iron skillet on high heat. Pour in the oil and tilt the pan to cover the whole surface with oil. Then crack one egg and place it in the center. Fry on high heat until the bottom is crispy and golden brown to your liking, about 30 to 40 seconds. Then reduce the heat to medium and cover with a glass lid; cook until the egg white is cooked and the egg yolk is done to your liking, about 30 to 40 seconds. Remove and serve.
I Love Thai cooking
Pranee teaches Thai Cooking classes in the Seattle area.
Her website is: I Love Thai cooking.com 


Follow Me on Pinterest

Read Full Post »

Without a Rice Cooker

You can cook rice for 30 people, anytime, without a rice cooker! Since last November, my son and I have been preparing one meal a month for 60 homeless youth at Seattle’s [James W. Ray] Orion Center. The organization helps homeless youth get off the street and provides them with meals, education and shelter. The meal-calendar is posted and updated to allow members of the public to sign up to prepare a meal for these hungry youth. It has been a rewarding experience to take part in helping to build community. Thank you to a friend who also signed up to help prepare a meal with me. Together—without a rice cooker—we cooked lavender-turmeric scented jasmine rice for 30–6o hungry young people.

Rice can be cooked in a rice cooker, on the stove top, or in the oven. My recipe below is for rice cooked in the oven. I wanted to share the recipe so you would know that you do not need to buy a rice cooker in order to cook large quantities of rice. Instead you can purchase a large hotel pan and cook up to 30 servings of rice in about an hour.

Before putting rice and water in the hotel pan, it is best if all ingredients are hot before they are sealed up and placed in a preheated oven. (Here’s a link for an explanation as to how this method works: “Once water is heated past the 212°F mark, it stops being water and turns into steam. Steaming has an advantage over methods such as boiling or even simmering …..”. Moist Heat Cooking Method by About.com.)

About the recipe

Culinary Lavender

Today, the recipe I want to share with you is Kao Oop Kamin and Dok Lavender, lavender-turmeric scented jasmine rice. It works well served with Thai main dishes such as Thai curry dishes. I came up with the concept of adding lavender to turmeric scented jasmine rice about two years ago after I visited the Lavender Wind Farm on Whidbey Island and purchased a bag full of culinary lavender. After that visit I began adding lavender to everything. My friend, Kathy Gehrt, a local expert on cooking with lavender, says ” you can infuse anything with lavender” just be careful not to over use the lavender. You can learn more about cooking with lavender from Kathy’s book as well as her blog “Discovering Lavender.

One day I simply played with turmeric powder and lavender in a rice cooker. I found it had an alluring and somehow surprising fragrance. After making this dish I forgot about this new flavor and scent combination until sometime later when I heated up the leftovers and experienced the same unexpected delight. The next time I cooked this recipe was at the first dinner I prepared at the Orion Center. My friend was puzzled by the rice’s flavor and fragrance—”What is it in this steamed rice?

Thai jasmine rice, culinary lavender and turmeric

The sweet perfume of lavender complements the pungent turmeric, which is also known as Indian saffron. This amazing blend gives off an alluring aroma and gives the rice a subtle flavor that allows you to serve it with any cuisine. You can find culinary lavender in jars or in the bulk herbs section in a natural food store.

Playing with lavender and turmeric in a rice cooker

Lavender-Turmeric Scented Jasmine Rice

Kao Op Khamin Dok Lavender

ข้าวอบขมิ้นลาเวนเดอร์

Lavender-Turmeric Scented Jasmine Rice

Yield: 30 cups cooked rice

When I cook this at a large event, I measure up the jasmine rice, turmeric, lavender and salt beforehand and store them in a large ziplock bag. Each bag will provide a main course or side dish for 30 servings. You can bake enough in your oven to serve 30 people. In a commercial kitchen, where the ovens are larger, you could double the recipe and bake each in a separate hotel pan—one on the top shelf and another one on the bottom shelf. For smaller portions at home, set the oven temperature at 350°F and bake for 30 minutes, then let rest for 10 minutes. The rice to water ratio is 1 to 1 ½.

1/4 cup canola oil
10 cups jasmine rice
1 tablespoon turmeric powder
3 tablespoons culinary lavender 
2 teaspoons salt
16 cups boiling water
2 sheets 2 ½-foot-long aluminum foil 

Preheat oven to 425°F. Place large pan on high heat on the top of your stove and add canola oil. When the oil is hot, add rice, turmeric, lavender and salt and stir for 1 minute. Pour the rice mixture into a hotel pan and then pour in boiling water. Stir well and cover tightly with foil. Put pan in the preheated oven and let it cook undisturbed (no peeking) for at least 40 minutes. Remove the pan from the oven and let it sit for 10 to 20 minutes before removing the foil. Stir and serve.

Summer 2010 at Lavender Wind Farm, Whidbey Island

 
I Love Thai cooking
Pranee teaches Thai Cooking classes in the Seattle area.
Her website is: I Love Thai cooking.com 
 
 Related articles

Read Full Post »

Do Nothing Day

Honey-lime Tea

Honey-Lime Tea, Cough Remedy

I got bit by a winter bug and have been resting for the past two days. What do I eat on such a do nothing day?  I prepared Honey-Lime Tea to sooth my coughing and sore throat. For dinner I prepared myself a rice porridge. While the rice porridge was on the burner, I whisked up an omelet from an old family recipe – a classic Thai omelet with pickled sweet radish – Kai Jeow Chaipor Wan. I took some pictures to share with you so you could enjoy eating this omelet along with rice porridge – Kao Tom from a recent post. This good gentle food doesn’t take long to cook, another reason why it is good for a day when you are not feeling well.

The four ingredients are eggs, shallot, Thai chilies and pickled radish. The pickled sweet radish is the same one that Thais use in phad thai, so it is easy to find. You may use dried daikon radish from PCC Natural Markets, but add a squeeze of lime juice and a teaspoon of fish sauce or soy to the recipe. You may also try it with Kimchi and pickled mustard greens; since both are pickled, you do not need to add fish sauce or soy sauce.

I hope you enjoy this simple recipe with four ingredients and three cooking steps. Twenty minutes after starting, I had both rice porridge and omelet on the dining table. I enjoyed this warm, down-to-earth comfort food and once again felt like I was at home with my mom and family in Phuket.

Pickled Sweet Radish Omelet

Kai Jeow Chaipor Wan 

ไข่เจียวไชโป้วหวาน

Serves: 2

1 small shallot, peeled and sliced
2 eggs
2 fresh Thai chilies or serrano chilies, sliced
1/4 cup pickled sweet radish
3 tablespoons canola oil

Place shallot, eggs, chilies and pickled sweet radish in a medium size bowl, then beat with fork to mix, about 1 minute.

Heat 6-inch cast iron pan or frying pan on medium-high heat. Pour in canola oil and tilt to coat the bottom of the pan. Pour omelet batter in the hot pan, stir quickly 5 times and then let it spread out to cover the bottom of the pan. Turn the burner to medium heat, cover with a lid and let it cook until the bottom of the omelet is dry. Flip the omelet and cook for 30 seconds more. Serve with rice porridge or steamed jasmine rice.

Sliced shallot, eggs, sliced chilies and pickled sweet radish

First you place shallots, eggs, chilies and pickled sweet radish in a medium size bowl.

Stir with fork until it well-mixed

Then beat it with a fork to mix, about 1 minute.

Phuket Pickled Sweet Radish Omelet

I Love Thai cooking
Pranee teaches Thai Cooking classes in the Seattle area.
Her website is: I Love Thai cooking.com 
 

Read Full Post »

The Hungry Planet

I attended the Hungry Planet: What the World Eats grand opening at the Burke Museum. I was totally awestruck by the large photographic exhibit and printed information from Peter Menzel and Faith D’Aluisio who show us how the rest of the world eats and feeds their families with one week of purchased food supplies. “A picture said a thousand words” and I hope that you will have a chance to view the exhibition which will be at the museum through June 10.

On Saturdays, PCC Cooks also participates in the exhibition by providing a cooking demonstration of one of eight different cuisines from around the world. I had the honor of representing PCC Cooks one Saturday by preparing Kao Tom Gai, Rice Soup with Chicken. I demonstrated how to prepare this Thai dish and provided samples. When I was growing up in Thailand this particular dish meant so much to me and the rest of the country. It was a time when families had to nourish their families with simple, healthy foods.

I was lucky to grow up in the land of plenty in Phuket, Thailand. My village has a mountain on one side and a rice field on the other. The Srisunthorn Road was on the edge of the mountain and our home was just off this main road. We spent our weekends gathering foods from the forest such as bamboo shoots, mushrooms and other edible plants. Our family also owned a plantation which provided an abundance of fruits such as rambotant, durian, jackfruit and coconut.  At the end of each month, or after each sale of a crop from the plantation, my grandmother made sure to purchase a month’s supply of rice and to stock up on all stable dry ingredients. Mobile markets would came every morning with meats, seafood and fresh vegetables and herbs. The open air market was full of venders of all sorts and once a week villagers could fill up their kitchen cabinets with food. In our family, when my grandmother was the treasurer of the household, she decided what was on the table on a daily basis, through times of abundance and scarcity.

Phuket Open Air Market

My grandma shared many bedtime stories with us about the lives of others or her experiences during economic down times. She taught us that every grain of rice should be eaten. Phuket is rich in tin,  rubber and other natural resources, but when it came to rice production, we depended on supplies from the central part of Thailand–a supply that was affected by the economy, politics, and climate. When the price of rice increased, our regular steamed rice would change to rice porridge to make our supply last as long as possible.

One cup of rice grains yields about 3 cups of steamed rice or 4 cups of thick rice porridge which can be thinned down to make 6 cups of rice soup. Instead of making 3 servings, 1 cup of rice can be stretched to provide 6 servings.

The Hungry Planet exhibit is eye opening. It shows how the rest of the world eats, what is available to them, what they can afford, what they choose, and the limitations. I love the picture from Mali, Africa, which shows the ritual of a family sharing a rice porridge that is cooked with sour milk.

For me, rice porridge is a soul food, comfort food and a health food. It has a healing and nourishing element and it is suitable for everyone and every occasion.

Now that you have heard my stories, what is yours?

Rice Porridge Three Ways

I know three ways to enjoy rice porridge. The first one is as a rice soup base which can then be made into Kao Tom Gai

Kao Tom ~ ข้าวต้ม

(Click photo above for Pranee’s Kao Tom Gai recipe)

A second way to enjoy rice porridge is to make a rice soup buffet for a big crowd or special event.  To do this, take a rice porridge and add a little bit of ground meat. Cook it without adding flavoring, but serve it with condiments as shown in the photo below. The condiments typically consist of ginger, white pepper powder, sugar, soy sauce, chili powder, fried garlic, vinegar with jalapeno peppers and green onions.

Thai rice soup condiments

A third way to eat rice porridge is to serve it the same way as steamed jasmine rice but ideally with Chinese-Thai style main dishes such as stir-fried vegetables with salted soy bean or oyster sauce, salted egg, salted peanut, pickled mustard green, or braised pork in five spices.

Either for stretching a dollar or caring for yourself and your family, rice porridge is my comfort food for every occasion.

Kao Tom (Rice Porridge)

ข้าวต้ม

PREP TIME: 20 minutes

Yield: 4 cups

1 cup jasmine rice
6 cups water

Bring jasmine rice and 2 cups of the water to a boil on high heat. Stir often while cooking for 5 minutes.

Add the remaining 4 cups of water and bring to a boil. Let cook on medium heat for 15 minutes more, until it yields 4 cups.

I Love Thai cooking
Pranee teaches Thai Cooking classes in the Seattle area.
Her website is: I Love Thai cooking.com 

Read Full Post »

A Gift from My Thai Kitchen

Creating a homemade gift is a wonderful way to express your heartfelt thanks and appreciation for your friends, families or associates. Every year I like to come up with something from my kitchen that will interest the recipients and be easy for them to love, such as curry paste, chutney, chili jam or seasoning salt—there are plenty of ideas.

Thai Yellow Rice Pilaf – A Gift from My Thai Kitchen

This year it works out well for me to choose an old project—making a rice pilaf mix. This is something that I did with my son’s fourth grade classmates as a parent volunteer project, though this time my rice mix recipe is reconstructed from two favorite Thai rice dishes. You may recognize Thai Yellow Curry Fried Rice with Pineapple (Kao Phad Sapparos) and my favorite Southern dish, Phuket Chicken Baryani Rice (Kao Mok Gai). I trust that you will enjoy this versatile recipe often. My plan is to give the rice mix as a gift to friends and family, but it also makes a good side dish combined with leftover turkey. Right after Thanksgiving will be a great time for you to try out the recipe before making up the mix to give as a gift.

Thai Yellow Curry Rice Pilaf Mix

The rice dish made from the mix can also be called a rice pilaf, a traditional Persian dish, as I applied the science of baking rice  in the oven instead of using the traditional Thai method of preparing it in a rice cooker or steamer. The recipe below has so much potential that you can add any vegetable you desire, just like in a rice pilaf. Following an American Holiday theme I use craisins instead of pineapple or raisins, which will be fun cooked with leftover turkey or served as a side dish with turkey. So make it fun and be creative with your own accent. I hope you have a chance to create a rice mix for a friend or simply pack a few boxes to take with you to your cabin. Let’s celebrate with a gift from our kitchens!

Jasmine Rice

First start with the uncooked rice, then add the spices, dried fruits and nuts. Keep it simple and creative.

Thai Yellow Curry Rice Pilaf Mix


How to Make Thai Yellow Curry Rice Pilaf Mix

I purchased large quantities of all of the ingredients below and containers from the packaging specialty store. This recipe makes one gift package which will serve four as a main dish or eight as a side dish.

1 two-cup container or a one-quart ziplock bag
1 cup plus 2 tablespoons jasmine, long grain or basmati rice
2 tablespoons dried chopped onions
1 to 2 tablespoons madras curry powder
½ cup chopped or 20 whole raw cashew nuts or almonds
1 teaspoon salt
3 bay leaves
¼ cup each craisins, cranberries and dried pineapple

Place all ingredients in the container or ziplock bag in this order: jasmine rice, dried chopped onion, curry powder, cashew nuts, salt and bay leaves. Cover the container or ziplock bag and seal well, then add printing cooking directions (see below). Add some gift wrap or a bow and your gift is ready.

                       ≈≈≈≈≈≈≈≈≈≈≈≈≈≈≈≈≈≈≈≈≈≈≈≈≈≈≈≈≈≈≈≈≈≈≈≈≈≈≈≈≈≈≈≈≈≈≈≈≈≈≈≈≈≈≈≈≈≈≈≈≈≈≈≈≈≈≈≈≈≈≈

Thai Yellow Curry Rice Pilaf with Tomato and Onion

(Cut the instruction-recipe below and insert in the rice pilaf box)

Thai Yellow Curry Rice Pilaf

Cooking Instructions

Serves: 4 as a main dish or 8 as a side dish

2 tablespoons canola oil
1 package Thai Yellow Curry Rice Pilaf Mix
1 2/3 cup water or chicken stock
4 cooked chicken thighs with bone in and skin on, or 4 pieces leftover turkey with bone in and skin on
¼ cup sweet chili sauce, as accompaniment
1 English cucumber, sliced  for accompaniment
2 tomatoes, sliced for accompaniment
1 cup cilantro leaves for accompaniment
 

Preheat oven to 350°F.

Heat a Dutch oven or an oven-proof pan that comes with a tight lid on the stove top over medium-high heat. When the pan is hot, add canola oil and the Thai Yellow Curry Rice Pilaf Mix.  Stir the mixture until it becomes fragrant and the rice grains turn opaque, about 30 seconds, being careful not to let it burn. Stir in water or chicken broth. Place chicken or leftover turkey in with the rice and the broth. Bring the mixture to a boil, then cover the pan and place it in the center of the oven. Bake for 30 minutes without opening the lid.

Remove from oven and let sit for 15 minutes without opening the lid at all. Then stir it once to mix cooked rice together and put the lid back on. You can keep it warm in the oven at 100°F until it is ready to serve, but not longer than 30 minutes. Serve with accompaniment on the side.

                       ≈≈≈≈≈≈≈≈≈≈≈≈≈≈≈≈≈≈≈≈≈≈≈≈≈≈≈≈≈≈≈≈≈≈≈≈≈≈≈≈≈≈≈≈≈≈≈≈≈≈≈≈≈≈≈≈≈≈≈≈≈≈≈≈≈≈≈≈≈≈≈

Leftover turkey makes an excellent Kao Mok Gai or twice-cooked chicken in rich spices rice pilaf.

© 2011 Pranee Khruasanit Halvorsen
I Love Thai cooking
Pranee teaches Thai Cooking classes in the Seattle area.
Her website is: I Love Thai cooking.com 

Read Full Post »

Stinky Leaf Omelet

Last week I found fresh acacia leaf, or cha-om, for the first time in Seattle at the Makong Raineir Market. Without hesitation, I grabbed this rare opportunity to purchase some. Two days later the cha-om was still fresh in my refrigerator. There are many ways to prepare cha-om in rustic Thai cooking (see pictures below), but my heart was set on my favorite cha-om omelet—Khai Jeow Cha-Om—which is dense with a layer of cha-om leaf. It can be cut into 1-inch squares and served as a side dish or as an accompaniment to Shrimp Paste Chili Dip – Nam Prik Kapi (see the video of my sister and I preparing Nam Prik Kapi). I prepared a cha-om omelet last Sunday and packed it in a tiffin (a stainless steel food carrier), along with warmed jasmine rice and shrimp paste chili dip. Then I took it to a Thai community potluck party and I am happy to tell you that it was gone in the blink of an eye. We all love these stinky leaf omelets—a taste of our Thai villages.

A Package of Cha-Om at an Asian Market in Seattle

Fresh cha-om has a very strong, almost sulphur-like aroma that mellows when it is cooked. A little research led me to a link which mentions that cha-om is rich in Niacin (B-complex), just like most deep green leaf vegetables such as wild pepper leaf (chapoo), spinach and coccinia (tum lueng). One hundred grams of these vegetables yields more than 1.9 mg. of B-complex vitamins. This reminded me of the old Thai saying about bitter vegetables that I mentioned in a previous blog:  “The sweet is a faintness and the bitter is a medicine.”

Cha-Om Shrub Fence

Cha-Om (ชะอม ), or Acacia Pennata, is a shrub that is native to South and Southeast Asia. It can grow up to 5 meters tall, but in Thailand we usually let it grow to about 2 meters, then cut it down to promote young leaves. Most villagers love to grow a few cha-om plants in their backyard. I am glad to share with you photos of my friend Nongnut’s cha-om plants. I took them a few months ago while wandering in my village in Phuket.

Tender Shoots of Cha-Om

Every week Nongnut’s mom would cut off the young leaves and bundle them up to sell in the morning in front of their house. The bundles would lie alongside the many other edible vegetables from their plantation such as bamboo shoots and young banana trunk. This is a very common practice in Thai villages. It keeps her parents active, they share daily dialogs with friends in the village, and they earn some money selling these nutritious, organic vegetables to villagers.

Typically one bunch of cha-om leaves weighs about six ounces; after removing the hard stems, it will yield about two cups of leaves. Frozen cha-om leaf is available in Asian markets in the US all year round.

Sour Curry with Cha-Om Omelet and Prawns

Cha-Om omelet cut into square chunks adds a delicious layer of flavor to the traditional Thai sour curry Gaeng Som Goong Cha-Om. In Seattle, the only place I know that serves this dish is the Krua Thai Family Restaurant in University Village.

Tom Laos - Mixed Vegetable and Mushroom Soup with Cha-Om Leaf

In Northeastern Thailand, cha-om is used in the famous Tom Laos Soup.

Acacia Omelet

Khai Jeow Cha-Om

ไข่เจียวชะอม

Whisk Cha-Om and Egg Together

Simply whisk cha-om  leaves, egg, salt and fish sauce together to create an egg mixture for Acacia Omelet, or Khai Jeow Cha-Om, a rustic dish of Thailand.

Cha-Om Omelet

There is no substitute for acacia or cha-om leaf, but this recipe can be adapted by using baby spinach for a quick, easy and healthy meal.

Serves: 2-4

2  cups (about 6 ounces ) chopped acacia leaves, stems removed
5 eggs
1/2 teaspoon salt
2 teaspoons fish sauce
6 tablespoons canola oil

Place acacia leaves, eggs, salt and fish sauce in a large bowl and whisk with folk until mixed, about 1 minute.

Heat a large pan on medium-high heat and cover the whole surface with half of the canola oil. Pour in half of the egg mixture and tilt the pan to make an even layer of omelet; let it cook until golden yellow on the bottom, about 3 minutes. Flip it and cook until the other side is also golden yellow, about 2 minutes. Remove with spatula to a serving plate. Repeat the same process with the remaining cooking oil and the rest of egg mixture. Cut the omelet into small squares about 1-inch by 1-inch and place in a serving plate to serve as a side dish with Thai chili dip or any curry.

This slideshow requires JavaScript.

In the Seattle area you can find cha-om in the freezer section at the Mekong Rainier Market or the Vietwah Market. Please click here to find the addresses for these stores.

© 2011 Pranee Khruasanit Halvorsen
I Love Thai cooking
Pranee teaches Thai Cooking classes in the Seattle area.
Her website is: I Love Thai cooking.com .

Read Full Post »

Are Winter Squash Leaves Edible?

I enjoyed the Seattle sun last Wednesday at the Columbia City Farmers Market along with the delicious food from the stalls. I purchased a few fresh vegetables from various farmers and, like always, a bunch of winter squash leaves from a Hmong farmer’s stall. This time the squash leaves prompted me to cook and share with you a recipe from my Thai kitchen: how to cook winter squash leaves –Yod Namtao – ยอดน้ำเต้า.

Winter squash leaves are edible. In fact, all parts of squash family plants are edible, from leaves to stems, flowers, fruit, skin and seeds. The young leaves and stems are shown in the photos above and below. These edible greens become available when a farmer cuts back the leaves on a plant in order to encourage it to produce fewer but larger fruits. Winter squash leaves are popular in rustic-style cooking in Southeast Asia and they are great sources of fiber and other nutritional benefits.

Winter Squash Leaves and Blossoms - my visit to Hoi An Market 2009

Though they may feel a little rough to the touch, the young leaves from winter squash have amazing flavors when cooked. They have a  spinach-like texture, but are richer and denser with a bite to it in flavor. Like any leafy green vegetable, you can stir-fry, steam or stew them. In my kitchen, I either blanch them in salted coconut milk or saute them with butter, then add water and chicken stock and cook them down until the leaves are softened but not mushy, about 5 minutes. Last year I made a winter melon leaves stew with dried fish and shallots using a Hmong farmer’s verbal recipe. It was similar to my Watermelon Rind Soup and made a delicious vegetable stew.           

Winter squash leaves are only available in the summer and only at the Hmong farmers’ stalls. Because of this limitation, I never fail to purchase a bunch of winter squash leaves each visit to the market. Supporting the Hmong farmers also helps me to ensure that there will be a continuing supply due to the demand. When you get a chance, please pick up some winter squash leaves at a Seattle Farmer Markets near you and give them a try.

This slideshow requires JavaScript.

Winter Squash Leaves Boiled in Salted Coconut Milk

Yod Namtao Luak Kati

ยอดน้ำเต้าลวกกะทิ

Winter Squash Leaves in Salted Coconut Milk

One bunch of winter squash leaves weighs about a pound. After removing all of the twine holding them together and the hard stems, the soft edible part weighs about six ounces; the rest goes into a compost. If I have time, I use a peeler to remove the rough skin on the stems then cook the stems down until they are soft, about 8 minutes.

There are many ways to prepare winter squash leaves, but blanching or boiling them in salted coconut milk produces my favorite quick and easy side dish. This same method can also be used with many other leafy green vegetables, which can then be served with Thai Chili Dip. You will be surprised how the flavor of winter squash leaves and leafy green vegetables are complimented by just a little coconut milk and salt.

 
Serves: 4
Cooking Time: 5 minutes
 
6 ounces winter squash leaves (see preparation above)
1/4 cup coconut milk
1 cup water
1/2 teaspoon plus 2 pinches salt

Bring coconut milk, water and salt to a boil on medium-high heat. Then add the squash leaves, using tongs to turn them around to make sure they are all cooked in the liquid—like blanching the leaves in a coconut broth. Cook from 3 to 5 minutes until the greens reach your desired degree of tenderness. Serve with the broth as a side dish, or with warm jasmine rice as a main dish.

© 2011 Pranee Khruasanit Halvorsen  
I Love Thai cooking 
 Pranee teaches Thai Cooking classes in the Seattle area. Her website is: I Love Thai cooking.com . 

Related articles

Read Full Post »

My Everyday  Asian Vegetable

Choy Sum - Flowering Cabbage

Choy Sum (also known as flowering cabbage) is a most popular vegetable in Southeast Asia. It belongs to the Brassica family along with Bok Choy and Gai Lan (Chinese kale or broccoli). The most common uses are in stir-fries and soups. My favorite way of preparing this is to stir-fry it as a side dish with salt and pepper or stir-fry with any rice noodles or egg noodles. It takes a short time to cook and is easy to pair with other ingredients. 

Stir-fried Choy Sum as a Side dish

Stir-fried Choy Sum

Phad Pak Gwang Tung

ผัดผักกวางตุ้ง

Servings: 4

Preparation: 5 minutes

Cooking time: 5 minutes

3 tablespoons canola oil
3 garlic cloves, peeled and minced
12 choy sum 0r about 12 ounces, cleaned and cut into 2 inch-lengths
Salt and pepper to taste

Heat canola oil in a wok on high heat and stir in garlic. When garlic is golden, stir in choy sum. Stir in a few drops of water and season with salt and pepper to taste, stirring well. Serve hot as a side dish with steamed jasmine rice.

© 2011 Pranee Khruasanit Halvorsen 
I Love Thai cooking
 Pranee teaches Thai Cooking classes in the Seattle area.
Her website is: I Love Thai cooking.com .
 

Stir-fried Phuket Hokkien Mee with Choy Sum

 
Related articles

Read Full Post »

Let It Stew

I love having a stew cooking on my stove top while I am catching up with a pile of work. I have had a frozen pork belly in my freezer for a month now, waiting for the time when it will become Moo Palo, or Stewed Pork Belly with Cinnamon and Star Anise in Soy Sauce, a delightful dish of Thailand. I could no longer make excuses that I was too busy too cook—I can accomplish both working and cooking: Just let it stew.

I worked at my home office all last week to meet my deadline for editing recipes and writing a proposal. When I saw the frozen pork belly in my freezer I pulled it out to thaw so that I could cook it the next day.  The rest was simple. I cut the pork belly into pieces, placed them in a Dutch oven and sprinkled the remaining ingredients randomly on top. Then I let the stove top (or you can use the oven) do the work of cooking. I took a break from work from time to time to check on the stew. While it cooked itself on the stove top for 2 hours, in my office I enjoyed the aroma of soy and cinnamon and star anise interacting with each other.

Stewed Pork Belly with Cinnamon and Star Anise in Soy Sauce, Moo Palo

This dish is similar to Thai Moo Palo but I omitted the hard-boiled eggs and instead of using five spice powder, I used Vietnamese cinnamon and star anise.  What I was looking for was a sweeter and more delicate flavor than from the Vietnamese version with cinnamon and dark soy sauce. It was surprising good and sophisticated. When I checked with my family they had no idea that there was a tablespoon of black pepper in it. It had just a hint of black pepper deepening the sauce.

In Phuket, this dish is called by its Phuket Hokkien name: Moo Hong – หมูฮ้องสูตรภูเก็ต. I cooked it the same way my mother would, with the fat and skin attached to the pork belly to keep it sweet and moist. The important ingredients that give  Moo Palo or Moo Hong Phuket its unique flavor are dark soy, crushed garlic cloves, black pepper, cinnamon powder, cinnamon sticks and star anise.

This slideshow requires JavaScript.

Stewed Pork Belly with Vietnamese Cinnamon and Star Anise in Soy Sauce

Moo Palo

หมูพะโล้

Serves 4

Preparation time: 10 minutes

Stewing time: 2 hours on medium heat on stove top

2 pounds pork belly (aka side pork) with fat and skin attached, cut into 1½-inch thick pieces
2 tablespoons dark soy sauce (Bengal)
3 tablespoons light soy sauce, more as needed
2 tablespoons Vietnamese cinnamon powder
1 tablespoon whole black peppers, crushed
8 cloves garlic, crushed and peeled (don’t chop, keep them whole)
3 star anise, whole
5 cloves, whole
2 cilantro stems, see Pranee’s explanation on cilantro root
2 teaspoons brown sugar

Place cut up pork belly in a dish and stir in the dark soy sauce, light soy sauce, Vietnamese cinnamon powder and black pepper; mix well. Marinate overnight or for several hours.

Place the pork belly and marinade in a Dutch oven over medium-high heat, then add garlic, star anise, cloves and brown sugar on top of pork. Brown the meat a little, then add water to cover the top of pork by 1 inch. Bring to a boil, then turn heat down to medium or medium low (depending on the burner) to create a nice gentle boil. Let it cook for 1 hour. Stir occasionally and add water if needed.

After an hour and a half, cover the Dutch oven with a lid and let the pork simmer for about a half hour, or until tender. (It is tender when you can cut it with a fork and it breaks up nicely without an effort.) Reduce the sauce to 1 cup, about ¼ cup per serving.

Serve warm with steamed jasmine rice.

 Pranee’s note:

Vietnamese Cinnamon or Saigon Cinnamon has more essential oils and 25 percent more Cinnamaldehyde  than other kinds of cinnamon.

You may add 4 shelled hard boil eggs during the last 1 hour of stewing time. It is also delicious served with cooked thin rice noodles.

An alternative cooking method is to braise the stew in the oven at 300°F for 3½ hours.

© 2011 Pranee Khruasanit Halvorsen
I Love Thai cooking
Pranee teaches Thai Cooking classes in the Seattle area.
Her website is: I Love Thai cooking.com .
 

Read Full Post »

A Stir-Fry from the Palm of My Hand

When I was growing up, in the mornings my grandma would often drop a few coins in the palm of my hand and tell me to go purchase Tao Gua (Tofu), Tao Nge (Mung Bean Sprout), and Guiy Chai (garlic chives) from a mobile market—a pick up truck filled with ingredients. I would return with a bag full of three pieces of tofu cake, mung bean sprouts, and a bunch of garlic chives. Together they made the cheapest and best stir-fry and we ate it about once a week. We would usually stir-fry them later for lunch; if it were for dinner, my grandma would soak the bean sprouts in cold water to keep them fresh in the tropical climate. This was back before we had a refrigerator. When I was at the Asian Market yesterday, I purchased these three ingredients in almost the same quantities as I did then and it came up to $ 2.75, only a few dollars and some coins.

Thais call bean sprouts Thua Ngok (ถั่วงอก), but in my hometown of Phuket we call them Tau Nge, a  Phuket Hokkien word. Hokkien is a Chinese dialect spoken by many Chinese throughout Southeast Asia. Tauge, is the word for mung bean sprouts in Chinese Hokkien and in Indonesian and Malaysian languages as well. Perhaps not surprisingly, the Dutch also use taugé for bean sprouts, probably a holdover from the time when they occupied Indonesia.

Mung bean sprouts, tofu and garlic chives are long-time favorite vegetables of Chinese Hokkien cuisine and culture, even though bean sprouts are actually native to Bangladesh.

Firm Tofu, Mung Bean Sprouts and Garlic Chives

Green onions or regular chives are usually a good substitute for garlic chives, but in this case I strongly recommend that you use garlic chives in order to maintain the flavors and authenticity of this dish. Garlic chives are available all year round at the Asian Market and it is a perennial herb in the Northwest. You may find other recipes where you will want to use them as well.

The other day when I was dining with a friend, I was so impressed to find a similar dish served at the Tamarind Tree Restaurant in Seattle. Their dish was almost identical in flavor, but instead of tofu, it used shitake mushrooms. I hope when you are at the Tamarind Tree Restaurant, you will please try Nấm xào giá ~ Bean sprout mushroom.

Phuket Stir-fried Mung Bean Sprouts and Tofu with Garlic Chives

Stir-fried Mung Bean Sprouts and Tofu with Garlic Chives

Phad Tao Gua Tao Nge Phuket

ผัดถั่วงอกกับเต้าหู้ภูเก็ต

5 minutes total preparation and cooking time, 3 ingredients and less than $3. It is my all time favorite stir-fry.

Serves: 4
 
3 tablespoons canola oil, divided
1 (16 ounce) package  firm tofu, cut into large pieces about 1/4-inch thick
1 cup garlic chives cut into 1-inch lengths (about 15 garlic chives),
6 cups mung bean sproutss, washed with cold water and strained
2 tablespoons soy sauce, or 1 tablespoon soy sauce plus one tablespoon oyster sauce
1 teaspoon sugar

Heat the wok on high heat, then test it with a few drops of water. If the water evaporates in two seconds, pour in 1 tablespoon canola oil. Cover the surface with oil by using a spatula or other utensil, then spread out tofu in the wok and fry on medium heat until they firm up and turn a golden color. This will take 1 to 2 minutes. Transfer to a plate.

Heat the same wok on high heat and add the remaining canola oil and the garlic; stir until golden, about 10 seconds. Stir in bean sprouts and cook on high heat for 45 seconds to 1 minute, stirring constantly. It will sound really interesting and steaming. It is the moisture from the bean sprouts creating the sounds against the hot wok. You will see steam, but not smoke. Then stir in garlic chives to cook lightly, about 45 seconds. Stir in tofu, soy sauce and sugar. Mix together, then serve promptly with hot steamed jasmine rice.

Pranee’s note:

The bean sprouts should not cook longer than 2 minutes, or they will lost their crunch. This dish is very simple and the flavors depend on having the freshest bean sprouts, tofu and chives—and that is enough! I love this dish because it has a clean and simple flavor and texture. The moisture released from the bean sprouts makes a sauce. If that doesn’t happen, add one or two tablespoons of water.

Another variation of this dish that you might see in Thailand substitutes calamari, prawns or pig blood cake for the tofu.

© 2011 Pranee Khruasanit Halvorsen 
I Love Thai cooking
Pranee teaches Thai Cooking classes in the Seattle area. 
Her website is: I Love Thai cooking.com .


Read Full Post »

The Mystery Dish of Southern Thailand

Stir-fried Fresh Grated Coconut with Phuket Curry Paste and Chapoo Leaf

I uncovered a mystery about my grandmother’s cooking during my last trip to Phuket. I asked around about Phad Maprow Khub Kruang Gaeng, a stir-fried, fresh grated coconut with Phuket curry paste. During my childhood and adult life, I had never seen it cooked or eaten or even mentioned by anyone except members of my family. And it was only my grandmother who always asked me to assist her with it when I was young. I always wondered if it was served for health or economic reasons, or simply a food that the women of the house put on the table for their large extended family. It was never served alone, but with other main dishes and steamed jasmine rice.

I described the dish to my family to refresh their memories. My mom said that mostly we prepared it with a special kind of coconut (out of a thousand different kinds of coconuts, we used one that has an interesting texture with more like a virgin coconut oil). Then my sister-in-law, who was born in Phang Nga (80 kilometers away from Phuket), recalled eating the dish in her hometown. She said she had prepared it before, but not often. Luckily for me, she was very happy to prepare this for me while I took notes and photographs. She did it exactly the way I remember my grandmother preparing it. Thank you to my sister-in-law Tim, who helped me preserve the history of this lost recipe.

We shared the dish afterwards and more than anything else, more than its just being an interesting dish, it was a moment of rediscovery of the old time flavors of the south. We bonded again with foods. I hope that some of you will try this recipe so it won’t be lost forever.

Curry paste and fresh grated coconut in a mortar mix with pestle

First, Tim pounds the Phuket curry paste. When it became a fine paste she mixed in the freshly grated coconut and pounded to combine all of the ingredients. Then she stir-fried the mixture in a wok.

Coconut and turmeric—the colors and flavors of Southern Thailand

Stir-fried Fresh Grated Coconut Meat with Phuket Curry Paste

Phad Maprow Khub Kruang Gaeng Phuket

ผัดเนื้อมะพร้าวสดขูดกับเครื่องแกงภูเก็ต

Serves: 8 (as a side dish)

Yield: 2 cups

1/2 to 1 recipe Phuket Curry Paste (please click here for the recipe)
2 cups freshly grated coconut meat, or frozen (thaw before cooking)
1 tablespoon sugar, or to taste
Salt to taste
32 chapoo or wild pepper leaves

Combine curry paste and grated coconut by hand or with a mortar and pestle. Place in a wok (without cooking oil) over medium heat, and stir constantly to allow the coconut and curry mix to become one texture. Continue stirring until the moisture in the coconut dries up and the curry paste is well-incorporated, about 5 to 8 minutes. It should be flaky with a little bit of moisture left, neither too dry nor too oily. Serve at room temperature with wild pepper leaves on the side.

Enjoy this as a tidbit by placing about 1 tablespoon on a wild pepper leaf, then wrapping it up so you can eat it in a single bite. Or simply mix it with warm jasmine rice and enjoy it as an accompaniment to curry and vegetable dishes.

Pranee’s Note:

This recipe has not been tested yet in my kitchen, so pay attention to spicy, salty and sweet when trying this recipe.

Chapoo leaf or wild pepper leaf is also known as la lot leaf (please see Pranee’s Blog Entry on Chapoo leaf)

Pranee’s Video on Youtube: How to Open a Coconut Husk: Thai Style

More Recipes by Pranee on Phuket Curry Paste

© 2013  Pranee Khruasanit Halvorsen
I Love Thai cooking
Pranee teaches Thai Cooking classes in the Seattle area.
Her website is: I Love Thai cooking.com 
 
 
Related Articles

Read Full Post »

Rubber tree plantation in Phuket, Thailand

Image via Wikipedia

My Love for Mushrooms

My love for mushrooms was born when I was in my teen years in my Thai village. The village is surrounded by mountains on one side and rice fields on the other. It was a perfect place for wild foods. I learned to gather wild vegetables such as bamboo shoots and green and ginger family rhizomes, and of course I picked some wild orchids for myself on the way home. There were also many rubber plantations. The dried falling branches from the rubber trees were a source of firewood and rubber tree mushrooms called Hed Kreng. They are a typical mushroom that grows only on the old rubber trees which cover most of the southern peninsula of Thailand.

In Seattle, I enjoy various mushrooms and we are in luck, there are plenty of fresh mushrooms from local mushroom growers.

If you are hesitant to cook this recipe for any reason, I want to reassure you that this dish is packed full with flavors and received a five star rating from an admirer on yelp.com.

Grilled Spicy Phuket Mushroom - Rubber Tree Mushroom


Grilled Brown Button Mushrooms with Thai Basil Leaf in Banana Leaf

HED MOK PHUKET

Servings: 4 (one parcel per person)

We used to gather Hed Kreng mushrooms from old rubber tree trunks and bring them home for my mom to make my childhood favorite, Hed Mok (Grilled Mushrooms). I recreated this recipe by using brown button mushrooms that have a flavor similar to Hed Kreng. While creating this recipe, I recalled my vivid memories of how my mom prepared them, and the taste and aroma that I used to savor. The intense flavors of basil, chili, and earthy mushrooms come alive. An important part of this recipe is to grill or bake the mushrooms over high heat to intensify the flavor. Also, use coconut cream rather than coconut milk so the mixture won’t get too wet.

1 teaspoon fish sauce
1 tablespoon red curry paste
½ teaspoon sea salt
¼ cup coconut cream
¼ cup shallots, sliced
1 pound brown button mushrooms, brushed and sliced
1 cup Thai purple basil leaf
4 Thai chilies, halved
4 parchment papers (12”X16”) or banana leaves

Preheat oven to 400°F.

In a large bowl, mix fish sauce, red curry paste, salt and coconut cream together until blended. Stir in shallots, mushrooms, and basil until mixed.

Divide mixture into four batches, and place each batch in the center of a piece of parchment paper. Fold the parchment paper over to make a bag; try to make it as flat as you can so the heat will distribute equally. Lay the bags of mushrooms on the baking sheet and bake for 20 minutes. Serve with warm steamed rice.

Pranee’s note: Oyster, button, or Portobello mushrooms would all be great for this recipe, or you can use a combination of them. Wrapping the mushroom mixture in banana leaves and then grilling them creates another depth of taste and aroma.

© 2011 Pranee Khruasanit Halvorsen
I Love Thai cooking
Pranee teaches Thai Cooking classes in the Seattle area.
Her website is: I Love Thai cooking.com .

Read Full Post »

You say Pummelo, I say Pomelo, and Thais say ”Som Oh

One of my goals for the New Year is for my blog readers to learn light and easy Thai cooking and some new exotic ingredients. Thai cuisine has been famous for many centuries and I want people to have a more in-depth knowledge of it.

Pomelo, Thai Grapefruit - The Flower Market in Bangkok

One way that I hope I can deepen your culinary skills is simply by showing you some of the techniques that Thais use to handle their ingredients, methods learned from our families, our communities and our ancestors.  I hope the instructions in my video demonstration will help you to open your pomelo.

Pomelos tastes so great by themselves, you don’t need to cook them. I created this simple fun recipe on New Year’s Eve to provide a zing to welcome the year 2011.

Best wishes to you all.

I love pomelo. It is in season around New Year’s time, but you can enjoy it every week to give a zing to your life. There are so many way to create a wow moment with pomelo. My favorite recipe is from Phuket, Thailand, and is made with shrimp, tamarind sauce and caramelized shallots. It is a great dish for teaching my students about the layer of flavors and textures that can be found in a Thai salad.

Yum Som Oh, Pomelo Salad with Crab

For my blog visitors, I think learning to open a pomelo is challenge enough, so I am keeping this recipe simple (which is also how I cooked during this past week). This recipe is prepared like a crab or shrimp cocktail rather than the traditional pomelo salad from Thailand.

Pomelo Salad with Crab

Yum Som Oh Khup Phu

ยำส้มโอกับปู

Serves: 6

1 pomelo (prepared as shown in the video above), about 2 cups
1 shallot, peeled and sliced
1/4 cup chopped cilantro, plus 6 cilantro sprigs for garnish
1/2 cup cooked crab meat or cooked shrimp
1 tablespoon palm sugar or brown sugar
1 tablespoon tamarind concentrate
2 tablespoons lime juice, about 1 lime
1 tablespoon fish sauce, or more as needed
1/8 teaspoon chili powder

Place pomelo, shallot, cilantro and crab in a medium size salad bowl. Whisk sugar, tamarind concentrate, lime juice, fish sauce and chili powder until well-blended, then pour over pomelo. Fold all of the ingredients together gently with a salad spoon and serve in a nice glass. Serve at room temperature or chill. Garnish with cilantro sprigs.

Vegetarian option:

Omit crab and use a few pinches of sea salt instead of fish sauce.

© 2011  Pranee Khruasanit Halvorsen
I Love Thai cooking
Pranee teaches Thai Cooking classes in the Seattle area.
Her website is: I Love Thai cooking.com .
 
Related articles

Read Full Post »

Inle Lake Green Tomato Salad, a Recipe from Shan StateMyanmar

Green Tomato, Red Tomato and Somewhere in Between

Today, on my way back from the University District Farmers Market, I visited a friend and saw her tomatoes in various shades of colors on her windowsill. Then I remembered that I wanted to share this recipe with you.

When I see green tomatoes, I think of my family’s visit to Inle Lake, Myanmar in June 2008. Our two-hour boat ride was enchanting, and we saw a fisherman using his foot to row his canoe. At the shallow edge of the lake were floating gardens with rows and rows of tomato plants. We had a chance to see the hydroponic farms and miles of tomatoes growing on floating gardens.

Inle Lake Fisherman

When we stopped for lunch and a cooking class at the View Point Restaurant, the chef surprised us with a green tomato salad along with many famous Shan State dishes. The menu reflected the local abundance of tomatoes from local farming, as Inle lake is the largest source of tomatoes and vegetables in Myanmar.

If you are planning to visit Myanmar anytime soon, please do make sure that the View Point Restaurant & Cooking School is in your itinerary. I love the people who work there, and the views of rice fields, the river, and the bridge—a great place to observe locals going about their daily lives.

This slideshow requires JavaScript.

I had never eaten green tomatoes before but I am familiar with the concepts of fried green tomatoes, pickled green tomatoes, and green tomato relish. So what else can you do with green tomatoes? Inle Lake Green Tomato Salad is an answer here.

Before cooking and eating green tomatoes, this is what you should know.

Thisis an excerpt about Tomatoes & Health that I copied from About.com:.“Although green tomatoes are wonderful when cooked or pickled, they should be avoided in large amounts when raw. Green tomatoes contain large amounts of tomatine, a toxin in the same alkaloid family as solanine which may be found in green potatoes, another member of the nightshade family. ”

I ate a few pieces of green tomato slices and felt fine but didn’t like the taste; it was too tart and bitter.  My friend Deb had mentioned that green tomatoes shouldn’t be eaten fresh, so I  decided to bake the green tomato slices for 15 to 20 minutes at 350 degrees Fahrenheit. The cooked tomatoes  tasted great, but the color was dark green.  I bake my green tomatoes or simply use firm ripe tomatoes instead.

Inle Lake Green Tomato Salad

This green tomato salad is very simple to make. You start by making  Lemongrass Vinegar.  I would recommend making a lot of it and storing it in the refrigerator.  It can be added to any recipe that calls for vinegar.

Inle LakeGreen Tomato Salad

Yum Makruatad Keow

4 large green or ripe tomatoes, sliced
1 shallot, peeled and minced
1 tablespoon chopped  peanuts, dry roasted and unsalted peanut
1 tablespoon fried minced garlic plus 1 teaspoon garlic oil ( this the oil that the garlic was fried in)
1 to 2 tablespoons lemongrass vinegar 
1 teaspoon toasted dark or light  sesame oil
½ teaspoon black sesame seeds
Salt to taste

Place green tomato slices on a large platter.

To make salad dressing, combine the shallot, peanuts, fried garlic, garlic oil, lemongrass vinegar, and sesame oil in a small bowl and whisk until combined. Pour over green tomatoes and garnish with black sesame seeds.

© 2010  Pranee Khruasanit Halvorsen 

 I Love Thai cooking   
Pranee teaches Thai Cooking classes in the Seattle area. Her website is: I Love Thai cooking.com .

Read Full Post »

Northern Thai Cuisine with the Kantok Diner

When planning a trip to Chiang Mai, the largest city in northern Thailand, one must see all of the cultural aspects that Northern Thai culture or Lanna culture has to offer. That is why I took my tour members to the Old Chiangmai Cultural Center. It is my favorite place for eating Northern Thai cuisine, listening to Thai music, and watching the dances. This may seem like a tourist trap, but for a short visit to Chang Mail, I recommend this experience before returning home. My visits with tour members in February 2007 and 2008 were memorable. We sat under the moonlight in a courtyard surrounded by old Thai teak buildings, ate, and watched the dance show. And of course the visitors had a chance to dance at the end.

Kantok Dinner at the Old Chiangmai Cultural Center

A typical Kontok dinner menu consists of Pork-Tomato Chili Dip (Nam Prik Ong), Green Chili Pepper Dip (Nam Prik Num), Fried Chicken (Gai Tod ), Chaingmai Curry Pork (Geang Hungley), Fried Banana (Kleuy Tod) and all of the vegetable condiments that go with chili dip, plus steamed sticky rice and steamed jasmine rice. All of these dishes were placed in bowls (kan) and set on a small round teak or rattan table (tok) that was only about 10 inches tall. We sat around the table and ate the food with our fingers, or with forks and spoons.

Tomato-Pork Chili Dip, Nam Prk Ong

Inspired Recipe from Our Chiang Mai Kantok Dinner

Nam Prik Ong

Tomato-Pork Chili Dip

Nam Prk Ong

น้ำพริกอ่อง

This dish is easy to make, and among Thai chili dips, pork-tomato chili dip is easy to love. It has a tomato base and is spicy hot with chili pepper, but does not have too strong a taste of shrimp paste. The secret is to use the ripest, reddest and sweetest tomatoes you can find. I recommend multiplying the recipe so you will have enough to keep some in the freezer. In Seattle I keep some Nam Prik Ong in the fridge to use as a condiment when I serve a meal with one main protein dish. I also love to use it as a condiment with steamed jasmine rice or to accompany other savory dishes or an array of fresh vegetables.

Yield: 1 cup

2 cilantro roots, or 1 tablespoon chopped cilantro stems
1 stalk lemongrass, trimmed and sliced, about 3 tablespoons
3 Chile Guajillo, or New Mexico chili pods, sliced and soaked in warm water for 30 minutes
5 whole dried Thai chilies, soaked in warm water for 30 minutes
10 cloves garlic, peeled
5 shallots, peeled and sliced
1 to 2 teaspoons shrimp paste placed on a piece of parchment paper and roasted in a 350BF oven for 10 minutes, (or substitute 1 tablespoon Napoleon anchovy paste)
1 teaspoon salt, or more as needed
3 tablespoons canola or peanut oil
¼ cup ground pork
1 cup sweet cherry tomatoes or any sweet tomato variety, chopped
1 tablespoon palm sugar or brown sugar
1 tablespoon fish sauce
¼ cup chopped cilantro to garnish

Make a curry paste by placing the cilantro roots, lemongrass, chili Guajillo, Thai chilies, garlic, shallots, shrimp paste and salt in the food processor. Turn on the machine and while it runs, pour cooking oil into the spout in a stream (like making pesto). Let the processor run for 3 minutes, stopping it occasionally to use a spatula to scrape down the sides of the machine.

Place the curry paste in a frying pan with the pork and cook over medium heat until the pork is no longer pink. Stir in tomato, palm sugar, and fish sauce and let it simmer until the tomato is softened. Nam Prik Ong should have the consistency of tomato sauce (not watery). When it is done, stir in chopped cilantro and serve with jasmine rice and vegetable condiments, or serve it Kantok Dinner Style with sticky rice and other traditional dishes.

Vegetable Condiments: Sliced cucumbers, long beans, wing beans, Thai eggplants, banana blossoms, steamed Kabocha pumpkin.

© 2010  Pranee Khruasanit Halvorsen
I Love Thai cooking
Pranee teaches Thai Cooking classes in the Seattle area. Her website is: I Love Thai cooking.com .

Read Full Post »

Older Posts »

%d bloggers like this: