Feeds:
Posts
Comments

Archive for the ‘Thai Ingredient 101’ Category

Coconut Palm Sugar 101

Palm Sugar

Thai coconut palm sugar has a unique flavor with caramel and butterscotch notes. It is has a low melting point and high burning point.  It is also a great sugar for savory dishes, as it is a perfect addition to bitter, sour, salt and spicy note in Thai cooking.

It is also known as a good choice for sugar for a low glycemic index.

Making several cuts or slits into the bud of a coconut flower stalks and collecting sap or nectar. Phayom or Thai plant bark chip is added for a natural preserve to keep the sap from fermenting into alcohol.

The sap is reduced, taking approximately 1 ½  hours. The clue for the sugar maker to know when the caramel is ready is by observing the texture and the size of the bubble and the intense fragrance.

Stir with special tool to aerate the palm sugar and get it to a texture of creamy rich before pouring into a container. It will take about 15 to 30 minutes to cool and solidity depending on the volume.

Related articles

Read Full Post »

For Richer or For Poorer

This slideshow requires JavaScript.

In Thailand, fish sauce is called nam pla. It is made of anchovies and salt which are fermented for 6 to 12 months under the tropical sun. The process of fermentation leaves behind an elixir laden with flavor and concentrated glutamic acid. This elixir creates a mouthful of flavor when added to salads, soups, curries, stir-fries, dipping sauces, rice and noodle dishes, or served simply as an everyday condiment – Nam Pla Prik. It is is a medium-brown liquid  that is available in bottles of various sizes ready to use for seasoning and cooking.

When it comes to Thai cuisine and culture, one can’t live without fish sauce. It is important to get the best quality fish sauce, so I have some recommendations for buying it outside of Thailand.  My favorite fish sauce brands, which I use interchangeably, are Thai KitchenTiparos and Three Crabs. Once the bottle has been opened, you can leave it out at room temperature if you cook with fish sauce often, otherwise you can keep it in the fridge for up to 6 months. When it gets too salty or stale, replace it with a new bottle.

Nam Pla Prik as a condiment

Thai people from all walks of life always have fish sauce in their kitchens and typically use it every day, either in their cooking or as a condiment. Thais value its significant flavor and Nam pla is part of Thai people’s lives, regardless of whether they are from rural villages, big towns or the capital city of Bangkok. In fact, it is a Thai’s best friend in all life situations, but especially in economic down times, or for newly married couples starting their lives together. When Thais face financial struggles, one often says “a fish sauce and warm rice is simply enough” (in Thai: มีข้าวกับน้ำปลาเพียงพอแล้ว).  When we go through a tough time and have just  enough money to buy rice and fish sauce, life is still good, still filled with hopes and dreams, and we still have each other, for richer or for poorer.

Nam Pla Prik


Spicy Fish Sauce

Nam Pla Prik 

น้ำปลาพริก  

Yield: 1/4 cup

Nam pla prik is no secret to Thai dining;  Thais use  it the way Americans use salt and pepper. This liquid of chili and garlic-infused fish sauce is delicious over warm steamed jasmine rice or just about any Thai food you are about to savor. The fresh layer of fish sauce enhances the food and adds another dimension to each mouthful, heightening the experience on your palate. My favorite way to use it is over a fried egg and steamed hot jasmine rice, with fresh sliced cucumber and tomatoes alongside. Any time you are dining at a Thai restaurant, you may ask for nam pla prik the same way that you would ask for salt and pepper.

¼ cup fish sauce
2 Thai chiles or a jalapeno pepper, sliced
2 cloves garlic, sliced
½ teaspoon sugar
½ teaspoon lime juice, optional

Stir fish sauce, Thai chiles, garlic, sugar and lime juice together in a small bowl. Use this spicy fish sauce for seasoning. You may keep it in an airtight jar up to 2 weeks in the refrigerator.

img_0054.jpg

Thai Condiment Set – with Nam Pla Prik

© 2011 Pranee Khruasanit Halvorsen
I Love Thai cooking
Pranee teaches Thai Cooking classes in the Seattle area.
Her website is: I Love Thai cooking.com .
 
Follow Me on Pinterest

Related articles

Read Full Post »

What is a Fruit, Eaten as a Vegetable, and Used as a Sponge?

Wait—you are eating luffa? Yes, in Thailand luffa fruit is eaten at a young stage as a vegetable. It is soft, sweet and aromatic after cooking, either in a stir-fry or a soup dish. We eat the whole fruit except for the skin.

When I have a craving for luffa as a vegetable, I only choose the youngest luffa available. As the fruit gets older, the fibrous veins becomes more visible and tough and the flesh gets more airy and dries out to become a sponge. Farmers leave many healthy-looking luffa fruit longer on the trellis in order to harvest seeds and sponges as the annual vine grows old, dies, and dries up. The last harvest for the plant is healthy seeds and luffa sponges for bathing or cleaning pots and pans.

บวบหอม

บวบหอม – Smooth Luffa – Luffa aegistiaca

We enjoy two species of luffa as a vegetable in tropical and subtropical countries. The above luffa is บวบหอม – buap homSponge Luffa or Smooth Luffa. Below is the บวบเหลี่ยม – bump liam –  Ridged Luffa or Angled Luffa.

Growing up in Thailand I felt that what makes a Thai village scene beautiful is walking around and seeing both kinds of luffa growing in and around granny’s home, either on the fences or the chicken penthouse or on a tree. And one doesn’t need a fancy vegetable garden to grow them, just two square feet of fertile ground, routine watering, then a bit of training to get the vine to climb up a twig or fence as it grows. After that it can take care of itself and all you have to do is admire the yellow flowers, harvest the luffa, collect seeds for the next season and enjoy a supply of sponges.

Angled Luffa on the arbor - Angled luffa - Luffa acutangula

บวบเหลี่ยม – Angled Luffa on the trellis – Luffa acutangula

This picture was taken a few years back when I visited my mom and uncle and we walked around my village in a circle. The angled luffa is young, long, and round with ridges. This one is a perfect size for harvesting. It could be from 1 to 1 and 1/2 inches in diameter and 8 to 12 inches long. The yellow flowers were bright against the dark green guard hanging on the chicken coop to provide shade for chickens. I trust that the yield of luffas from this single plant provided many meals, stir-fried, in a country-style soup, or served with Nam Prik – Thai Chili Dip

Step-by-Step: How to Peel and Cut Luffa 

One year when I visited mom I found her in the kitchen just about to prepare stir-fried luffa with egg for lunch. Because I wanted to share the technique and recipe with you and all my blog followers, I asked her if she could do this in slow motion and let me interrupt her so I could take photos of her peeling and cutting luffa the way everyone from our Thai village always did. I want to share with you this treasured culinary moment in my mom’s kitchen.

how to peel angled luffa

How to peel angled luffa

The luffa is actually related to the cucumber family. They are alike in many ways but the luffa is softer. We use a cucumber peeler to peel the ridged skin.

IMG_0171

Angled luffa looks like a soft cucumber

After peeling and rinsing, we do the oblique cutting or roll-cutting.

oblige cut is a cutting style for stir-fried luffa

The oblique cutting style is used for stir-fried luffa

Please click here to see a video and the explanation from Simply Ming about how and why oblique and roll cutting is used in Asian Cuisine.

The reason we love luffa so much is that it is succulent, moist, sweet and tender. Therefore we don’t need many ingredients in this stir-fried dish. We often enhance the flavor with some protein like egg, prawn or pork, then a little fish sauce or soy sauce for salt. The taste has a hint of zucchini and cucumber. It has a delightful silky smooth texture that is soft, but firmer than a marshmallow.

Mom's style stir-fried angled luffa with egg served with steamed jasmine rice

Mom’s style stir-fried angled luffa with egg, served with steamed jasmine rice

Both species of luffa can be cooked in the same way. There is not a big difference between the two, but I prefer angled luffa over smooth luffa as it is more succulent and sweet. This recipe, and the photographs were recorded many years ago in my mom’s kitchen in Phuket. It captured our fine day visiting and savoring real Thai home cooking.

Stir-fried Angle Luffa with Egg

Buab Phad Khai
บวบผัดไข่
Serves: 4

Like any Thai stir-frying dish, cooking on high heat is the key. Shrimp or pork are popular proteins used in stir-fried angled luffa, and almost always with egg, some soy and fish sauces and a pinch of sugar. It can be served as a side dish or a main dish with steamed jasmine rice.

3 tablespoons high heat cooking oil such as canola, peanut or soy bean oil

3 cloves garlic, chopped

2 eggs

3 large or 4 medium-size angled luffa, peeled and oblique-cut, about 1 and 1/2 pounds

1 tablespoon fish sauce

1 tablespoon soy sauce

1/2 teaspoon sugar

1/2 cup water or chicken broth

Heat a wok on high heat until it is hot. Pour in cooking oil and stir in garlic. When garlic is golden, stir in eggs and stir a few times. When the egg is cooked, stir in luffa. Stir for 1 minute and add fish and soy sauces and sugar. Add water or chicken broth and let cook for 1 to 2 minutes with the lid on. It should have a soft texture and some sauce like the recipe above. Serve warm.

I Love Thai cooking
Pranee teaches Thai Cooking classes in the Seattle area.
Her website is: I Love Thai cooking.com 
Lets connect on  Twitter,  FacebookYoutubeInstagram and Pinterest
For more in-depth in Thai ingredients and Hand-on Cooking Class please check out
Pranee’s One day Asian Market Tour & Cooking Class at Pranee’s Thai Kitchen
 

Related Links

http://www.kitazawaseed.com/seeds_luffa_angled.html

How to Grow Your Luffa Sponge

http://www.luffa.info/luffagrowing.htm

Roll-Cutting Video

http://www.howtocookmeat.com/techniques/howtorollcut.htm

Read Full Post »

Thai Twist

As we approach the end of the year, I would like to take this occasion to wish you all a very happy holiday season with joy and cheers. I very much appreciate your support in following Pranee’s Thai Kitchen blog and attending my Thai cooking classes. A heartfelt thank you! I hope I can welcome you all one day to cook together at Pranee’s Thai Cooking Studio. In the meantime, I would like to give you a special list of recipes that will hopefully give you some insight and inspiration on how to cook your old and new holiday recipes with Thai ingredients to add a new twist to them. Please follow along to see how some Thai dishes or Thai ingredients can delight your family and friends—and most importantly, you the cook, who will have a fun time in the kitchen giving your holiday meal a Thai twist.

Thai Herbs: Lemongrass, Kaffir Lime Leaves, Galangal and Turmeric

Thai Herbs: Lemongrass, Kaffir Lime Leaves, Galangal and Turmeric

Tom Yum Flavor, Zesty and Spicy

First, I would like to inspire you to think “Thai” and make it part of your cooking by using zesty Thai herbs and tropical flavors either instead of or in addition to your traditional herbs. Western cooking has so many uses for lemon zest; Thai cooking uses Kaffir lime leaf, lemongrass and lime zest in similar ways. When shredded fine, you can add them to practically everything, including stuffing, soup, or cranberry sauce. And when you want to infuse them in a sweet syrup or soup, their essential oils are water-soluble, making it is easy to impart their flavors in boiling liquid. It takes only about 5 minutes for them to achieve their maximum flavor.

Cranberry Sauce with a Touch of Thai Herbs

Thai Herbs: Lemongrass, Kaffir Lime Leaves, Galangal and Turmeric

A few years back I created two recipes that I prepared and gave to friends as a holiday gifts: Pranee’s Cranberry Sauce with Spiced Rum and Thai Herbs and Pranee’s Thai Lime Green Chili Jam (which is especially tasty served alongside an appetizer such as Pranee’s Crab Wonton). It was fun for me and my friends still remember the unique tastes of these two dishes and mention them often.

Crunch with Spring Roll Wrapper

You should also think Thai when you want to ease your cooking. Asian spring roll sheets or lumpia sheets make it easy to prepare large quantities of appetizers. You can wrap just about anything up in them for a quick appetizer or dessert where texture is needed. I often have spring roll sheets in the freezer as part of my emergency ingredients at home. Last week, while I still had some jet lag after returning from Thailand and had little time to cook, I wrapped cooked chicken curry filling in the sheets, deep-fried them (they can also be baked), then served them with cucumber salad and Thai sweet chili sauce. It was a satisfying quick fix.

IMG_9587

Curried Chicken Spring Roll, Cucumber Salad and Sweet Chili Sauce

Sweet and Spicy with Sweet and Hot Chili Sauce

Today, Thai Sweet Chili Sauce and Thai Sriracha sauce have become staple Thai ingredients in American kitchens. Adding Thai  Sweet Chili Sauce to sauces in place of sugar or honey adds more complex flavors. And if you want to spice anything up, Sriracha sauce can do the magic by just adding a drop or two to your holiday sauce or dressing. Having these two sauces at home can also provide a nice taste balance in an instant.The Thai flavor profile is sweet, sour, salt, salty and spicy. I often balance the Chili Sauce (sweet) and Sriracha (hot) sauces together with a dash of fish sauce, a splash of lime juice and a touch of cilantro. Soon all of the flavors are harmonized, and provide a perfect dipping sauce for everything—including leftover turkey. Sweet Chile Sauce also makes a great base for a salad dressing. I hope you will enjoy my recipe with a modern twist: Sweet Chili Vinaigrette.

Thai Sweet Chili Vinaigrete

Thai Sweet Chili Vinaigrette

Coconut Love

Finally, try giving some Thai flavor to your desserts. A few years ago I was inspired by Russian Tea Cakes to develop a recipe for Coconut Tea Cakes. The Thai version made a nice surprise for a friend who discovered the coconut texture and flavor after assuming from their looks that she was going to bite into a traditional Russian tea cake cookie. Another dessert to try if you have a surplus of mashed potatoes or sweet potatoes is to substitute them for mung beans to make a delectable Thai Coconut Custard.

coconut tea cake

Coconut Tea Cakes and Other Treats

I hope you have a great time preparing meals with a little Thai twist during the holiday season. Warmest wishes from my Thai kitchen.

Pranee

Gift Certificate is Available
Gift Certificate for Thai Cooking Lesson

Gift Certificate for Thai Cooking Lesson


I Love Thai cooking
Pranee teaches Thai Cooking classes in the Seattle area.
Her website is: I Love Thai cooking.com 
Lets connect on  Twitter,  FacebookYoutubeInstagram and Pinterest
 

Related Link:

What’s for breakfast?

Banana Pancake Recipe : praneesthaikitchen.com

Vietnamese Coffee Recipe : praneesthaikitchen.com

Rice Soup : praneesthaikitchen.com

Read Full Post »

Thais Like It Hot

ขอพริกป่นคั่วหน่อยค่ะ – Kho Prik Phon Krua Noi Kha, “May I have a little bit of chili powder?” This is a typical question to ask at a food stall if you wish to kick up the heat a notch or two on the food you were served. This is not considered an offense at all to Thai cooks. In general most Thais like it hot, but some like it hotter. Chili powder personalizes the spiciness to suit one’s mood.

Prik Phon Khrua - Roasted Chili powder

                                        Prik Phon Khrua – Roasted Chili powder

Chili-Lime Vinaigrette, tomato and dill

Chili-Lime Vinaigrette, Tomato and Dill

In my Thai village, or any part of Thailand, roasted Thai chili powder – พริกป่นคั่ว- Prik Phon Krua – is a basic ingredient that is always within reach to spice up food. Having a little fish sauce and chili powder at hand is as common to Thai culture as salt and pepper are to Western culture. The most important thing for a cook new to Thai cuisine to understand is that chili pepper, which has a spicy taste, is used to balance and improve the harmony of flavor with sour, salty and sweet. It is not to make foods spicy hot, but rather to enhance their flavor or to create a harmony of flavor with sweet, sour and salty. This is what makes eating Thai food a memorable experience. If you are not a big fan of hot food, just try a little bit each time. A little chili powder goes a long way, and you will learn how the lively spicy taste can bring out the potential of other flavors to make the food taste great at the next level.

In my Thai kitchen, I use Thai chili powder two ways. One is as an ingredient in Thai salads, soups, dipping sauce, etc. The other is as a condiment available on the dining table.

Thai Dinner Table Condiment

Thai Dinner Table Condiments

Chili powder is one of the ingredients used everyday in Thai kitchens. I want to take this opportunity to demystify it. Chili powder is usually made from small dried Thai chilis, simply ground into a chili powder we call – พริกป่น – Prik Phon. But there are other chili powders as well and how the chilis are prepared before grinding—such as roasted in the oven or fried—determines whether it has the fresh flavor of heat or an intensely delicate flavor. A delightful roasted chili powder – พริกป่นคั่ว – is called Prik Phon Krua. It is made from chilis roasted without any oil in a wok or in an oven. Thais often serve fried whole chilis – Prik Tod -พริกทอด- as a condiment or garnish. Or fried chilis can be ground or crushed into a powder called Prik Pon Tod – พริกป่นทอด.

พริกป่นคั่ว -Prik Phon Khua - Roasted Chili Powder

พริกป่นคั่ว – Prik Phon Khua – Roasted Chili Powder

My secret chili powder blend above is a mix of my three favorite chilis for use in Thai cooking

Top left is the Chile de Arbol, also known as bird’s beak chili, which has a heat index between 15,000 and 30,000 Scoville Heat Units (SHU), a measurement of the spicy heat of chili peppers and other spicy foods. Top right is dried Japones Chili pepper, also known as Japanese Chili, with a heat index between 15,000 and 30,000 SHU, or, according to some sources, 30,000 to 50,000 SHU. On the bottom right are Thai Kitchen Thai Bird’s Eye Chilis. They are hot and intense, and a little shorter than the more common Thai Bird’s Eye Chilis which have 50,000 to 100,000 SHUs. Some bird’s eye chilis can be as hot as 100,000–225,000 SHU. Try using one type of chili at a time to get to know each one’s level of taste and aroma and the intensity of the heat it produces.

Roasted Chili Powder – Prik Phon Khua – พริกป่นคั่ว

You may choose one or more type of chilis to make chili powder. The recipe below is one I often prepare for my class. It uses chile de arbol, which has fewer SHU and a beautiful and interesting flavor. One cup of dry Thai chilis is anywhere from 80 to 90 chilis. After roasting and grinding they will yield about 7 tablespoons of dried chili powder. Typically, a teaspoon of chili powder is made from about 4 chilis. Keep the powder in an airtight jar.

Ingredients

1.4 ounces dry Thai, de arbol, or japones chilis

Pre-heat oven to 300 degrees F. Place one layer of parchment paper on a baking sheet. Spread the chilis out evenly on the paper, and place the baking sheet in the center of the preheated oven. Turn the range hood fan on high. After 3 minutes, begin opening the oven door every 30 seconds—less often at the end—to prevent the chilis from burning. The color will get deeper red, red-brown, or maroon-red depending on the type of the chili. Remove the chilis from the oven when they change to the deeper colors. When cooled, ground the peppers down to the desired texture: coarse, medium, or powdery. Place in a jar with an airtight lid. It will stay fresh for about 3 months, or you can store the ground powder in the freezer.

I Love Thai cooking
Pranee teaches Thai Cooking classes in the Seattle area.
Her website is: I Love Thai cooking.com 

Related links Pepper and Your Health (webmd.com) Endophine 101 (ivillage.com) Tom Yum Mama Noodle Soup (praneesthaikitchen.com)

Read Full Post »

Young Galangal – Kha Oon – ข่าอ่อน

I have many fond memories of my apprenticeship at a young age to my grandmother in her kitchen. One of the tasks I performed was harvesting the tender stems and rhizomes—the horizontal, underground stem that sends out roots and shoots from its nodes—of the galangal plant.

IMG_0128

Tender Stems and Leaves of Young Galangal Plant

In the old days, we had a few galangal bushes in our garden and when grandma wanted to make her soup – Tom Som Kha Oon (ต้มส้มข่าอ่อน) – from young galangal stems she would ask me to go search for the youngest shoots and stems. Over time, I learned the wrong and right ways to harvest them, and I have some tips to help you with your harvest. As you read my story through to the end you will learn more about how to prepare and cook the young galangal stems as well.

First choose a young plant. It should be about one to three feet tall above the ground. (Older plants are about five feet tall.) A young plant should have no more than three green leaves. Harvesting the shoots is similar to harvesting bamboo shoots. Holding the leaves, I use strong force to snap and pull the stem away from the bush at a 45-degree angle. This should give me the whole stem and, with some luck, part of the young plant with the rhizomes attached as in the photo below. If grandma needed some older rhizomes, I would use a small shovel to remove the soil around the plant and a knife to cut out the clump of rhizomes around the new stems.

IMG_0125

Young Galangal and Tender Stem – ข่าอ่อน-หน่อข่าอ่อน

Galangal typically takes about four months to reach this size and become ready to harvest. Its smell is softer and gentler than the strong pungent smell of older galangal that has stayed in the ground for almost a year. In Thailand, you will typically find young galangal in the market and in the kitchen.

Lemongrass and kaffir lime fruit and leaves are common fresh Thai herbs, but galangal is just as significant—if not more so—to Thai cuisine. We use galangal widely. It is in almost every dish possible except for in the rustic vegetable soup known as yellow sour, or sour curry in Southern Thailand (Gaeng Luang or Gaeng Som – แกงเหลืองหรือแกงส้ม and Gaeng Leangแกงเลียง. The most well-known dishes that use galangal are Tom Kha, Tom Yum, and Thai curry paste.

Galangal Plant - ต้นข่า

Galangal Plant – ต้นข่า

A few years back I visited a lemongrass and galangal plantation. I am happy to share with you the photos I took there. This picture was taken during the dry season. This plant is not as busy as my grandma’s, which were planted closer to the water and given mulch. Galangal plants typically reach four to eight feet in height. When young plants reach about one to three feet tall, their young shoots and rhizomes – Kha Oon – ข่าอ่อน – can be harvested. The older and more pungent rhizome, called Kha Gae – ข่าแก่  is most like the galangal that you find in the U.S.

Young Galangal and Tender Stem

Young Galangal and Tender Stem

This beautiful bouquet of young galangal and shoots is fresh from the farmer’s market in my Thai village. I am glad that the farmers have them available every day. I purchased a few for my mom to make her favorite soup – Tom Som Kha Oon (ต้มส้มข่าอ่อน). It is a sour soup of young galangal stems and banana stems that is common in Phuket cuisine.

I hope you enjoy my mom’s tips and step-by-step techniques for preparing galangal stems. It may be difficult for some of you to find young galangal stems, so I hope that this post will at least increase your knowledge of Thai cuisine in a Thai village.

Step-by-Step: How to Prepare Young Galangal and Tender Stems

My mom removing some hard fibrous leave for young leave

My Mom Removing Some Hard Fibrous Leaves for Young Leaves

The general rule is to remove the hard, fibrous leaves of the galangal plant and to use all of the parts that are tender and can be cooked in 15 minutes. All parts that are tender are edible like just vegetables. Their texture is similar to asparagus, and they have a gentle fragrance that is sweet with a mild pungency that is not as noticeable after cooking in a sweet and sour soup.

IMG_0129

Place tender stems on a cutting board and smash with a cleaver or pestle to soften, then cut into 1 to 1 1/2 inch lengths.

Tender Galangal Stem and Banana Stem Soup

Cook until tender in liquid such as soup or curry, about 15 minutes.

I Love Thai cooking
Pranee teaches Thai Cooking classes in the Seattle area.
Her website is: I Love Thai cooking.com 
 
Related Links

https://praneesthaikitchen.com/tag/how-to-prepare-banana-stem-for-cooking/

http://www.thekitchn.com/ingredient-spotlight-what-is-g-43841

Cooking Tender Galangal Stems in Green Curry  http://pantip.com/topic/30708280

Galangal VS Ginger http://chowhound.chow.com/topics/921739

How to Farm Young Galangal – Kha Oon 

Read Full Post »

From Pod to Paste

Tamarind Fruit – Makham มะขาม

When I visited my village last year, I took my usual leisurely walk around Dern Len. As I walked past my relative’s home, I saw the large tamarind tree that I played underneath with friends when we were young and used as shelter from the hot sun. The four-stories-high tamarind tree still stands, timeless in their yard. I was lucky to see my relatives as well—we haven’t seen each other for many years. I greeted them and we sat down to catch up, and observed once again the yearly family ritual of preparing tamarind chunks under the tree. With everyone’s permission and kindness, I am able to share stories and photos with you today. This is a real snapshot of the Thai-food-ways that are at the heart of my Thai village where Thai culinary tradition is still practiced sustainably.

IMG_0214

Tamarind Tree More Than 50 Years Old

Tamarind pods dry and mature on the tree, then are removed or shaken to fall on the ground. After collecting many baskets of the dried pods, we gather around the table and with many hands we get enough tamarind chunks to last until the next harvest a year away. Often the surplus is bagged and sold, or given to close family members.

Step-by-Step: How to Prepare Tamarind Pod

Tamarind pods dry and mature on the tree until the owner of the tree can find an expert tree climber. Typically the climber will stand on the branches or hold them and shake them until the pods fall onto the ground which is lined with nets or fabric.

removing tamarind pod, vein and seed

Removing Tamarind Pod, Veins and Seeds

After the tamarind pods are collected, people get together to remove the pods, veins, and seeds and pack the tamarind chunks into a package, ready to use in the kitchen. My cousin will show you step-by-step how to open a tamarind pod.

IMG_0217

First Press with Thumbs to Break the Pod

First she holds it with two hands, then uses both thumbs to press the pod until it cracks.

Then remove the pod

Then Remove the Outer Shell of the Pod…

Second, she removes the outer shell of the pod.

IMG_0228

and the Fibrous Veins

Third, she remove the veins that cover the tamarind flesh.

IMG_0240

Next, Insert a Narrow, Small, Sharp Knife into the Flesh

Fourth, holding the tamarind with one hand, use the other hand poke a paring knife with a sharp point into the bean section.

IMG_0241

Push the Hole Open Wide Enough to Get the Seed Out

Finally, use the knife to widen the hole and squeeze out the seed. Repeat until all the seeds are removed.

Seedless Tamarind Chunk is sundry in the bamboo tray

Sun-dry Seedless Tamarind Chunks on a Bamboo Tray

Seedless tamarind chunks sun-dry on bamboo trays for a few days. This gives them a longer shelf life.

IMG_0252

Tamarind in a 1/2 Kilogram Package

Then it is packed into a half-kilogram bag.

The moisture content in tamarind paste is different from tree to tree, and from season to season. The tamarind above is dryer than most you will find in the grocery store.

Now that you understand step-by-step how tamarind chunks are removed from the pods, read my previous post on how to make ready-to-use tamarind concentrate. It explains and illustrates how to intuitively use tamarind as a sour agent in various dishes.

I Love Thai cooking
Pranee teaches Thai Cooking classes in the Seattle area.
Her website is: I Love Thai cooking.com 
 
Related Link

Tamarind Pod, Tamarind Paste and a Jar of Tamarind Concentrate

How to Make Ready-to Use Tamarind Concentrate (praneesthaikitchen.com)

Tamarind Soda

Pranee’s Tamarind Syrup, Tamarind-Honey Tea, Tamarind Soda Recipes (praneesthaikitchen.com)

Read Full Post »

Happy Holidays with Aloha

Though I am Thai, and live mostly in Seattle with frequent visits to Thailand, I enjoy visiting Hawaii during the holiday seasons for an escape to warmer weather. In Hawaii, “aloha” is as commonly heard as Sawatdeeสวัสดี is in Thailand. Aloha, however, has many more meanings and today it is appropriate to choose this one: “affection, peace, compassion and mercy.” I would like to take this opportunity to wish you the best of the Holiday Season with Aloha. Happy Holidays to you all. 

Aloha for this Holiday Seasons

Aloha for this Holiday Season

When it comes to Hawaiian fruit, I have a deep love for passion fruit- Saowarod – เสาวรส – or as it is known in the Hawaiian language, Lilikoi. Hopefully this blog will help you learn about passion fruit and how I enjoy them, and give you a chance to share the ways you enjoy passion fruit.

Passion fruit is available in tropical areas such as Hawaii, South America and Southeast Asia. It has a perfect sour and sweet lemony taste similar to the citrus fragrance, and there are seeds and juice in the yellow or purple shell. Its taste and aroma will brighten your day. It brightens every day for me in this land that is abundant with passion fruit.

Kona Farmer Market

Kona Farmers Market, Near Ali’i Road

My first day in Hawaii I always go to the farmers market or fruit stands for fresh local fruits. This time I bought enough fruit to last the entire trip. Fortunately, as a tourist staying in a hotel room with a small refrigerator, I came up with a simple breakfast idea that allowed me to enjoy passion fruit every day. The method is very easy, with no cooking required. 

Passion Fruit at Kona Farmer Market

Passion Fruit at Kona Farmer Market

There are are two types of passion fruit: purple and yellow. The Thai yellow variety is more common here, and you can purchase as many as you would like as it travels well and makes a good instant juice. All you need to eat it is a pocket knife, a plastic spoon, and a napkin.

Step-by-Step How to Open Passion Fruit

IMG_0400

Cutting into the Passion Fruit

Before cutting the top as show above, you can cut off a small part of the bottom to make a platform for the fruit to stand on like shown in the third picture below. Then holding the fruit tight with one hand, cut around the stem end to create an opening large enough for the spoon. I came up with this method for eating fresh passion fruit because it is not as messy as cutting one in half.

IMG_0403

Insert the Spoon and Loosen All Around the Cell Wall a Few Times

Insert the spoon close to the inner shell and loosen the cell wall as you turn the fruit in a circular motion a few times. This technique will break up the fiber, and the inside becomes nice saucy seeds and juice.

IMG_0406

Passion Fruit Waiting for you to Enjoy the Seeds and Juice

Now the fruit can sit waiting for you at the breakfast table. You can enjoy it like a fruit juice, and the seeds are delicious and a great source of fiber and vitamin C.

IMG_0697

Passion Fruit and Greek Yogurt

My favorite way to enjoy passion fruit is to pour it on my Greek yogurt. This make a perfect breakfast or a snack during the day.

I hope you will enjoy passion fruit as much as I do and find different ways to enjoy it. Please share your experiences.

I Love Thai cooking
Pranee teaches Thai Cooking classes in the Seattle area.
Her website is: I Love Thai cooking.com 
 

Related Photos from Pranee’s Photo Stock

 More photos of passion fruit

Passion Fruit Flower

Passion Fruit Flower in Nicaragua

Passion Fruit and Flowers at different stages

Passion Fruit and Flowers at Different Stages – Nicaragua

Related Link How to Eat Passion Fruit (www.ehow.com)

Read Full Post »

Amazing Fruit

Bael Fruit Tea-

Bael Fruit Tea-ชามะตูม

Bael fruit is not as mysterious as you might think. If you are one of the many people who have never heard of it, this recipe will provide you with a sweet and fragrant opportunity to learn about it. Its history is ancient, having been used long before the advent of Hinduism, and it carries religious significance. The bael fruit trees grow abundantly throughout the Indian subcontinent and southeastern Asia. In Thailand, we know bael fruit – matoom – มะตูม – both as a component of a popular cold drink during the summer, and for its leaves, which are used in religious ceremonies.

The Drink

Dry Bael Fruit มะตูม

มะตูม – Matoom – Bael Fruit aka Bengal Quince

For most Thais, bael fruit is a favorite that is instantly recognizable by its unique, sweet and aromatic flavor. It is also believed to be good for the digestion. Thais use the expression หอมเย็น ชื่นใจ to convey that the cold tea is fragrant, cool and refreshing. To my students it was a pleasantly delightful drink. They were even more surprised when they learned about the bael fruit. Now you can learn how to make hot or cold fruit drink from matoom.

Dry-Sliced Bael Fruit

Dry-Sliced Bael Fruit

Dry sliced bael fruit can be found at the Asian Market or an online grocery store. In a Thailand supermarket you can find matoom drink in a plastic bottle, or as an instant tea powder to which you simply add hot water. But there is nothing like making your own matoom drink.

IMG_3347

8 Pieces Dry Sliced Gael Fruit

In Thailand, a dry sliced matoom is heated over charcoal before making it into a drink. You may also put it in the toaster or place over a gas burner or gas grill. The direct heat will set off its sweet fragrance. In my kitchen in Seattle, I simply place 8 slices of sliced dry bael fruit on a baking sheet and put it under a preheated broiler for 1 minute or more on each side. You will smell a sweet, delightful fragrance.

Add 6 cups water and bring to a boil

Add 6 Cups Water and Bring to a Boil

Then place the slices in a medium sized pot, add 6 cups water, and bring it to a boil. Let it boil on medium heat for 20 to 30 minutes. The sliced bael fruits that remain in the pot will look pale and soft after all their essence is released into the tea.

Bael Fruit Tea - ชา

Bael Fruit Tea – ชามะตูม

Delightful Beverages

During the winter months in Seattle I serve it warm from the teapot just like any other tea. In the summer months in Seattle and Thailand, I love to serve it over ice as a cold drink just like iced tea. It is a very satisfying drink either way. The taste is less sweet than it smells, but it does the trick – I often don’t add any sugar. Serve it at any time and for any occasion. I received a lot of admiration from my students and Thai friends for introducing and reintroducing this drink to them.

Bael Fruit Tea – Cha Matoom – ชามะตูม 

Yield: 4 cups

8 to 10 pieces dry sliced bael fruit

6 cups water

Sugar to taste

Pre-heat the oven on  broil.

Place 8 slices of sliced dry bael fruit on the baking sheet and put under the preheated broiler for 1 minute on each side, until it is fragrant but not burnt. Place the heated bael fruit in a medium size pot and add 6 cups water. Cover.

Bring to a boil then, then continue to cook on medium heat until the tea is a nice brown color, about 15 to 20 minutes. The remaining dry fruit should be pale and soft after all the tea is extracted.

Discard the bael fruit and strain the tea through the fine sieve or cheese cloth. Serve warm like a tea; stir in sugar as desired. For a cold drink, simply pour over ice before serving.

I Love Thai cooking
Pranee teaches Thai Cooking classes in the Seattle area.
Her website is: I Love Thai cooking.com 
 

Related Link

http://matoomherb.blogspot.com/

Bilva or Bael Fruit and Hinduism (astropeep.com)


Read Full Post »

From Jade, to Mantis, to Celadon Green

Pandan Sweet Sticky Rice – ข้าวเหนียวแก้วใบเตย – Kao Neow Kaew Bai Toey

Kao Neow Kaew Bai Toey – Sweet sticky rice, coconut milk and sugar with pandan green color and flavor

Many Southeast Asian cultures have their own stories and culinary love affair with the liquid green of jade, the alluring fragrance of a wild flower, and the sweet, nutty and vanilla taste that comes from pandan leaf or Bai Toey, a member of the screwpine family of plants. I have stories of my own about helping my mom and three aunts prepare dessert each morning in order to supply the villagers’ demands for Thai desserts for breakfast at the local coffee shop. That was a long while ago, but today in Seattle I still practice my culinary heritage by adding this jade green water extract to many foods that I cook. No matter how far people are from their homeland, or how long they have been gone, the Thai culinary tradition of using Bai Toey – ใบเตย – is staying alive among those native to the cuisine. Pandan leaf, or Bai Toey, is known in Vietnam as La Due, and in Malaysia as Kaitha, to mention a few.

Pandan leaves give our kitchens a sweet, alluring fragrance, and the lingering of a sensational taste. Don’t be surprised by its deep green grass aroma when it is in its fresh state. When combined with palm sugar and coconut milk, or when cooked, it leaves behind an amazing taste that can surprise you with the excitement of a new culinary discovery. Fortunately, green pandan leaves are available at a reasonable price, either fresh or frozen, at Asian markets, so there is no need to miss out on this culinary tradition.

Adding green pandan extract to tapioca pearl – coconut pudding

Before you go any further, I hope you have a chance to first read my blog post on  Pandanus leaf – Bai Toey from years ago. It includes a Pandan-Jasmine Tea recipe and will give you an insight into Bai Toey and the ways it imparts its taste, aroma and color into Thai desserts and beyond. For my Thai Street Food series of classes, I prepared enough pandan custard with brioche for myself and the class, and indulged myself for breakfast. But it is not yet time for me to share the pandan custard recipe, nor other uses for the leaves. Today’s post will simply focus on the crucial step of making of green pandan water -น้ำใบเตย – Nam Bai Toey, an essential ingredient in many Thai desserts.

Exotic Green from Southeast Asia

The food photos above and below are from my own collection over the years, mostly from my visits to Thailand. The foods came from street foods venders, coffee shops, or my village market. The green color in all of them is from pandan water. When cooked, the jade green color can change to celadon or mantis green—how deep a green depends on the amount of leaves used.

IMG_0081

Steamed layer rice cake – ขนมชั้น – Khanom Chan

Khanom Chan – Layered steamed rice cake. Its ingredients are rice flour, coconut milk, sugar and green pandan water

pandan custard -สังขยาใบเตย- Sangkaya Bai Toey

Pandan custard -สังขยาใบเตย- Sangkaya Bai Toey

Pandan custard -สังขยาใบเตย- Sangkaya Bai Toey is a traditional custard that is used like a spread or dip.

ปาท่องโก๋ สังขยา

ปาท่องโก๋ สังขยาใบเตย – Chinese Doughnut with Pandan Custard

Pandan custard served for dipping with Chinese doughnuts – pla Tong go – ปาท่องโก๋ – or with cut soft white bread

Pandan Tapioca Pearl Cake - Khanom Saku

Pandan Tapioca Pearl Cake – Khanom Yok Manee – ขนมหยกมณี- Jade Gemstone

Another ancient Thai dessert, Pandan Tapioca Pearl Cake, it’s name is  Jade Gemstone – ขนมหยกมณี  – Khanom Yok Manee

Step by Step: How to Make Pandan Water, น้ำใบเตย – Pandan Extract Recipe

In Seattle, pandan leaf – bai toey – is available fresh or frozen at Asian Markets and comes in a package of six leaves. For green food coloring, I recommend that you use all six leaves and freeze any extra juice—the greener the better. I have been making many Thai desserts the last few months and have been using a lot of pandan leaves. For some desserts, the complete flavor profile is very dependent on the pandan flavor. One of these is sungkaya – Thai custard; I have added my favorite pandan custard – Sungkaya Bai Toey – to my Thai Street Food class.

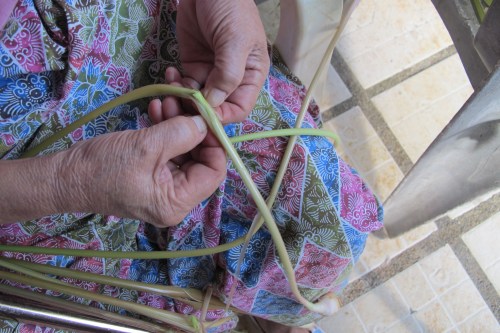
Clean, dry and trim four pandan leaves. Cut each leaf into three pieces, then layer them in a pile.

pandan leaf

Layer all leaves together and cut into thin shreds

Then thinly slice pandan leaves.

IMG_1603

Place in mortar and pound with pestle

Place shredded pandan leaves into a mortar.

pound until it for a paste

Pound until it form a paste

Pound the pandan leaves for about two minutes, until they form a paste.

green pandan water

Stir in water

Stir in 5 tablespoons water.

pandan water

Green pandan water – น้ำใบเตย – Nam Bai Toey

Yields 1/4 cup green pandan water

The pandan water is ready for any recipe that calls for green pandan extract.

Alternative method: Place shredded pandan leaves and 1/4 cup water into a blender and blend for 30 seconds; strain, then discard the pulp.

Tips & Techniques. For a green pandan water concentrate, let the pandan water sit for 15 minutes. About two tablespoons of green concentrate will sit on the bottom. You may use just this portion.

The best way to make pandan water ahead of time or to preserve pandan leaves is to preserve the shredded pandan leaf in water and freeze the water and leaves together; the second best method is to make the green pandan extract and freeze it. When the whole leaves are frozen by themselves, it is easy for them to get a freezer burn or to dry out too quickly and lose their green color. When that happens I use the leaves for tea instead. Please see link below for my Pandan-Jasmine Tea Recipe.

I Love Thai cooking
Pranee teaches Thai Cooking classes in the Seattle area.
Her website is: I Love Thai cooking.com 

Related articles

Read Full Post »

The Umami of Thai Cuisine on Stage

shrimp paste and curry pastes

Shrimp paste and curry pastes

After my last blog post on Southern Thai Red Curry Paste, I realized that this would be an appropriate time to introduce you to an ingredient that is important to making an authentic Thai curry: shrimp paste. In Thailand we call it กะปิ –Kapi. It is the hidden ingredient in most Thai curry pastes, as it is there only in small amounts. Most people can’t detect it, but like fish sauce in Thai soup, it makes a dish rich and robust. A small amount of shrimp paste in the country soup Gaeng Leang makes a good base for a soup, just like dashi does in Japanese soup. Perhaps I will write a blog post at a later time giving you an in-depth look at how shrimp paste is used in Thai cuisine, but for now I will focus on how it is made. Please follow me as I share some firsthand knowledge with you.

At Thai markets you will see big mounds of Kapi; in the supermarket it is packed in plastic tubes. It looks like a muddy, purple-gray paste and has a smell like a powerful blue cheese. The smell may make you pause and wonder why it is so significant to Thai cuisine. Shrimp paste is rich in umami—often referred to as the fifth taste after sweet, sour, bitter and salty. It is often described as savoriness, or “a pleasant brothy or meaty taste with a long lasting, mouthwatering and coating sensation over the tongue.” ((source)) The umami taste is created when the tongue detects components of the compound glutamate, which heightens flavors and creates a sensation of savoriness. The glutamate in fish paste is created by fermentation. Another umami-rich ingredient is Thai fish sauce – น้ำปลา – Nam Pla.

Kapi Nam Prik - กะปิน้ำพริก & Kapi Gaeng - กะปิแกง

Kapi Nam Prik – กะปิน้ำพริก & Kapi Gaeng – กะปิแกง

There are two grades of shrimp paste. The finest quality is for making the Thai Chili Dip กะปิน้ำพริก – Kapi Nam Prik and currently sells for about 150 Baht ($4.75) for a kilogram (a little over 2 pounds). The lower grade, which has a deeper flavor, is for incorporating in curries กะปิแกง – Kapi Gaeng. It costs about 90 Baht ($2.85) for a kilogram. My family always uses the premium grade for all dishes calling for shrimp paste.

กะปิ – Shrimp Paste

kapi shrimp

กุ้งเคย- Goong Koey

Shrimp paste is known in Thailand as กะปิ – Kapi. In my home town and many other parts of Thailand it is called เคย – Koey. It is made of กุ้งเคย – goong koey, a crustacean. In some regions, the shrimp paste is made from opossum shrimp which is in the same class as krill, but in a different order of the crustacean family. Shrimp paste is widely made in southeast Asia, but with different methods of fermentation. These result in different looks and they may be called shrimp paste or shrimp sauce. It also has different names in different countries: Hom Ha in Southern China, Belacan in Malaysia, Ngapi in Burma, Bagoong Alamang in the Philippines, and Terasi in Indonesia, to name a few (source). Nevertheless, the use and purpose of shrimp paste in each cuisine is very similar, and it provides a local a source of calcium, phosphorus and iodine.

Pak Nam Kradae Fishing Village

Pak Nam Kradae Fishing Village – ปากน้ำกะแดะ Kadae estuary

I was fortunate to have a chance to learn about making shrimp paste in the Kadae fishing village community directly from a Kadae fisherman and shrimp paste artisan at ปากน้ำกะแดะ  – Kadae estuary, Kanchanadit, Surathani. The majority of the fishermen and villagers in Kadae are descendants of Chinese immigrants from Hainan Island, China. I had a chance to meet with a few elders and hear fascinating stories of their ancestors.

At  the edge of the river, my brother introduced me to Lung Phumipat, a fisherman, and his wife. (Thais call a respectable man whose age is close to their parents’ ages or older uncle – Lung. A woman of the same age is aunt – Pah). Lung and his wife invited us inside their wooden home. I asked them for permission to take photos and notes on making shrimp paste to share with students and blog readers. They showed and taught us as much as they could. We were very appreciative.

dry salted shrimp paste,

Dry salted shrimp paste,

Lung Phumipat’s customers are typically neighbors or people who have heard about him by word of mouth. He never gets a chance to sell his shrimp paste at the market because people come to his home to get it or pre-order it.

He said his version of shrimp paste is very simple, but there are still many steps to make a good shrimp paste that he can’t leave out. He told me that after rinsing the fresh กุ้งเคย – goong koey or krill, he mixes it with salt and lets it ferment about 24 hours or a little longer. Then he drains it and spreads out the salted กุ้งเคย – goong koey on a blue nylon net and lets it dry in the sun for a few days. The next important step is pounding the salted, sun-dried shrimp into a fine paste.

กะปิ

Learning how to pound the shrimp paste

The pounding is to turn the sun-dried shrimps into a fine paste and to get rid of air pockets in order to avoid spoilage and provide a safe environment for the fermentation. He pounded it until it was creamy and sticky and formed a dense paste. It was a hard work because the stickiness caused resistance when pulling the pestle. When I tried to use the wooden pestle, Lung Phumipat made sure that I stood straight, held the pestle correctly and pounded the paste near the edge. Standing properly makes the whole process more efficient and prevents injury.

The final step is to place all of the shrimp paste in a container or fermentation jar by adding a small layer at a time and pressing hard to prevent air pockets, repeating this until the jar is filled. Then it is covered and left to ferment for at least two to six months.

IMG_0058

Packaged to order

This is where Lung Phumipat and his wife have simplified the process. They pack a half kilogram of the paste into a plastic bag, then roll it back and forth to get rid of air pockets, and form the dense shrimp paste into a cylindrical tube. Because the demand for his shrimp paste is so high, he doesn’t get a chance to let his shrimp paste ferment and it is his customer who lets the shrimp paste ferment on the shelf in their kitchen until it is ready to incorporate into a savory Thai dish. The locals know when the shrimp paste is ready. They can identify it by its distinguishing smell at each stage. I simply wrote a note on mine as to its maturity date. There is no expiration date for shrimp paste, but the best way to keep it is to store it in the fridge or freezer in an air-tight jar until it is gone.

Thank you to uncle Phumipat and his wife for their hospitality and the generosity of their time in educating and sharing their culture and their heritage. The time we were with them at Kradae estuary was memorable.

© 2012  Pranee Khruasanit Halvorsen

I Love Thai cooking
Related articles


Read Full Post »

Love the One You’re With

When you want to cook Thai food outside of Thailand and rare ingredients are missing or their availability is limited, we learn how to make substitutions for critical ingredients. Thus it often transpires that some ingredients in traditional dishes change over time. Green papaya salad – Som Tum – is not acceptable without green papaya, so how do you create this traditional dish when the freshest texture and flavor are important and all you can find is an aging and bitter green papaya? My friend in Switzerland and some Hmong farmers in the Pacific Northwest use sweet, fresh local carrots from their gardens in place of the hard-to-find green papaya. The homesickness for this traditional dish can be cured by the sound of the mortar and pestle and the pungent authenticity of the rest of the ingredients. I never forgot the taste of the Som Tum I ate in Switzerland after being away from Thailand for two months for the first time. Love the one you’re with!

Khmer Chicken Curry with Sorrel

Khmer Chicken Curry with Sorrel

The best and freshest ingredients from our garden can also replace the absent or impossible to find tamarind leaves. This is perhaps what led me to this next local Pacific Northwest ingredient—sorrel—and the discovery of a pattern of substitutions: the similarity of the texture of carrots to that of green papayas, the similarity of the flavor of sorrel leaves to young tamarind leaves, and the similarity of the flavor and texture of green apples to green mangoes. I am not here to change Thai cuisine. These new dishes arenot the same as the old, but the substitution of nostalgia for a traditional culinary love affair.
young tamarind leaves

Young tamarind leaves

My photos from a fresh market in Surathani
Young Tamarind Leaves 
ยอดใบมะขามอ่อน
Yod Bai MaKham Oon
Young tamarind leaves have been used as food in Southeast Asia for a long time. My family and other Thais in my village cook them in vegetable stews like Tom Som and use them to add a sour flavor to coconut milk and non-coconut milk based curry dishes. In addition to having a delightful tangy sour taste, tamarind leaves have a medicinal benefit: they are packed full of vitamin A.
Sorrel

Sorrel – ซอรเรล – Rumex acetosa

Sorrel– ซอรเรล- Rumex acetosa is native to Europe and northern Asia. Only 15 years ago, I discovered cooking with sorrel for the first time. It was at a Thai community kitchen when some elders from Lao and Cambodia brought a fresh sorrel and vegetable condiment. Then my friend Ruth Huffman showed me the sorrel  in her garden. Ruth uses it as a leaf vegetable and culinary herb. Now I have three vegetables in my garden from the Polygonaceae (buck wheat) family: regular sorrel, sorrel ‘raspberry dressing’, and rhubarb. Sorrel is recommended for eating in small quantities because of its oxalic acid content. High levels of oxalic acid, like in the green in rhubarb leaves, can be a poison. In the recipe below,  you can use more Swiss chard if you do not have sorrel and simply add more lime juice as desired. I am staying in town this summer and you will find me posting more Thai recipes made with wholesome local sustainable foods. My summer lifestyle is big on gardening, grilling, and entertaining outdoors.
Khmer Chicken Curry with Sorrel

Khmer Chicken Curry with Sorrel

From left to right, I combine regular sorrel, sorrel ‘raspberry dressing,’ and baby Swiss chard from my garden in this curry.
You can find sorrel and Swiss chard all year long in the Pacific Northwest.

Khmer Chicken Curry with Sorrel leaves

แกงไก่เขมรใบซอรเรล

Gaeng Gai Khmer Bai Sorrel

The delightful taste of Khmer chicken curry with sorrel leaves can make it hard to make the recipe stretch to six servings. This curry is more of a comfort food, reminiscent of vegetable stew, with a hint of citrus curry—rice porridge with a wonderful aroma. It is packed with health benefits from fresh turmeric, galangal, and tamarind or sorrel leaves. The curry is flavorful, but not hot, and the coconut milk is only required to taste. The toasted rice makes the soup rich in texture but light in taste. I enjoy this as a one-dish curry meal with a bit of steamed rice on the side. This recipe tastes best made with fresh Khmer Curry Paste or Phuket Curry Paste.

Serves: 4–6

3 tablespoons canola oil
1 chicken breast or 4 chicken thighs, sliced
5 tablespoons Khmer curry paste 0r 3 tablespoons Phuket Red Curry Paste or 3 tablespoon Thai red curry paste
2 tablespoons fish sauce
1/4  cup to 1/2 cup coconut milk
3 to 5 tablespoons toasted rice powder
2 cups sorrel leaves
2 cups Swiss chard leaves
½ tablespoon lime or tamarind concentrate
1 tablespoon palm sugar, optional
 

Heat a pot with a heavy bottom on medium-high heat, then stir in canola oil, chicken, and Khmer curry paste; cook until fragrant and you see the oil separate out from the remainder of the ingredients. Pour in 1 cup water and let cook on medium heat with the lid on until the chicken is tender, about 10 minutes.

Stir in coconut milk and toasted rice powder and cook for 5 more minutes. Stir in sorrel, Swiss chard leaves, and lime juice and cook for 30 seconds. Serve right away with warm steamed jasmine rice.

 
© 2013  Pranee Khruasanit Halvorsen
I Love Thai cooking
Pranee teaches Thai Cooking classes in the Seattle area.
Her website is: I Love Thai cooking.com 
 
I grow my sorrel in a pot

I grow sorrel, sorrel “raspberry dressing” and Swiss chard in the same pot

Read Full Post »

Garlic Chives, Herb Essentials

In Seattle, it is the re-sprouting of garlic chives from the ground that tells me every year that spring is here. By April, I am enjoying my first harvest of garlic chives. Growing up with a rich Thai-Chinese heritage, garlic chives were always present in my family kitchen. We call it Gui Chai -กุยช่าย. Also known as Chinese chives, allium tuberosum is native to China and Japan, and widespread throughout Southeast Asia. It is one of the many herbs that I enjoy growing in Seattle. It greets early spring every year around April, and in the fall, around September, the leaves die off. In warm climates like Thailand my family enjoys its long, flat green leaves all year round simply by cutting off a clump of chive stalks with a knife run close to the ground; two weeks later it will have grown up again. I can tell you from experience that garlic chives are easy to grow and delightful to have in your garden. A little bit of fresh garlic chives in your cooking will go a long way to providing an essential flavor of Southeast Asia.

Garlic Chives - Kui Chai-กุยช่าย

Garlic Chive – Kui Chai -กุยช่าย

One of my projects last summer was growing garlic chives from local Ed Hume Seeds for this post

Garlic chives are easy to grow from seeds. They like to grow in a cluster,
so I sowed 10 to 15 seeds next to each other.

I love the fact that growing a few clusters of garlic chives inspired me to cook more with them. While waiting for one plant to re-sprout after cutting, I would cut a second one that had completely re-sprouted. The fresher the garlic chives, the sweeter and less pungent they are. They taste more like garlic than regular chives, and not at all like green onions. Don’t reject the pungent aroma of fresh garlic chives—after cooking they have a sweet and complex flavor with a delightful fragrance.

Garlic chives are essential in Southeast Asian cuisine. In Thailand, they are widely used in stir-fries, dumpling fillings, rice pancakes, added to soups, as one stalk in a fresh noodle roll, and, most importantly, they are inseparable from the renowned Phad Thai noodles. But they are important in other cuisines as well. Recently, at Hue Ky Mi Gai restaurant in Seattle, a simple chicken broth with a few strands of garlic chives caught me by surprise. I was amazed at how much the garlic chives in a simple good broth enhanced the food experience of the Vietnamese cuisine.

Classic Garlic Chives Dishes in Thai Cuisine

For this post I will focus on garlic chives and how we use them in dishes, and not talk about possible substitutions. It is the essential flavor from this long, green, flat-leaved herb that completes the taste and gives some classic dishes the flavor profiles that make them stand out in world cuisine.

Phad Thai

Phad Thai at May's Restaurant

Bean sprouts, lime, banana blossom, garlic chives, ground roasted peanuts and chili powder are classic condiments for Phad Thai

Garlic chives play a more important role in Phad Thai than non-Thais could imagine. It is a common fact in Thailand that we use garlic chives for Phad Thai and have done so since Phad Thai’s inception less than a hundred years ago. In a Phad Thai dish there is a balance of sweet, sour, salty and spicy. The incredible flavors of sweet from palm sugar, sour from tamarind, salty from fish sauce and spicy from chili are combined with one more element—bitter from garlic chives. Together they build a complex and memorable flavor profile.

Stir-fried Mung Bean Sprouts and Tofu with Garlic Chives

bean sprout, tofu and garlic chive

Bean sprouts, tofu and garlic chives

Stir-fried Mung Bean Sprouts and Tofu with Garlic Chives – Phad Tao Gua Tao Nge Phuket- ผัดถั่วงอกกับเต้าหู้ภูเก็ต

Mung bean sprouts, tofu and garlic chives are classics for stir-frying. It is amazing to also see these same three ingredients in Phad Thai.

Khanom Gui Chai – ขนมกุยช่าย

garlic chives dumpling

Garlic Chives Dumplings – Khanom Gui Chai – ขนมกุยช่าย

Khanom Gui Chai – ขนมกุยช่าย – is a street food and a snack that is very popular throughout Thailand. My photo above is from the floating market in Thailand where many Thai-Chinese families sells their specialties to locals. Garlic chives are stir-fried with soy sauce for a filling and the dumpling is steamed and fried. Before serving, a little bit of dark and light soy sauce is added as seasoning.

 
© 2012  Pranee Khruasanit Halvorsen
I Love Thai cooking
Pranee teaches Thai Cooking classes in the Seattle area.
Her website is: I Love Thai cooking.com 
 
Follow Me on Pinterest
Related articles

Read Full Post »

Incredible Me

Banana Tender Stems

Banana Tender Stems

Banana Stemsหยวกกล้วย – are considered a vegetable in Thai cuisine.  They are available everyday at wet markets and open-air-markets if you don’t have your own banana tree growing in your backyard or can’t get them from the nearby forest. Actually, the banana tree is not a tree at all. It is a giant herbaceous plant, with large leaves that closely roll up one over the other. Together they look like a trunk, but they are leaves from underground stems and they form only an “apparent trunk. Villagers in Thailand and many countries in South and Southeast Asia consider the tender core of the banana stems, the apparent trunk,  a valuable nutritious vegetable. In Thai we call them, หยวกกล้วย – Yuak Kluey – Banana Stems. Each leaf can be peeled off. As you get closed to the center, you will find the most tender leave.

Banana stem cut crosswise

Banana stem cut crosswise

Banana leaves closely rolled up one over the other. This is a cut from a five-month-old banana apparent trunk. Banana trees usually have about 15 to 20 leaves.

Just like corn is used in the United States for both human and animal food, all parts of the banana plant—leaves, banana, banana skin, and roots—have minerals, vitamins, and fat. Thai farmers feed all parts of the banana to their pigs and farm animals. When I was in high school I had a pair of piglets. On the weekends I chopped down banana stems, cooked them with broken rice, and let them stew into a porridge before feeding them to the pigs. Farmers also mix chopped banana stems with other grasses during dry season for cows, goats and cattle—there are plenty of bananas in Southeast Asia. Banana stems are one-third edible vegetation and two-thirds water, but have a good amount of protein and fat plus minerals and vitamins. They are a good source of fiber, potassium, phosphorus, B6 and calcium, as good as the banana fruit itself. The stems are considered food in everyday cooking in Asia and Southeast Asia.

Banana Tree Trunks

Banana Tree Trunks

On Phuket Island, there are two varieties of bananas that have stems considered excellent for cooking. They are Kluey Nam Wah – กล้วยน้ำว้า – which are similar to apple bananas, and  gluey pa – กล้วยป่า – wild bananas that are best for their delicious stems. In Phuket, it is typical for mountain- and hill-sides to be covered with wild bananas. The best time to harvest quality banana stems for cooking is when they are about 3 to 4 months old, before the tree begins to flower and the core is still tender.

Phuket Tom Som - Phuket Sour Soup with Wild Vegetable

Phuket Tom Som – Phuket Sour Soup with Wild Vegetable

After banana stems are cooked, the texture is juicy, crunchy, and squishy, and the taste is sweet, tart, and bitter, plus their air pockets absorb the flavors of the other ingredients in the dish. I can’t compare the flavor of banana stems with anything else, but I can say that the texture and taste give me the same satisfaction as when I bite into Belgian endive. I would like to encourage you to try banana stems when you have a chance. If I were a banana stem, I would say that I am incredible, and that my taste, texture and nutritional value make me stand out with great personality. The dish that presents me is always memorable because of the incredible me!

Banana Stems

Add sliced banana stems to sweet and sour vegetable soup

One morning last month I found my mom, sister, and sister in-law prepping and cooking together in the kitchen. I immediately grasped my camera and, trying not to interrupt everyone in the middle of the process, I took a snapshot of a real life in my Thai family kitchen. This is a typical vegetable soup of Phuket; it has been part of my mom’s new low fat, low sodium diet since she returned from the hospital. For this post, I will just highlight the banana stems themselves without adding a recipe in order to demystify the ingredients and cutting techniques, and help you to understand the amazing beauty of banana stems in Southern Thai cooking. I was lucky that my family prepared banana stems two ways while I was there, one for soup and another for sour curry. I hope you enjoy a real cooking show from my mom’s kitchen.

Step-by-Step How to Prepare Banana Stems for Soup

discard the tough outer layer of banana stem

Discard the tough outer layer of the banana stem

After purchasing the banana stems from the market, my mom removed the tough outer layer to get to the tender part.

Preparing banana stems for making the soup

Preparing banana stems for making soup

Preparing banana stems for making the soup

Preparing banana stems for making soup

Use your  index finger to remove the soft fiber strand or stringing.

soak sliced banana stem in cold salted water or lime water

Soak sliced banana stems in cold salted water or in lime water

Soak sliced banana stem in a cold salted water or lime water for a short or long period of time, then it is ready to incorporate into a soup or stew.

Step-by-Step How to Prepare Banana Stems for Curry

Cut into one a half inch pieces

Cut into one and a half-inch pieces

Cut into pieces about one and a half-inches in length.

Cut Banana Stem in four pieces

Cut banana stem in four pieces

Then cut each piece lengthwise into four pieces as shown in the photo above.

banana stems

Soak cut banana stems in cold salted water or lime water

Keep the stems fresh and prevent browning by putting them in cold water with salt or lime juice, about 1 teaspoon salt or the juice of 1/2 lime for 4 cups water.

Sour Curry with Fish and Banana Stem

Gaeng Som Pla Yuak Kleuy – Sour Curry with Fish and Banana Stems

My sister cooked  Gaeng Som Pla Yuak Kluey, Sour Curry with Fish and Banana Stems.

Tips and Techniques for Cooking with Banana Stems

After you learn how to prepare the banana stems step-by-step, now you need to encourage yourself to incorporate banana stems into these incredible dishes. Here are my favorites: Phuket Tom Som (Phuket Sweet and Sour Vegetable Soup Recipe), Gaeng Som Moo Sam Chan (Surathani Pork Belly Sour Curry), Gaeng Yuak (Northern Thai Curry with Chicken, Gaeng Kati Gai (Thai curry Chicken with Coconut Milk). I would also not hesitate to try them in Tom Kha Gai.

Buying and storing. Buy the freshest banana stems and cook within a day; with exposure to light and air they will keep growing and get tougher. One can store them in the refrigerator for a day or two, but I prefer to cook them as soon as I can to enjoy the best taste. The cooking time for banana stems is about 3 to 5 minutes. Keep them soaked in cold water with salt and lime juice until you are ready to cook.

 
© 2012  Pranee Khruasanit Halvorsen
I Love Thai cooking
Pranee teaches Thai Cooking classes in the Seattle area.
Her website is: I Love Thai cooking.com 

Read Full Post »

Eat Like a Local

Everyone in my Thai family was born and lives in Phuket, as we have for many generations. This is also true for many of Phuket’s over 200,000 natives, though there are about one million people living on Phuket Island today. Despite all of the changes, one place remains almost timeless. This is Rawai Beach, where the pace of change is slow compared to other parts of Phuket. So where do Phuket natives escape to on the weekend? Rawai Beach – หาดราไวย์.

Rawai Beach – Thailand

There we dine on seafood as we did for many generations before there were so many foreign influences, enjoying a typical menu of grill seafood or blanched cockers with Phuket seafood dipping sauce. In my next post I will show you exactly what we ordered the last time I was at Rawai Beach with my family, and how we ate it. This may help you understand our cuisine and culture. I hope you will enjoy my personal story of how my family eats and travels. When you get a chance to visit Phuket, I hope that you, too, will have a chance to eat like a local.

Talay-Zep Seafood & Wine Restaurant

ร้านอาหารทะเลแซ่บ ชายหาดราไวย์

Rawai Beach Phuket Thailand

Each visit I make to Phuket provides fun reunion time with my family. Almost every weekend during my short visits we bond over food, whether it is fresh home cooking, or take-out from Talad nad – ตลาดนัด  or nearby restaurants. Sometimes my family and I will take a little adventure travel to another end of the island or to the nearby province of Phang Nga. This trip my sister-in-law and I had a desire for seafood Phuket style. As always, we visited Talay-Zep restaurant, the scene of countless of our reunion dinners.

Talay-Zep Seafood Restaurant in Rawai, Phuket Island

ร้านอาหารทะเลแซ่บ ชายหาดราไวย์

My friend Kularb -กุหลาบ – and her husband Pho – โปั – own Talay-Zep Seafood and Wine Restaurant, which is on Rawai Beach Road among 15 other Phuket seafood restaurants. We enjoyed a big seafood feast, which I will share with you in my next post. Today, however, I will share just my family’s favorite dish: Horseshoe Crab Salad with Mango. Just like Anthony Bourdain, most of my family consider this a delicacy dish—though I myself was not convinced to eat these eggs, which are the only edible part of the crab. In fact, the horseshoe crab is not a crab at all, and it does not have edible flesh like other crabs. It is more closely related to spiders and scorpions, a living fossil that has remained virtually unchanged for millions of years. But now, after doing some research, I have learned more about the risks involved in eating horseshoe crab eggs, and how to avoid them, so I may take one bite the next time around.

Talay-Zep Seafood and Wine on Rawai Beach

Talay-Zep Seafood and Wine on Rawai Beach

Kularb, Pranee and Pho

Nevertheless, I asked Kularb to share her knowledge of horseshoe crab eggs and her verbal recipe with you. Today I am not encouraging you to cook, but to read and learn about something you may never have heard of before: Horseshoe Crab Egg Salad – Yum Khai Mengda Talay – ไข่แมงดาทะเล.

Horseshoe Crab – แมงดาทะเล

Kularb’s notes on how to prepare horseshoe crab for its eggs

Horseshoe crab is not difficult to cook, but  the person who removes the eggs—or roe—from the horseshoe crab must know the correct procedures to do this to prevent the other inedible parts of the crab from contaminating the eggs. If the eggs get contaminated, you can fall sick with dizziness or the symptoms of food poisoning and complications of the digestive system. Kularb suggests that you only harvest the eggs from cooked horseshoe crabs. The eggs, which are found in the belly area, can be green or orange-colored, about the same size as salmon roe but with a firmer, crunchy texture and an interesting flavor.

There are two ways to prepare horseshoe crabs before removing the eggs. One way is to place the whole horseshoe crab in boiling water and cook it until the eggs are just cooked. Another way is to place the horseshoe crab on the grill until the eggs have cooked, about 5 minutes. Kularb notes that it is a very difficult task to remove the eggs from the shell and that it requires a skilled cook to prepare the eggs. She or her husband prepares the horseshoe crab eggs for her restaurant.

Horseshoe Crab Egg Salad

Yum Kai Meng Da

ยำไข่แมงดาทะเล

Yum Kai Meng Da is the only way that Thais usually prepare horseshoe crab eggs. Kularb’s verbal recipe is the same as my green mango salad recipe so I hope you enjoy this recipe even beyond the horseshoe crab egg salad. For everyone to enjoy this salad without the risk, I have created a Mock Horseshoe Crab Egg Salad, which can be prepared substituting Israeli couscous cooked al dente with a touch of fish sauce in place of the crab eggs. With the mock salad recipe there is nothing to worry about—just enjoy the delicious salad! You may use horseshoe crab eggs if desired, but do so at your own risk and with an awareness of the risks involved.

Horseshoe Crab Eggs Salad

Serves: 4

 1/2 cup cooked horseshoe crab eggs (see Kularb’s note), or Isreali couscous cooked al dente
2 tablespoons fish sauce
3 tablespoons lime juice, about 1 large lime
1 1/2 tablespoons palm sugar
2  fresh Thai chillies, chopped, or 1 teaspoon chili powder
2 tablespoons sliced shallot
1 cup shredded green mango, from about 1/2 green mango (or substitute a granny smith apple for the green mango)
1/4 cup Chinese celery, cut into 1 inch lengths
1/4 cup cashew nuts, chopped
2 lettuce leaves

Cook horseshoe crab eggs according to Kularb’s instruction and set aside.

To make the salad dressing, stir fish sauce, lime juice, palm sugar and chili powder together in a large bowl. Stir well until the palm sugar is dissolved. Then stir in Israel couscous or horseshoe crab eggs, shallot, green mango, Chinese celery, and cashew nuts until well combined.

Place lettuce leaves on the serving plate and top with salad mixture. Serve right away.

© 2013  Pranee Khruasanit Halvorsen
I Love Thai cooking
Pranee teaches Thai Cooking classes in the Seattle area.
Her website is: I Love Thai cooking.com 
 

Should You Eat Horseshoe Crab Egg? 

“Although many experts and doctors would suggest staying clear of consuming horseshoe crab it is quite possible to eat them on a regular basis. It is important to ensure that the person preparing the delicacy is familiar with the correct procedure as otherwise it is possible to fall sick if you were to consume the wrong parts or organs. Today it is a species that is becoming more common in seafood restaurants tanks not just in south Asia but around the world.” from Crableghowtocook.com

Read Full Post »

Quail Eggs, Please

ไข่นกกระทาครับ

Quail Egg - ไข่นกกระทา

Quail Egg – ไข่นกกระทา – Khai Nok Krata

When I was in Phuket last month, on my way to Talad nad – ตลาดนัด – an open air market, my friend’s son asked me to get him some hard-boiled quail eggs please: “Khai Nok Krata Krub” -ไข่นกกระทาครับ. He said it with such expectation, his simple request tickled my fond memory of this petite egg. I loved quail eggs when I was young, just like any Thai kid. On my way back from the Talad Nad, I gave him a bag of a dozen hard-boiled quail eggs. I was glad to find them, afraid that if I had not he might be disappointed. He rolled the egg on the table until its thin shell cracked all around, then pinched the shell to break it and remove it. He popped the whole egg in his mouth with delight. It is a healthy choice for a snack. I could not help but taste one myself when he asked to share with me. I enjoyed the delicious egg with its rich, creamy, mouthful of flavor. Welcome home!

Cook and learn

Cook and learn

Quail eggs are usually served in one of two basic ways: as a 3- to 4-minute hard-boiled egg, or as a sunny side up fried egg. And now you are about to learn to fry quail eggs Thai style. Please enjoy the photos showing a Thai cooking style from a southern Thai fishing village. They are from my trip to Surat Thani in 2011. This technique has a special name: “Khanom Krok Khai Nok Krata” – fried quail eggs in a Khanom Krok Pan, which is similar to a pancake puff or aebleskiver pan. This group of friends was preparing their own healthy snacks on the weekend from chicken eggs and quail eggs in a Khanom Krok pan. They were teaching and learning from each other. I hope this will inspire you to try it at home.

Quail egg cook in Khanom Krok Pan

Quail eggs cook in Khanom Krok Pan

Fried Quail Egg Thai Style

Khanom Krok Khai Nok Krata

ขนมครกไข่นกกระทา

Fried Quai eggs in Khanom Krok pan or ebleskiver

Fried quail eggs in Khanom Krok or aebleskiver pan.

Quail eggs are a delicacy in Western Europe and North America, but in Southeast Asia, quail eggs are abundant and inexpensive. At Talad Nad wet market, you can find fresh quail eggs at the egg vendors, and at the snack vendor you will often find fried or hard-boiled quail eggs ready for you to enjoy. In the Seattle area, fresh quail eggs are available at Asian markets such as Viet Wah or Uwajimaya for $2 a dozen. You can also find them at the Pike Place Market Creamery where a package of 1o eggs from California are $4.75. At University Seafood and Poultry, Washington quail eggs are $6.98 for a pack of 10 eggs.

Yield 10

1 tablespoon cooking oil
10 quail eggs
Maggi sauce and Sriracha sauce

Heat a Khanom Krok pan or Ebleskiver pan on medium-high heat. Use a heat-proof pastry brush to brush the pan with a generous amount of oil. When the pan is hot, crack quail eggs and drop one egg into each hemispherical indentation. Let it cook until the bottom of the egg is crispy, the egg white is cooked, and the egg york is slightly cooked, about 3 minutes. Cook longer if you wish the yolk cooked more. Remove the egg with a metal spoon that fits the size of the indentation. Repeat the cooking until all the eggs are done. Serve with Maggi or Sriracha sauce; use one or two drops of each per egg.

Pranee’s note:  In some cultures, slightly raw quail eggs are preferred. These basic fried quail eggs can be a snack, or incorporated into a fried egg salad, or a side dish to a meal.

© 2013  Pranee Khruasanit Halvorsen
I Love Thai cooking
Pranee teaches Thai Cooking classes in the Seattle area.
Her website is: I Love Thai cooking.com 
 
Follow Me on Pinterest

Read Full Post »

Oops! Excuse Me – ขอโทษค่ะ

What is considered good or bad manners can change when you take cultural differences into consideration. A slurping sound, for example, is acceptable in Southeast Asia when you are enjoying a food moment with your soup. My sister and I encountered an awkward experience at the dining table when we visited Kho Samui, an island off the east coast of the Kra Isthmus in Thailand. Later, though, it all made sense to us. Since November is a national peppercorn month, please let me tell you a story of my Thai family trip to Koh Samui and our discovery of Thai Green Peppercorn Dip – Nam Prik Prik Thai Sod – น้ำพริกพริกไทยสด

Samaui sunset

In 2011, on the day after Chinese New Year, my brother drove his pick-up truck with three passengers – my sister, sister-in-law and I — to Samui Island, or Koh Samui. We left Phuket before the sunrise around 5am and arrived at Koh Samui at sunset. We went to Nathon, the island’s main town, and stayed at the  Grand Sea View Resortel. A friendly staff person who was native to the island recommended that we dine at the hotel restaurant, which had a set menu of local Koh Samui cuisine. While we enjoyed the sun setting right in front of us, we feasted on six dishes that highlighted Koh Samuicuisine: Pork & Mackerel with Pickled Mustard Green Soup, Green Peppercorn Chili Dip, Stir Fried Sweet Pork with Soy Sauce, Grilled Tuna in Red Curry with Cumin Leaves, and Stir Fried Glass Noodle with Green Papaya and Minced Pork. Though we are southerners from the other side of the peninsula, we discovered that our southern cuisines are prepared in much the same ways, though with a different combination of ingredients.

Koh Samui – Green Peppercorn Chili Dip

We lingered over our dinners. The sunset was beautiful, though the air was still with a high humidity we could feel. Half way into the meal, while my sister and I talked about the unique green peppercorns chili dip, we both began to experience many light small burps that continued randomly throughout the rest of the meal. Finally we looked at each other and laughed. Suddenly I could not feel the humidity any more, just a refreshing cool air conditioning on my skin where there was sweat. It felt like a little fan was blowing air near my skin. We realized that the chili dip was total genius! This may be the answer to why people eat such spicy foods in hot and humid climates—spicy foods provide an instant remedy. They help you acclimate to the weather, they aid digestion, and they act as a diuretic. I think this will be a good recipe to share with you during the holiday seasons because black or green peppercorns are a natural food that you can use instead of Pepto Bismol to help your digestion. Oops! Excuse me. –  ขอโทษค่ะ

Green peppercorns – piper nigrum – perennial vine

Green Peppercorn พริกไทยสด

Green peppercorns are widely used in Thai, French and Western European cuisines. In Thailand, you can find fresh green peppercorn everyday in wet markets and as a staple ingredient in Thai restaurants. They are very aromatic, fresh tasting, and have a mild flavor of black pepper. Though you can use green peppercorns in the place of black peppercorns in Western cooking, that is not a practice in Thai cuisine, where green peppercorns have their own place and they define such dishes such as Phad Cha, Klue GlingPhad Ped, Green Curry, and any stir-fry that has curry paste or pungent herbs as a component. Green peppercorns create a playful flavor in all of these dishes, which generally have a rustic Thai style of cooking. In-depth Thai cuisine  is a healthy cuisine. Our ancestors cleverly disguised spices and herbs in our foods to accentuate and distinguish the flavors, but as we eat and enjoy the tastes, we are also taking in a healthy  benefit for our bodies. As for green peppercorns, the instant benefit is to promote appetite and aid digestion, and to serve as a diuretic to promote body sweat.

Fresh Green Peppercorn Dip – Recipe from Samui

The executive chef at Grand Sea View Resotel gave us a lesson on Samui local cuisine the following day. If you visit Koh Samui, please call ahead to arrange a time. The restaurant doesn’t have a regular schedule, but is available on request.

Green peppercorn, garlic and Thai chili

 I improvised with what we have here in Seattle: dry green peppercorns, garlic and Thai chili.

Thai Green Peppercorn Dip

Now the dip is ready for the dining table.

I use it as a condiment to add extra flavor to Thai and non-Thai dishes or to aid digestion.

Green Peppercorn Chili Dip

Nam Prik Prik Thai Sod

น้ำพริกพริกไทยสด

Yield: 2 tablespoons

This recipe is inspired by Samui green peppercorn chili dip – Grand Sea View Resotel, Kho Samui, Thailand

Since I remade this dish at home, I enjoy it often. Not always as a chili dip like in Thailand, but often as a condiment like salt and pepper. When I prepare a Thai meal, I use shrimp paste in place of the sea salt I would use in a western dish. Simply treat this green peppercorn chili dip as a new way you can use anytime to serve salt and pepper to your family and friends—especially during the holiday season when a seasoning can be a home remedy to aid the digestion of a large meal. No need for Pepto Bismol!

1 tablespoon fresh, dry or frozen green peppercorns
1 fresh Thai chili
1 clove garlic
1/2 teaspoon sea salt or shrimp paste

In a mortar with pestle, pound green peppercorns until they form a fine paste. Then add Thai chili, garlic and sea salt or shrimp paste and pound until the mixture blends into a paste. Place in a small bowl and set on the table with a small spoon to use it as a condiment to rice or a main dish.

Grand Sea View Resotel

175/4 Moo 3, Angthong, Koh Samui,
Surathani 84140, Thailand

Website: http://www.grandseaviewbeachresotel.com/

Tel. +66 (0) 77 421481, 426152-3, 426058-9
Fax : +66 (0) 77 426061

I Love Thai cooking
Pranee teaches Thai Cooking classes in the Seattle area.
Her website is: I Love Thai cooking.com 

Read Full Post »

How to Cook Peeled Split Mung Beans

Any time you come across Thai or Asian recipes that require cooked peeled split mung beans, you will find that you need to stop and learn about mung beans before you can proceed any further. Therefore I decided to do this blog post with step-by-step instructions that will simplify and demystify the process. This will make rest of the recipe less daunting and you will be able to make it with ease.

This is a technique that my mom and villagers use to prepare split mung beans before cooking them into sweet and savory dishes. Please prepare more than you need so you can keep some in the freezer for your convenience the next time you need them.

split muang bean

Peeled split mung beans are available in plastic bags at Asian grocery stores or online stores. They keep for a long time on the shelf, so I always make sure to have at least one bag on hand. They are made from mung beans that have been hulled, or peeled and split. Thai cooks always purchase them in the peeled and split form. Peeled split mung beans are one of the staple ingredients of the Indian subcontinent, Southeast Asian, and neighboring countries, and they are available in all Asian markets.

Step-By-Step Instructions for Cooking Peeled Split Mung Beans

Split mung bean soaking in water

Remove any dirt, sticks or debris that may come in the package, then place the split mung beans in a large bowl. Add water to cover at least 3 inches above the top of the beans. Let stand for at least 2 hours, or for the best results, overnight.

Split mung bean in a steamer

Strain the water from the beans then place them in the steamer with 2 inches of water in the bottom of the pot.

Steamed split mung beans

Cover the steamer and bring the water to a boil. Reduce the heat and steam on medium-high heat for at least 30 minutes. Check the texture of the beans. They should hold their shape, but when squeezed between the fingers they should have a soft texture. They can be creamy, but not grainy. If needed, steam longer until you get the fine result. When the beans are cool they are ready to place in a freezer bag and freeze, or prepare them according to your recipe.

Steamed Peeled Split Mung Beans

Tua Keow Lawh Puak Nuang

ถั่วเขียวเลาะเปลือกนึ่ง

Here is the first step for you to learn to prepare steamed, peeled, split neans, the basis of many sweet and savory recipes. You will be able to refer back to this recipe often. My favorite recipes with peeled split mung beans that I cooked often when I was in Thailand include Met Khanon (mock jackfruit dessert), Tao Suan (mung bean pudding), and Tua Pap (mock bean pods). There are many more ways to enjoy cooking with cooked split mung beans as well.

Yield: 2 1/2 cups

1 cup peeled split mung beans

Remove any dirt, sticks or debris from your package of mung beans, then place them in a large bowl. Add water to cover to at least 3 inches above the top of the beans. Let soak for at least 2 hours, or for the best results, let the beans and water sit overnight.

Strain. After soaking, 1 cup peeled split mung bean yields 1½ cups. Place mung beans on the steamer with 2 inches of water in the bottom of the pot.

Cover the steamer and bring the water to a boil. Reduce the heat and steam on medium-high for 30 to 60 minutes. Check the texture of the peeled split mung beans. They should hold their shape, but have a soft texture when squeezed between your fingers. They should be creamy, but not grainy. If needed,steam longer until the beans have the desired fine texture. Remove from heat.

When the beans are cool, they are ready to be placed in a freezer bag and frozen, or to use to prepare your intended recipe. After steaming, this recipe yields 2 ½ cups cooked mung beans.

© 2012 Pranee Khruasanit Halvorsen

I Love Thai cooking

Pranee teaches Thai Cooking classes in the Seattle area.

Her website is: I Love Thai cooking.com 

Read Full Post »

Blue & Purple 

Dok Anchan – Butterfly Pea – Clitoria ternatea

What is that flower behind your ear? นั้นดอกอะไรอยู่หลังใบหูของคุณ. In a Thai village, the answer might be that it is a jasmine, hibiscus or butterfly pea flower. You often see women or men in Thai villages wearing flowers behind their ears on special occasions. For me personally, my answer would be that it is a blue butterfly pea flower.

In addition to wearing a blue butterfly pea flower – ดอกอัญชัน (dok anchan) or Clitoria ternatea – behind my ear while working in my garden, I would like to introduce you to its properties as a Thai culinary flower. Butterfly pea is an annual vine that is native to the land in southeast Asia near the equator. Thais love dok anchan for it beautiful unique looks and for its culinary uses as a food coloring and as an edible flower. My friend Somrak uses dok anchan in her Thai cooking at home, shredding it into a fine ribbon and adding it to rice salad, or for making a tea, or adding blue color extract to steamed jasmine rice. Many hotels in Thailand greet guests with a welcome drink made from dok anchan. But above and beyond all of these uses, our ancestors recognized it for its medicinal benefits, which include its anti-depression, anti-inflammatory, and anti-cancer properties. The blue concentrate added to hair products also promotes healthy hair growth (please see related links below).

In Thailand I grew butterfly pea plants on a trellis, but often enjoyed the harvest from friends’ gardens. In the Thai village lifestyle in the old days we shared or exchanged our surpluses with one another. The vines can produce many flowers a day, so often they went unused. This meant that at any  moment there were always flowers waiting for you in someone’s garden and we helped ourselves when needed. The pigment in the flowers comes from anthocyanins, and has long been widely used in Thai and Malaysian cuisines for blue or purple food coloring for butterfly pea sticky rice. In Thailand, any foods prepared with shades of blue, purple or pink come from dok anchan. In addition, southeast Asia uses the flowers in traditional Ayurvedic medicine.

Double pedals butterfly pea flower

Where can you get dried butterfly pea flowers? In the U.S. you can mail-order homegrown organic air-dried butterfly pea flowers from Etsy.com and Alibaba.com. If you wish to plant them next summer for your backyard vine, this may be the right time to purchase them. Check online for a few sources where you can purchase butterfly pea seedsThompson & Morgan has the seeds for Butterfly Pea Fabaceae

Thai desert with dok anchan blue color

Khanom Chan – ขนมชั้น – Thai one-layer cake with anchan flower food coloring gets pale purple when cooked.

Thai snack, a dumpling with purple rice flour dough

Chaw Muang – ช่อม่วง, steamed dumpling, a famous Thai appetizer ใช้สีทำขนมช่อม่วง, ขนมดอกอัญชัญ


Chaw Mueng – purple dough and filling

Chaw Muang is a traditional Thai snack that can have a sweet or savory filling. After preparing a butterfly pea purple water infusion, the water is added to the dough according to the amount required in the recipe.

Step-By-Step Instructions for Making Blue and Purple Butterfly Pea Color Extracts

ขั้นตอนการทำน้ำดอกอัญชัญผสีฟ้าและสีม่วง

Blue color from dried butterfly pea flowers

Nam dok anchan (น้ำดอกอัญชัน)

First, steep 12 dried or fresh butterfly flowers in 1 cup boiling water.

Dried butterfly peas after 15 minutes of soaking in boiling water

Fifteen minutes later, or when no color is left in the petal, strain the liquid and discard the flowers. You will get deep blue water.

Fifteen minutes later, deep blue color is ready to use as blue food coloring.

Add a little lime juice to get a purple-red color

Add a few drops of lime juice. This will change the ph level and you will get purple water.

Pranee’s Tom Yum Martini with Butterfly Pea Coloring

I made butterfly pea simple syrup a day before my dinner party in order to make my signature Tom Yum Martini. A friend requests that I make them each year when I visit home.

I Love Thai cooking
Pranee teaches Thai Cooking classes in the Seattle area.
Her website is: I Love Thai cooking.com  

Read Full Post »

Add Zing to Your Limeade

Ginger Limeade

During August I try to slow down my summer activities and I enjoy staying home and working in the garden. After a hard-working day in the yard, I reward myself with a homemade ginger limeade. This recipe is used often in summer cooking classes for kids. This week it worked out perfectly for me to test the recipe one more time before sharing it with you and savor the results at the end my gardening day. I planned ahead to have the  freshest limes and ginger on hand, then I made the limeade in the morning so all the flavors would have a chance to blend and chill to the highest delight.

Lime – มะนาว

Thai cuisine depends on lime flavor. It is in almost in every dish. One should always have at least half a dozen limes on hand.

น้ำเชื่อมขิง – Ginger Simple Syrup

Crush the ginger until juicy and softened before adding it to the pot of sugar and water.

Ginger Limeade

Nam Manoa Khing

น้ำมะนาวขิง

Before you put together the ingredients to make ginger limeade, I would like you to follow closely my culinary insight on how to make ginger infused simple syrup. I didn’t make this technique up, it has been in my family for a long time. Infused fresh ginger provides a different flavor than dry powdered ginger or the fried ginger used in savory dishes. Crushing the ginger until the juice comes out helps break down the ginger’s cell walls. Thais use smashed ginger in a simple syrup for many dessert dishes. The aroma and taste of fresh ginger syrup is the first entry to sweet dishes such as Bua Loi Nam Khing (glutinous rice ball in sweet ginger syrup). I add ginger syrup to my limeade for a refreshing drink to enjoy in the hot summer or with a Thai meal.

Serves: 6

4 cups hot water
6 (1-inch) ginger pieces, peeled and smashed, about 3 ounces or 86 gram
1 cup brown sugar
3/4 to 1 cup lime juice, from 4 to 6  limes
10  slices of  limes, from one lime, for garnish
6 cups ice cubes

To make the brown sugar-ginger syrup, bring water, ginger and sugar to a boil in a medium-size pot. Let it boil on medium heat for 15 – 20 minutes. Remove ginger and strain. After it has cooled to room temperature, stir in lime juice.

Set aside enough lime slices for six glasses of limeade, then add remaining lime slices to a nice pitcher and pour in the limeade mix. Chill overnight, or for at least 6 hours. Before serving, add 2 cups ice cubes to the pitcher and stir. Fill six tall glasses with ice cubes and garnish each with a lime slice before adding the limeade.

Pranee’s note: 

To peel or not to peel? Peeling ginger is a personal option. I prefer to just peel off any tough skin or bruised parts. Ginger is abundant in Thailand. It is reasonably priced and I always had some at home, fresh and in the freezer.

© 2012 Pranee Khruasanit Halvorsen
I Love Thai cooking 
 Pranee teaches Thai Cooking classes in the Seattle area. Her website is: I Love Thai cooking.com .
Follow Me on Pinterest

Read Full Post »

Older Posts »