Feeds:
Posts
Comments

Posts Tagged ‘Coconut’

Are Winter Squash Leaves Edible?

I enjoyed the Seattle sun last Wednesday at the Columbia City Farmers Market along with the delicious food from the stalls. I purchased a few fresh vegetables from various farmers and, like always, a bunch of winter squash leaves from a Hmong farmer’s stall. This time the squash leaves prompted me to cook and share with you a recipe from my Thai kitchen: how to cook winter squash leaves –Yod Namtao – ยอดน้ำเต้า.

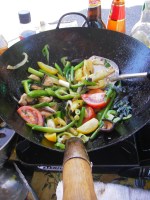
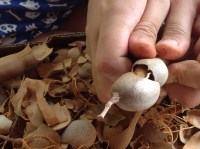
Winter squash leaves are edible. In fact, all parts of squash family plants are edible, from leaves to stems, flowers, fruit, skin and seeds. The young leaves and stems are shown in the photos above and below. These edible greens become available when a farmer cuts back the leaves on a plant in order to encourage it to produce fewer but larger fruits. Winter squash leaves are popular in rustic-style cooking in Southeast Asia and they are great sources of fiber and other nutritional benefits.

Winter Squash Leaves and Blossoms - my visit to Hoi An Market 2009

Though they may feel a little rough to the touch, the young leaves from winter squash have amazing flavors when cooked. They have a  spinach-like texture, but are richer and denser with a bite to it in flavor. Like any leafy green vegetable, you can stir-fry, steam or stew them. In my kitchen, I either blanch them in salted coconut milk or saute them with butter, then add water and chicken stock and cook them down until the leaves are softened but not mushy, about 5 minutes. Last year I made a winter melon leaves stew with dried fish and shallots using a Hmong farmer’s verbal recipe. It was similar to my Watermelon Rind Soup and made a delicious vegetable stew.           

Winter squash leaves are only available in the summer and only at the Hmong farmers’ stalls. Because of this limitation, I never fail to purchase a bunch of winter squash leaves each visit to the market. Supporting the Hmong farmers also helps me to ensure that there will be a continuing supply due to the demand. When you get a chance, please pick up some winter squash leaves at a Seattle Farmer Markets near you and give them a try.

This slideshow requires JavaScript.

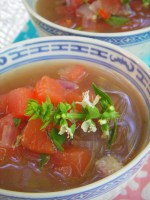
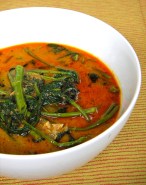
Winter Squash Leaves Boiled in Salted Coconut Milk

Yod Namtao Luak Kati

ยอดน้ำเต้าลวกกะทิ

Winter Squash Leaves in Salted Coconut Milk

One bunch of winter squash leaves weighs about a pound. After removing all of the twine holding them together and the hard stems, the soft edible part weighs about six ounces; the rest goes into a compost. If I have time, I use a peeler to remove the rough skin on the stems then cook the stems down until they are soft, about 8 minutes.

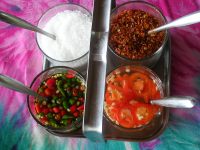
There are many ways to prepare winter squash leaves, but blanching or boiling them in salted coconut milk produces my favorite quick and easy side dish. This same method can also be used with many other leafy green vegetables, which can then be served with Thai Chili Dip. You will be surprised how the flavor of winter squash leaves and leafy green vegetables are complimented by just a little coconut milk and salt.

 
Serves: 4
Cooking Time: 5 minutes
 
6 ounces winter squash leaves (see preparation above)
1/4 cup coconut milk
1 cup water
1/2 teaspoon plus 2 pinches salt

Bring coconut milk, water and salt to a boil on medium-high heat. Then add the squash leaves, using tongs to turn them around to make sure they are all cooked in the liquid—like blanching the leaves in a coconut broth. Cook from 3 to 5 minutes until the greens reach your desired degree of tenderness. Serve with the broth as a side dish, or with warm jasmine rice as a main dish.

© 2011 Pranee Khruasanit Halvorsen  
I Love Thai cooking 
 Pranee teaches Thai Cooking classes in the Seattle area. Her website is: I Love Thai cooking.com . 

Related articles

Read Full Post »

Drink Me

It has been exactly a week since I returned from Thailand and I am still trying to catch up with our Seattle summer. My friends have all assured me that I didn’t miss much during the past month as we are still having the same cold weather we had in June. This July, Seattle hit the record lowest temperature for summer, so all I really need to catch up on is eating the plentiful seasonal fruits and vegetables from the local farmers markets and nearby towns.  

Hami Melon

During my first grocery shopping back here in Seattle, my cart was full with all sorts of berries. And then my eye caught on a good-looking melon that I haven’t tried: Hami melon. It is grown in California and available from mid-May to July and from September to December. I let it ripen at home for a few days and its sweet aroma was inviting me to taste it. The sweet scent reminds me of the Thai long muskmelon that I used to grow a long time ago in my organic garden in Phuket—it grew abundantly despite my lack of knowledge and farming experience.

Hami Melon

Hami melon is a type of muskmelon, a Chinese melon variety. A good one can taste sweeter and have a higher sugar content than most other varieties of melon. I decided to make a smoothie with coconut milk to duplicate Taeng Thai Kati, a famous Thai muskmelon dessert made with coconut milk, but we will drink ours instead of eating it. I kept the flavor profile and the amounts of ingredients the same as in Taeng Thai Kati, but added a generous amount of crushed ice and simple syrup to turn it into a nice cold smoothie. I used only one-third cup coconut milk in my recipe, a perfect amount to make a smoothie, a healthy summer drink. But if you are looking for a nice milkshake-like drink and dessert combo, add a scoop or two of coconut ice cream; it would taste heavenly. When a sweet flavor is needed, honey or palm sugar simple syrup are good choices to add a dimension of sweetness and aroma.

Coconut Melon Smoothie

Stock up on a few cans of coconut milk, then anytime the sweet floral scents of melon invite you, all you have to do is prepare this recipe. Hami melon is hard to resist, especially when it is combined with alluring fresh coconut milk. Drink me.

Coconut Melon Smoothie

Nam Kati Taeng Thai Smoothie

น้ำกะทิแตงไทยสมูทตี้

Serves: 2 to 4

Yield: 3 cups

16 ounces (see note) diced Hami melon, seeded, peeled and diced, or substitute honey-dew melon
⅓ cup coconut milk or coconut ice cream, more as desired
1½ cups crushed ice
2 tablespoons palm sugar simple syrup, optional (see note)
pinch of salt

Place melon, coconut milk, ice, sugar and salt in the blender and blend until smooth. Pour into a tall glass and serve right away with a straw.

Pranee’s Note

A 4-pound Hami melon (medium size), seeded, peeled and diced will yield about 2 pounds of diced melon.
 
To make palm sugar simple syrup, place a disc of palm sugar (about 4 tablespoons) and about ¼ cup water in a saucepan.
Bring to a boil and cook on medium heat for 5 minutes. Cool and chill. Keeps in the refrigerator for up to a week.   Yield: ¼ cup.
 
© 2011 Pranee Khruasanit Halvorsen  
I Love Thai cooking 
 Pranee teaches Thai Cooking classes in the Seattle area. Her website is: I Love Thai cooking.com .

Read Full Post »

Chasing the Monkey Tails

Early Morning around Surathani Province

Coconut Trees along the Roads, Southern Thailand Scenery

Kadaejae Monkey School, Surathani

I have been home again on Phuket Island for a few days now but still haven’t gotten used to the weather yet. Not that I want to complain about 94°F weather that feels like 104° F because of the humidity. I always love my visits with family and the foods here are truly exquisite.

While allowing myself to acclimate to the weather by drinking cool coconut water, I pulled out a lot of my notes, pictures and videos from my previous trip to Surathani. I was searching for information about a monkey school in Southern Thailand where monkeys learn how to pick coconuts from the coconut trees. My video took place at the monkey school.

Before leaving Seattle, I had been enjoying cooking with all forms of coconut: spicy-lime coconut chips, green or red curry with coconut milk, cucumber salad with coconut water vinegar and stir-fried fresh grated coconut with Phuket curry paste. Perhaps today is an appropriate time to learn about coconuts. What is a coconut anyway?

Before I answer this question, I want to first share some of the highlights of my trip to Surathani, a province in Southern Thailand that is famous as the land of a million coconut trees. I was lucky to have my brother as my tour guide taking me to all the famous Thai food restaurants and important sites along the way. He is a professional tour guide  and an expert on the Southern region. Most importantly we had a good time visiting the monkey school. Everyone was so warm and agreed to give me information and be part of the video taping, which you will see below. Thank you for P’ Paew, the owner of Kadaejae Monkey School and brother Sumit for the insight and patience. I had so much fun “Sanuk.”

When you start Thai cooking at home, you will encounter a lot of terms and types of coconut, so I think it is a good idea to start at the beginning with what is a coconut? In short, it is a seed, a fruit and a nut (in the botanical sense) What part of the coconut is used in cooking? In my Thai kitchen I cook with palm sugar which is made from the sap of the coconut flower. I use the heart of a coconut palm, which is nice and crunchy, in Sour Curry with Fish, and the heart of coconut palm (Gaeng Som Pla khab Yod Maprow). I also use coconut water vinegar, coconut milk, coconut cream, young coconut with coconut water and grated fresh and dry coconut—to name a few.

So here is a quick lesson on a coconut: coconut cream, coconut milk and coconut water.

When you remove the coconut husk (mesocarp) from a whole coconut, you can see the coconut shell (endocarp). After cracking the coconut shell, you get to the natural water inside the nut and this is called coconut water. The white meaty part inside the shell is the coconut meat (endosperm). Grating a chunk of white of coconut meat with a coconut grater gives you fresh wet grated coconut. To extract coconut milk, add a cup of water to 2 cups fresh grated coconut, then squeeze out the white milky liquid; this is concentrated coconut milk. (Thai call this the “head” of coconut milk). Add 1/2 cup water to the used grated coconut to extract  a thin coconut milk (Thai call this the “tail” of coconut milk). Let the coconut milk sit, and a fat creamy layer will form on the top; this is the coconut cream.

Back to the coconut water. Coconut water occurs naturally and has nothing to do with the process of making coconut milk. Nature provides the coconut meat and water as nutrients for shoots to grow near the three germination pores, or “eyes,” on the coconut. This coconut water inside the coconut shell is very good for the coconut plant, but it is also very good for you. It is full of vitamins and minerals. It is especially high in potassium and electrolytes, and has a neutral ph level. I strongly recommend that tourists traveling to paradise island drink this natural drink to help with rehydration, and it has the added benefit of being a sterile juice inside the shell.

I have  over 20 recipes on this blog that use coconut milk, coconut cream, coconut water vinegar and palm (coconut) sugar.

I hope this is a good start and I hope that my next trip to Thailand I will bring more inspired recipes to share with you.

Related articles

Read Full Post »

Sticky Rice in a Bamboo Tube, Kao Lam

I have fond memories of sticky rice in a bamboo tube—it looks so cool! At every festival in my village when I was growing up, there was a man who made and sold this Kao Lam. We would eat some at the festival then bring home a few for family members who couldn’t go. It is a perfect take-home food, since it is already packaged in a bamboo tube.

Sticky Rice in a Bamboo Tube, Cambodia

The sticky rice is cooked in a segment of bamboo, the kind that has a thin wall so the heat can penetrate to cook the rice inside the tube. After it is filled with the sticky rice ingredients, the bamboo is plugged with a piece of coconut husk wrapped with banana leaf to keep in the steam for cooking the rice. Then the bamboo tubes are placed over charcoal. When it is done, the outer skin of bamboo is removed and a thin wall left behind to protect the rice inside. All Southeast Asian countries have some version of this, and they are all cooked in a similar way. The photo below is from Cambodia. In Thailand this dish is called Kao Lam; in Malaysia it’s Lemang.

Thai Sticky Rice in Bamboo Sticks in Cambodia

If you like sticky rice with mango, you will like Kao Lam, too. I love the fact that when you peel the bamboo away (see photo below), the powdery fiber in the bamboo tube leaves a sheen. The rice comes out shaped like a stick and looks like it was wrapped in edible paper. The vendor in my village usually made three varieties: white sticky rice, black sticky rice, and white sticky rice with black beans.

How to open the bamboo tube

In America you can find cooked sticky rice that comes straight from Thailand in the frozen food section in Asian markets. But I would rather you try my sticky rice recipe below. I wrap it up in parchment paper, roll it into a cylinder, and bake it. It is delicious, has a very nice texture, and is as satisfying as the original.

During the summer of 2010, I taught Grilled Sticky Rice with Black Bean and Banana Stuffing in a Banana Leaf (Kao Neow Mad) in my Thai Grill class. Organizing my photos from my recent trip to Cambodia led me to this project, a Kao Lam version baked in the oven. It is not easy to cook sticky rice in a bamboo tube—only a few experts from each Thai village know how. Last August I created this adaptation, wrapping and rolling the sticky rice in pieces of parchment paper and then baking them. The results were good. It was easy, and the flavor and texture were satisfying. Then I made a lot of them in small packages and even put some in the freezer. I microwave them or reheat them in the oven and eat them for a protein snack before teaching my classes. In Thailand, most farmers eat sticky rice before working in the rice field.

Baked Sticky Rice and Black Bean Wrapped in Banana Leaf

Kao Neow Yang

Serveings: 8

2 cups Thai sticky rice, soaked in water for 3 hours or overnight, then drained (see note)
¾ cup coconut milk
¼ cup water
2 tablespoons granulated sugar, optional
1 teaspoon salt
1 cup canned black beans, drained
8 (8×8) inch pieces of banana leaves or parchment paper

Preheat oven to 350°F.

Stir sticky rice, coconut milk, water, sugar and salt in a large pan over medium heat. Stir until all coconut milk is absorbed. Stir in black beans and fold gently to mix.

Put equal amounts of the sticky rice mixture onto 8 banana leaves. Form the rice into a cylinder about 6″ long and lay it in the center of the leaf so that you have about 1 inch left on either end. Fold the banana leaf in half around the rice, then roll it around the cylinder; fold in both ends and secure them with a toothpick, poking down and then up, or you can twist the ends and tie them. When you are done, each bundle will make a round tube about 6 inches long and 1 to 1 1/2 inches in diameter. Grill for 5 minutes on each side until the sticky rice is translucent and cooked, or bake in the oven for 10 minutes.

Pranee’s note:

In Thailand, recipes generally use one of two types of rice: jasmine rice or Thai sticky rice. The starch in rice is made up of two components, amylose and amylopectin. Jasmine rice has more amylose than amylopectin, giving it a puffy appearance, whereas Thai sticky rice has more amylopectin than amylose, creating its sticky texture. Both white and purple Thai sticky rice are long-grain rices with a firm grain and become sticky when cooked. They are tropical rices, and different from Japanese, Chinese or Mediterranean (Arborio and Valencia) rices, which have a medium or short grain and grow in temperate climates.

© 2010 Pranee Khruasanit Halvorsen
I Love Thai cooking
Pranee teaches Thai Cooking class in Seattle areas, her website is: I Love Thai cooking.com


Outer layer of bamboo tube is removed


Read Full Post »

%d bloggers like this: