Feeds:
Posts
Comments

Archive for the ‘Thai Recipe for Kid’ Category

What is a Fruit, Eaten as a Vegetable, and Used as a Sponge?

Wait—you are eating luffa? Yes, in Thailand luffa fruit is eaten at a young stage as a vegetable. It is soft, sweet and aromatic after cooking, either in a stir-fry or a soup dish. We eat the whole fruit except for the skin.

When I have a craving for luffa as a vegetable, I only choose the youngest luffa available. As the fruit gets older, the fibrous veins becomes more visible and tough and the flesh gets more airy and dries out to become a sponge. Farmers leave many healthy-looking luffa fruit longer on the trellis in order to harvest seeds and sponges as the annual vine grows old, dies, and dries up. The last harvest for the plant is healthy seeds and luffa sponges for bathing or cleaning pots and pans.
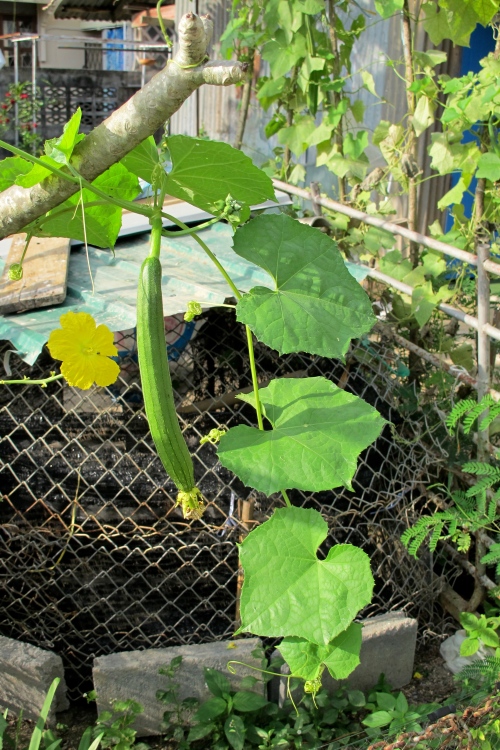
บวบหอม

บวบหอม – Smooth Luffa – Luffa aegistiaca

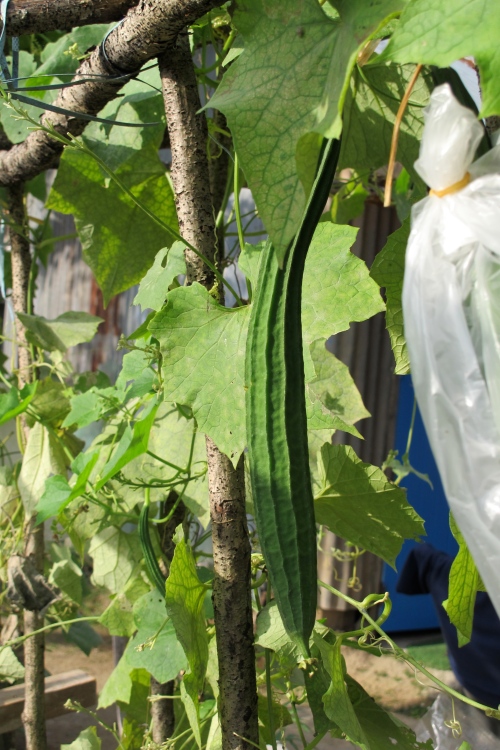
We enjoy two species of luffa as a vegetable in tropical and subtropical countries. The above luffa is บวบหอม – buap homSponge Luffa or Smooth Luffa. Below is the บวบเหลี่ยม – bump liam –  Ridged Luffa or Angled Luffa.

Growing up in Thailand I felt that what makes a Thai village scene beautiful is walking around and seeing both kinds of luffa growing in and around granny’s home, either on the fences or the chicken penthouse or on a tree. And one doesn’t need a fancy vegetable garden to grow them, just two square feet of fertile ground, routine watering, then a bit of training to get the vine to climb up a twig or fence as it grows. After that it can take care of itself and all you have to do is admire the yellow flowers, harvest the luffa, collect seeds for the next season and enjoy a supply of sponges.

Angled Luffa on the arbor - Angled luffa - Luffa acutangula

บวบเหลี่ยม – Angled Luffa on the trellis – Luffa acutangula

This picture was taken a few years back when I visited my mom and uncle and we walked around my village in a circle. The angled luffa is young, long, and round with ridges. This one is a perfect size for harvesting. It could be from 1 to 1 and 1/2 inches in diameter and 8 to 12 inches long. The yellow flowers were bright against the dark green guard hanging on the chicken coop to provide shade for chickens. I trust that the yield of luffas from this single plant provided many meals, stir-fried, in a country-style soup, or served with Nam Prik – Thai Chili Dip

Step-by-Step: How to Peel and Cut Luffa 

One year when I visited mom I found her in the kitchen just about to prepare stir-fried luffa with egg for lunch. Because I wanted to share the technique and recipe with you and all my blog followers, I asked her if she could do this in slow motion and let me interrupt her so I could take photos of her peeling and cutting luffa the way everyone from our Thai village always did. I want to share with you this treasured culinary moment in my mom’s kitchen.

how to peel angled luffa

How to peel angled luffa

The luffa is actually related to the cucumber family. They are alike in many ways but the luffa is softer. We use a cucumber peeler to peel the ridged skin.

IMG_0171

Angled luffa looks like a soft cucumber

After peeling and rinsing, we do the oblique cutting or roll-cutting.

oblige cut is a cutting style for stir-fried luffa

The oblique cutting style is used for stir-fried luffa

Please click here to see a video and the explanation from Simply Ming about how and why oblique and roll cutting is used in Asian Cuisine.

The reason we love luffa so much is that it is succulent, moist, sweet and tender. Therefore we don’t need many ingredients in this stir-fried dish. We often enhance the flavor with some protein like egg, prawn or pork, then a little fish sauce or soy sauce for salt. The taste has a hint of zucchini and cucumber. It has a delightful silky smooth texture that is soft, but firmer than a marshmallow.

Mom's style stir-fried angled luffa with egg served with steamed jasmine rice

Mom’s style stir-fried angled luffa with egg, served with steamed jasmine rice

Both species of luffa can be cooked in the same way. There is not a big difference between the two, but I prefer angled luffa over smooth luffa as it is more succulent and sweet. This recipe, and the photographs were recorded many years ago in my mom’s kitchen in Phuket. It captured our fine day visiting and savoring real Thai home cooking.

Stir-fried Angle Luffa with Egg

Buab Phad Khai
บวบผัดไข่
Serves: 4

Like any Thai stir-frying dish, cooking on high heat is the key. Shrimp or pork are popular proteins used in stir-fried angled luffa, and almost always with egg, some soy and fish sauces and a pinch of sugar. It can be served as a side dish or a main dish with steamed jasmine rice.

3 tablespoons high heat cooking oil such as canola, peanut or soy bean oil

3 cloves garlic, chopped

2 eggs

3 large or 4 medium-size angled luffa, peeled and oblique-cut, about 1 and 1/2 pounds

1 tablespoon fish sauce

1 tablespoon soy sauce

1/2 teaspoon sugar

1/2 cup water or chicken broth

Heat a wok on high heat until it is hot. Pour in cooking oil and stir in garlic. When garlic is golden, stir in eggs and stir a few times. When the egg is cooked, stir in luffa. Stir for 1 minute and add fish and soy sauces and sugar. Add water or chicken broth and let cook for 1 to 2 minutes with the lid on. It should have a soft texture and some sauce like the recipe above. Serve warm.

I Love Thai cooking
Pranee teaches Thai Cooking classes in the Seattle area.
Her website is: I Love Thai cooking.com 
Lets connect on  Twitter,  FacebookYoutubeInstagram and Pinterest
For more in-depth in Thai ingredients and Hand-on Cooking Class please check out
Pranee’s One day Asian Market Tour & Cooking Class at Pranee’s Thai Kitchen
 

Related Links

http://www.kitazawaseed.com/seeds_luffa_angled.html

How to Grow Your Luffa Sponge

http://www.luffa.info/luffagrowing.htm

Roll-Cutting Video
http://www.howtocookmeat.com/techniques/howtorollcut.htm

Read Full Post »

So Passionately

Kamala Beach at Sunset

Kamala Beach at Sunset

Every year I visit home I enjoy my leisurely walk in the early morning at Kamala Beach. This year I also found an excuse to embrace the beauty of sunset while walking in the evening and went off to do an errand when the sun was near setting and the humidity and heat were less intense.

I was working on a breakfast menu for my guests who were arriving that week. On the menu was an egg dish, bread with pineapple jam, juice, yogurt, tropical fruit, coffee and tea. I love having a basket of tropical fruits ready to peel and eat at anytime, so on this walk my destination was a fruit stand to stock up on tropical fruits like Phuket pineapple, pomelo, banana, mango and papaya. At the stand, I was delighted to see passion fruit. It is a common fruit in Thailand, but one that has rarely had a chance to be on the shelf at the food stand. This is because it has not been so poplar until just the last few years as we have become more aware of the health benefits of our own tropical fruits. Let’s embrace this opportunity.

passion fruit juice

Prepare passion fruit with juice by removing pulp and seeds

When I reached the fruit stand on the main road before the last intersection and the steep road to Patong, I filled my basket with Thai fruits and the owner gave me a bag full of 20 overripe passion fruits for 50 Baht (about $1.50). The good looking ones were 15 Baht (50 cents) each, which may help explain some of my excitement and appreciation for the passion fruit. Plus the best time to enjoy Thai passion fruit is when the skin is wrinkly and the juice is at its sweetest. I walked home with excitement—it was time to play with passion fruit again. (Please read my first post on passion fruit – เสาวรส – Saowarod.)

pineapple jam

Pineapple Jam

When I am on vacation I enjoy cooking in any small kitchen with just a few ingredients. The pineapple jam I had on hand prompted me to create a passion fruit-pineapple spread to serve on toast or plain yogurt. My tropical-inspired spread was complete. With its tangy, sour taste, the aroma of passion fruit, and the soft, sweet texture from pineapple jam, I had indeed created a wow moment. After tasting the spread, my sister, niece and guests managed to appreciate every drop on yogurt and on toast. This recipe captures the moment. So passionately.

passion fruit - pineapple spread

Passion Fruit – Pineapple Spread

Passion Fruit-Pineapple Spread

I already had some pineapple jam, and when I extracted the passion fruit juice, this versatile recipe easily came to mind. The bright tartness of passion fruit juice combined with thick and sweet pineapple jam to soften the jam’s thick texture and give the perfect balance of sweet and sour with a lingering fruity aroma. We enjoyed them both on toasts and plain yogurt.

Yield: 1 cup

Preparation Time: 15 minutes

Cooking Time: 20 minutes

1 cup passion fruit juice, freshly-made or ready-made

2/3 cup pineapple jam

Place passion fruit juice in a medium size pot over medium heat; when it come to a boil, stir in pineapple jam and whisk over medium-low heat until well combined, about 5 minutes. Let it cook on low heat for 20 minutes to thicken. Place in a clean mason jar and use as a spread or as a fruit sauce on yogurt or cake. It keeps well in the fridge for 2 weeks, or 6 months in the freezer.
© 2015 Pranee Khruasanit Halvorsen
I Love Thai cooking
Pranee teaches Thai Cooking classes in the Seattle area.
Her website is: I Love Thai cooking.com
Lets connect on Twitter, Facebook, YouTube, Instagram and Pinterest
For more in-depth in Thai ingredients and Hand-on Cooking Class please check out Pranee’s One day Asian Market Tour & Cooking Class at Pranee’s Thai Kitchen

Related Links

Sand Whiting: praneesthaiktchen.com

Passion Fruit: praneesthaikitchen.com

What is the Difference Between Jam, Jelly, Conserves and Marmalade : TheKitchn.com


Read Full Post »

Two Sisters Cook

About 26 years ago, my sister, Rudee and I dreamed that one day we would own a restaurant together. As the many different pursuits in our lives evolved, it turned out that my sister pursued the dream on her own, but our passions are still related to Thai food and cooking. She opened a restaurant in front of her house the same year that I founded I Love Thai Cooking in Seattle. My sister has specialized in Aharn Jaan Deowอาหารจานเดียว – a one dish meal also known as Aharn Tam Sungอาหารตามสั่ง– made to order. Like a small restaurant on a tiny lot or street corner, my sister shops early in the morning then preps in time for the lunch crowd. In the afternoon she does some more prepping for either sit down or take home dinners. The menu is posted on the restaurant wall. It has about 20 dishes for you to choose from, from Phad Kraprow Gai (stir-fried chicken with holy basil) to Tom Yum Goong (sweet and sour soup with prawns).

With my mom and my sister at Rudee’s Restaurant

Today I am sharing with you a recipe from my sister’s restaurant: Thai Fried Rice with Chinese Sausage – Kao Phad Kunchiang – – ข้าวผัดกุนเชียง. I want to express my gratitude to my sister for her hard work running her small businesses while caring for her family and our mom. For this recipe, she was kind enough to duplicate it one more time during the restaurant’s non-busy hours so I could make the video and take the photos which I am sharing with you today. Please make an effort to watch them. Prep the ingredients below, then watch the video to boost your confidence by learning tips, techniques and timing for preparing the dish. You can learn more about my sister’s cooking by watching videos on my I Love Thai Cooking YouTube channel. 

Chinese Sausage - กุนเชียง

Chinese Sausage – กุนเชียง

As I look at this picture, I feel as I did when I was young and walking behind my mom on a market trip. I would tug on her shirt to let her know that I would like her to buy some of the Kunchiang – dry Chinese sausage – for dinner. As young kids growing up, my sister and I loved Kunchiang. My sister’s Fried Rice with Chinese Sausage Recipe is very much like my mom’s version. In Seattle I purchase my Chinese sausage and keep them in the fridge where they can be kept for a long time, and I can cook this dish anytime I have leftover rice.

Chinese Sausage in Thai Cuisine

Kun Chiang – กุนเชียง aka Lap cheong in Southern China, is made in Thailand by Thais of Chinese descent. It is simply dry sausage with salt and sugar added that has been smoked and dried. Its flavor is unique, however, and it is hard for me to recommend a substitution. It is made in China and California and available in Asian markets here in Seattle. My favorite sausage is from California. It is lower in fat and has a perfect smoky note, not too intense. Common ingredients in the sausage are pork butt, fat, sugar, salt, corn starch, five spice powder and Chinese white rice wine. My favorite way to prepare these Chinese sausages is in fried rice. I hope you have a chance to try this easy recipe from my sister.

green onion, onion, Chinese sausage, and tomato, กุนเชียง

Green onion, onion, Chinese sausage, and tomato

Even just a few ingredients can produce a delightful taste. I love these brilliant combinations. If you want to add one or two more kinds of vegetables, try Chinese kale and young corn.

Kao Phad Kunchiang - ข้าวผัดกุนเชียง - Thai Frid Rice with Chinese Sausage

Kao Phad Kunchiang – ข้าวผัดกุนเชียง – Thai Fried Rice with Chinese Sausage

A pungent bite of fresh green onion in the middle of the savory Kao Phad Kunchiang can be rewarding to the taste buds. The pungent taste will add a dimension and highlight the taste in every ingredient in the fried rice.

Step-By-Step Pranee’s Thai Cooking Video

Thai Fried Rice with Chinese Sausage

Kao Phad Kunchiang

ข้าวผัดกุนเชียง

Serves 1

Preparation time: 10 minutes

Cooking time: 5 minutes

2 teaspoons canola oil

1 link Chinese sausage, sliced

1 egg

1/4 cup sliced onion

1 medium tomato, diced

1 cup steamed jasmine rice, room temperature

2 – 3 teaspoons Roza tomato ketchup or tomato paste

2 teaspoons soy sauce

1 green onion, sliced

1 cilantro, to garnish

3 slices cucumber, to garnish

1 whole green onion, to garnish

Heat the wok on low heat and add cooking oil and sliced Chinese sausage. Stir back and forth to fry the sausage and also to render the fat at the same time. Cook the sausage until it is fragrant, about 30 seconds. Discard all but 1 tablespoon of the fat. Add one egg, stir once and spread the egg out on the surface of the wok.

Adjust the burner to high heat. Add onion and tomato and stir back and forth, then add in the jasmine rice, tomato ketchup and soy sauce. Keep stirring until the rice has softened, about 1 minute. Stir in green onion until well combined. Garnish with cilantro on top, and cucumber slices and one whole green onion on the side.

© 2015 Rudee Piboon with Pranee Khruasanit Halvorsen
I Love Thai cooking
Pranee teaches Thai Cooking classes in the Seattle area.
Her website is: I Love Thai cooking.com 
Lets connect on  Twitter,  FacebookYoutubeInstagram and Pinterest
For more in-depth in Thai ingredients and Hand-on Cooking Class please check out
Pranee’s One day Asian Market Tour & Cooking Class at Pranee’s Thai Kitchen
Roza Tomato Ketchup

Roza Tomato Ketchup

Roza Tomato Ketchup is similar to tomato paste in taste and texture. American ketchup my not work well for this recipe. You may use a smaller amount of tomato paste or Sriracha sauce instead.


Read Full Post »

The Best is on the Top and in the Middle

Like custard, caramel grated coconut has a goodness that has many uses and places in dessert creations. I have a place in my heart for this sweet coconut delight. I chose an English name for this coconut dessert topping and filling – Caramel Grated Coconut – Sai Maprow -ไส้มะพร้าว – Nah Maprow – หน้ามะพร้าว. Its caramel taste, either as a topping or as a filling, heightens other desserts. I hope you enjoy reading on to discover the uses of this delightful sweet caramel grated coconut in many Thai and Southeast Asian desserts. The recipe follows. It has carefree steps and just two ingredients: grated coconut and sugar (plus a little salt).

Stella's Caramel Coconut - Sri Lanka

Stella’s Caramel Grated Coconut – Sri Lanka

Last week I set aside a day to create just one dessert dish – Khanom Sod Sai – ขนมสอดไส้ – Steamed Coconut Cream Pudding with Caramel Grated Coconut Filling. This dessert involved many steps. The preparation, note taking, photographing, and final cleaning took over 6 hours. I love special days like this when recreating a dish reconnects me with my early learning experiences in my family’s kitchen.

มะพร้าว

In the middle. Sai Maprow -ไส้มะพร้าว Caramel Coconut ball is placed inside a sticky rice dough for Khanom Sod Sai and Khanom Tom

However, today I will share with you just one part of the recipe for Khanom Sod Sai, that is the Thai caramel grated coconut. It is a quintessential part of Thai desserts and for other Southeast Asian cuisines as well. There are many intriguing steps, but demystifying them will help you find ways to incorporate this treat in your cooking. Please share your experiences in the comment box below.

Caramel Coconut – Sai Maprow (filling) -ไส้มะพร้าว – Nah Maprow (topping) – หน้ามะพร้าว

Caramel Coconut Stuffing

In the middle. Caramel coconut ball with a purple sticky rice dough and coconut cream in Khanom Sod Sai

The above picture is of Khanom Sod Sai. The caramel coconut ball is placed in the middle of a sticky rice dough, which is then wrapped around it before being steamed with coconut cream pudding in a banana leaf. This is similar to Khanom Tom Khao, where the caramel coconut ball is placed in the middle of the dough, which is then boiled and rolled in coconut flakes.

Caramel Coconut is ready for spreading before rolling together with sticky rice before enjoying

On the top. Nah Maprow – หน้ามะพร้าว The caramel coconut is placed on top of sticky rice.

In Nah Maprow, the caramel coconut is placed on top of a small piece of banana leaf, which is then lifted up and used to spread the caramel coconut on top of sticky rice before savoring the combination. In Phuket, this dessert is called Khao Neow Nah Cheek – ข้าวเหนียวหน้าฉีก. I typically enjoy this for breakfast when visiting home.

Caramel Coconut as a filling for Sri Lanka Pancake

Caramel Coconut as a filling for Sri Lanka Pancake

In 2014, I visited the cities of Colombo and Galle in Sri Lanka and traveled to many beautiful places with a friend. Near Ratnapura we learned about Sri Lanka cuisine from Stella, our personal tour guide’s sister. We spent a half day with her family in their kitchen. For dessert, Stella showed us how to make caramel coconut to use as a filling for Sri Lanka crepe. I would like to express my gratitude to Stella for teaching and inspiring me and for sharing her techniques for creating this recipe again with ease.

Step-by-Step: How to Make Thai Caramel Coconut

There are two ways to make caramel grated coconut for Thai desserts. The first way is to mix—either by hand or with a utensil—brown sugar, fresh grated coconut and a touch of salt until they are well incorporated, then pan fry them until the sugar is caramelized and absorbed into the coconut. A second method is to add a little water to the sugar and heat it until it melts. Continue cooking until the sugar burns slightly and has a hint of caramel color, then add fresh or frozen grated coconut. Stir well until the sugar and coconut are well combined and the coconut is coated with the brown caramelized sugar.

My family and most home cooks in Thailand use the first method, whereas culinary professionals and merchant use the second one. The latter has a more intense caramel flavor, depending on how much you let the sugar burn, and it also has more affect on the color of the coconut. Personally I love the second version, show below, which is also the fastest and easiest.

หน้ามะพร้าว or

The final result of Caramel Grated Coconut – Sai Maprow -ไส้มะพร้าว – Nah Maprow – หน้ามะพร้าว~

What kind of sugar should you use? Both recipes work with all sugars. In many countries, cooks use white or brown jaggery, which is a more complex type of sugar. In Thailand, some prefer palm sugar, however, in Southern Thailand we are more flexible. My family uses brown sugar, whereas the rest of the Thai community uses palm sugar. Stella preferred white sugar. Combining two kinds of sugar should work as well.

photo 2-7

Stir brown sugar, water and salt together in a large pan. Bring to a boil, then reduce to medium heat. Allow mixture to cook without stirring until it is foamy, thick, and almost burnt, about 5 minutes.

Stella's Technique of making a caramel from the sugar first before adding coconut

Stella’s Ttechnique of making a caramel from the sugar first before adding coconut

The sugar should take on a thin caramel-like texture like the picture above, with a hint of caramel taste or more if desired, before stirring in the grated coconut.

มะพร้าว

มะพร้าว – Thawed Frozen Coconut

Young coconut – Marrow Num – มะพร้าวหนุ่ม (coconuts that are six to nine months old and lack the husk of the more well-known mature coconut) is preferred in Thailand, but in America my first choice would be frozen grated coconut, followed by shredded coconut from the bakery section.

หน้ามะพร้าว

Caramel Grated Coconut – Sai Maprow -ไส้มะพร้าว – Nah Maprow – หน้ามะพร้าว

Let it cook on medium-high heat, stirring often until the liquid is almost evaporated, about 4 minutes. Then reduce the heat to low.

หน้ามะพร้าว

Caramel Grated Coconut for Sai Maprow -ไส้มะพร้าว – Nah Maprow – หน้ามะพร้าว

Continue cooking until you can pull the caramel coconut to the side of the pan and no liquid remains, about 3 minutes.

Caramel Grated Coconut Filling – ขนมสอดไส้

Caramel Grated Coconut

Sai Maprow-ไส้มะพร้าว

Nah Maprow – หน้ามะพร้าว

Cooking Time: 30 minutes

Yield: 50 fillings or topping balls

3 cups brown sugar

1/3 cup water

½ teaspoon salt

3 cups frozen grated coconut, thawed (see note below)

Stir brown sugar, water and salt together in a large pan. Bring to a boil, then reduce heat to medium. Allow sugar mixture to cook without stirring until it is foamy, thick, and almost burnt, about 5 minutes. The sugar should turn into a thin caramel like the picture above with a hint of caramel taste. Now stir in grated fresh or frozen (thawed) coconut.

Let the coconut mixture cook on medium-high heat, stirring often, until the liquid is almost evaporated, about 4 minutes. Adjust the heat to low and continue cooking until you can pull the caramel coconut to the side of the pan and there is no liquid left, about 3 minutes.

Remove from heat and let the mixture set until it is cool enough to handle. With cold water by your side, moisten both of your hands. Drop one tablespoon of the caramel coconut into one hand, press it into a dense ball with your other hand, then place it on a plate. If the mixture is too hot, moisten your hands again with cold water to prevent burning. Repeat the process until all of the coconut has been rolled into balls. Makes 50 balls.

Cook’s Note: Fresh, frozen, or dried grated coconut can be used in this recipe but the cooking time may vary depending on the moisture in the coconut. Pay attention to following the steps after adding the grated coconut.

photo 3-7

Khanom Sod Sai – ขนมสอดไส้ – Steamed Coconut Cream Pudding with Caramel Coconut Filling

© 2015  Pranee Khruasanit Halvorsen

I Love Thai cooking
Pranee teaches Thai Cooking classes in the Seattle area.
Her website is: I Love Thai cooking.com 

Related Link: Cooking with Grated Coconut Recipes

~ Stir-fried Grated Coconut with Phuket Red Curry Paste (praneesthaikitchen.com)

~ Spicy Thai Coconut Chip (praneesthaikitchen.com)

~ Pinterest: Pranee’s Coconut Love Pin (Lovethaicooking)

~ Khanom Tom Khao (http://tankitchen-dessert.blogspot.com/)

Talking of coconut, Thai love all forms, all types. I put all my favorite links on my LoveThaiCooking Pinterest under Coconut Love.

Read Full Post »

Heavenly Dessert

When I was young I could not resist eating Khanom Mo Gang – ขนมหม้อแกงถั่ว – Thai Coconut Custard with Mung Beans. One small parcel in a banana leaf was not enough for my hungry soul.

In Thai cuisine there are many kinds of Mo Gang Thai custard but two types dominate: one with egg, palm sugar and coconut milk, and another that includes cooked split mung beans or cooked taro. What makes this Thai custard so special is the coconut milk and fried shallot oil. These two ingredients set Thai Mo Gang apart from other custards.

One event that I have never forgotten was when my aunt purchased a little parcel of Mo Gaeng for everyone for breakfast and my brothers and sister woke to discover that their shares were gone. They have long ago forgiven me and forgotten this, but I still have lingering memories of the taste and my mischief. 

Thai Coconut Custard with Mung Beans

In Thailand an individual serving of this Thai dessert is wrapped in a banana leaf and secured with a little wood stick like a toothpick.

Kanom Mor Gaeng

Kanom Mor Gaeng Tua

Thais commonly open up the little parcel and use a small spoon to leisurely take one small bite at a time. The banana leaf is not only used as a wrapper, but as a disposable plate as well.

Step-by-Step: How to Make Thai Coconut Custard with Mung Beans

Steamed Mung Beans

Cooked Split Mung Beans

The first step is to steam split mung beans ahead of time using Pranee’s Step-by Step instructions from an earlier post for preparing Steamed Peeled Split Mung Beans. The second step is to make fried shallots and shallot oil following the recipe on this youTube video: https://youtu.be/5LTCo3SRWLk. Then the rest of the preparation is very simple.

Run egg, sugar batter through a sieve

Prepare the steamed split mung beans and fried shallot ahead of time and the rest is simple.

Place sugar, eggs, salt and Pandan leaf in a medium size bowl. Using a whisk or an egg beater, whip until foamy and the sugar and salt are dissolved, about 1 minute. Stir in coconut cream and repeat the mixing process until well blended, about 30 seconds. Run the egg and sugar mixture through a sieve into food processor, removing the Pandan leaf. Add steamed mung beans to the food processor or blender and blend until smooth, about 1 minute.

cook mung bean custard on low heat for 5 minutes

Cook mung bean custard on low heat for 5 minutes

Heat the mixture in a deep pan over medium heat. Add 1/2 portion of fried shallots and all of the shallot oil and stir constantly  until the texture changes to a thick soup, about 5 minutes.

photo 4

Pour thick Mung Bean Custard from the mixer onto a greased 8″ by 8″ baking pan

Pour the thick batter into a greased 8″ by 8″  baking pan. Sprinkle the remaining half of the fried shallots on the top (see picture below) before baking.

Freshly Baked Khanom Mor Geng - ขนมหม้อแกงถั่ว

Freshly Baked Khanom Mor Geng

Bake at 375°F in a preheated oven until the top is golden and the edge of the custard pulls away from the edge a little, about 45 minutes.

Thai Coconut Custard with Mung Beans

Thai Coconut Custard with Mung Beans – ขนมหม้อแกงถั่ว

Thai Coconut Custard with Mung Beans

Khanom Mo Gaeng

ขนมหม้อแกงถั่ว

Serves 8 to 16

Preparation time: 20 minutes

Baking Time: 45 minutes

3 tablespoons canola oil

2 shallots, peeled and sliced

1 1/2 cups evaporated cane sugar

6 eggs, duck eggs preferred

1/4 teaspoon salt

1 Pandan leaf

1 1/2 cups coconut cream

2 cups steamed mung beans

Heat a small skillet over medium heat and stir in canola oil and shallots. Stir back and forth until the shallots are golden brown. Using a slotted spoon, remove fried shallots and divided into two portion, and let them cool. Save the oil for later.

Place sugar, eggs, salt and Pandan leaf in a medium-size bowl, and using a hand whisk or egg beater, beat until foamy and sugar and salt are dissolved, about 1 minute. Then stir in coconut cream, and repeat the mixing process until well blended, about 30 seconds. Strain into food processor to remove Pandan leaf. Add steamed mung beans to the food processor or blender and blend until smooth, about 1 minute.

Heat the mixture in a deep pan over medium heat. Add 1/2 portion of fried shallots and all of the shallot oil into the pan. Stir constantly until the texture changes to a thick soup, about 5 minutes.

Pour the thick batter into a greased 8″ by 8″  baking pan. Sprinkle 1/2 portion of fried shallots on surface (see picture above) before baking. Bake at 375°F in a preheated oven until the top is golden and the edge of the custard begins to pull away from the sides of the pan, about 45 minutes.

© 2015  Pranee Khruasanit Halvorsen

I Love Thai cooking
Pranee teaches Thai Cooking classes in the Seattle area.
Her website is: I Love Thai cooking.com 
 
Related Links:
How to Cook Peeled Split Mung Bean (praneesthaikitchen.com)
Mung Bean (wikipedia)
Fried Shallots (https://youtu.be/5LTCo3SRWLk)


Read Full Post »

Golden Cup – กระทงทอง

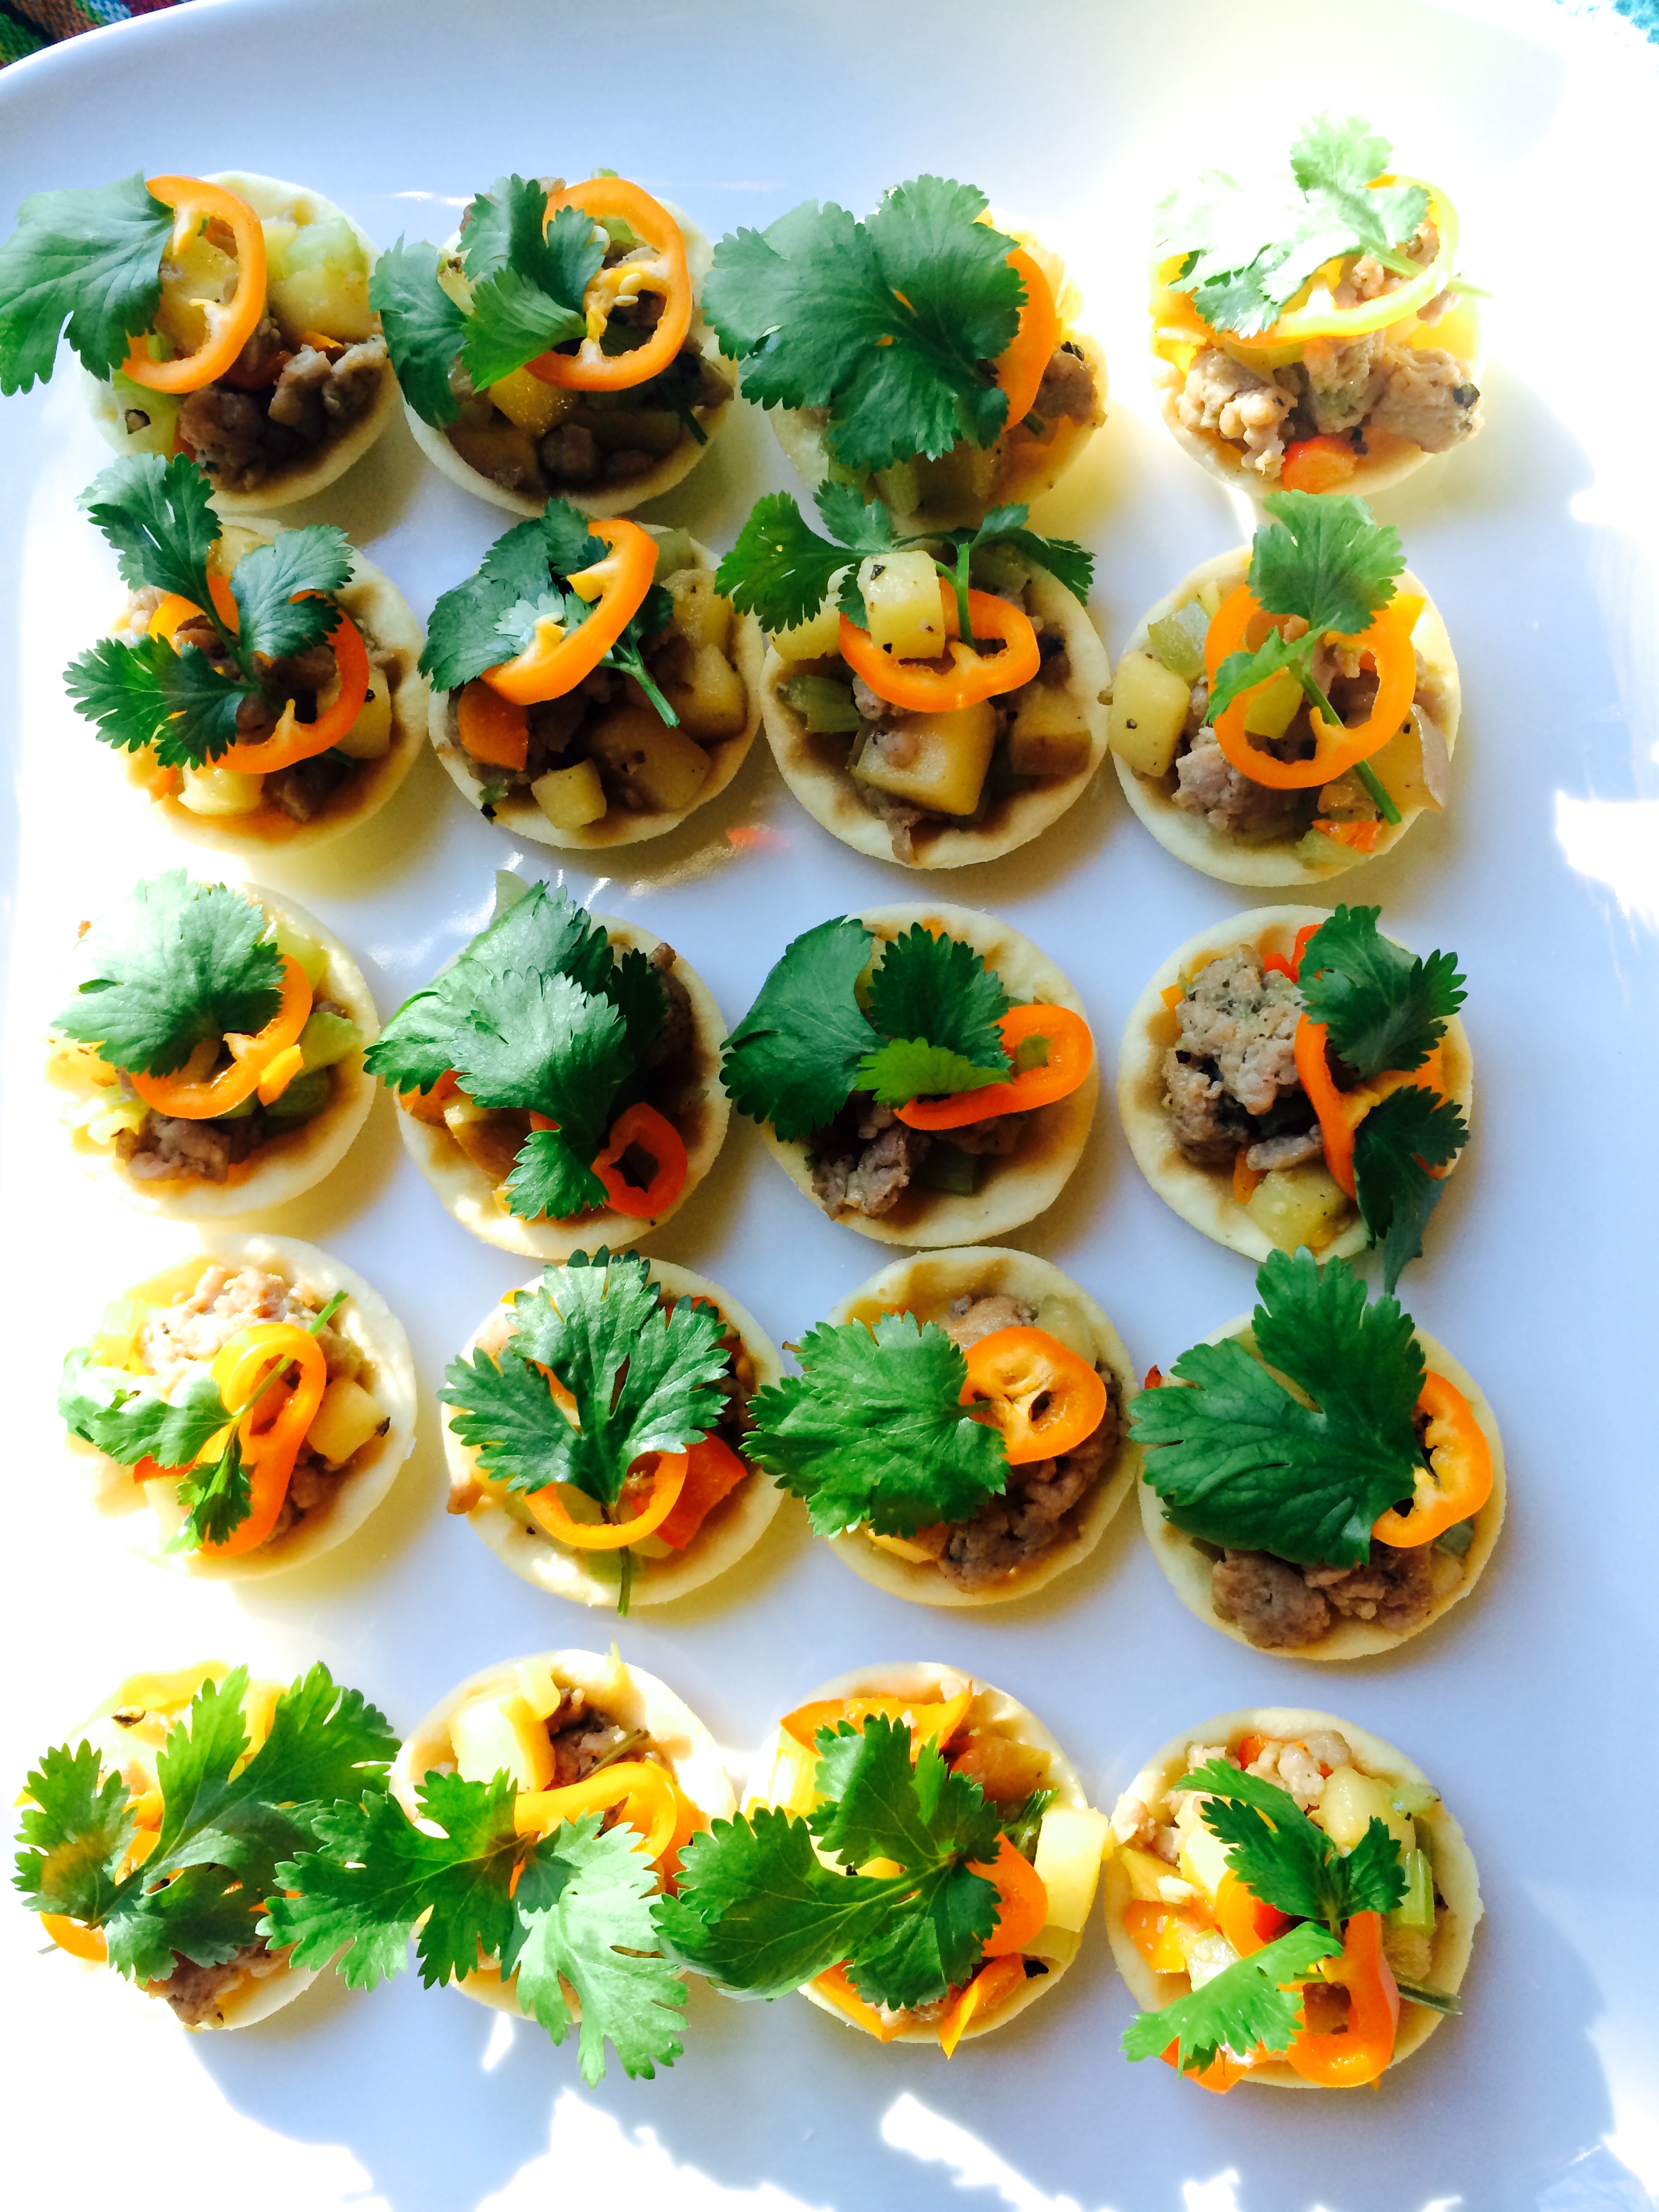
Golden cup – Krathong Tong – is a classic Thai dish served as an appetizer or snack. I learned how to make golden cups when I had my first kitchen and was taking professional culinary classes. Making the filling is quite easy. The hard part is making the golden cup. It requires a perfect dough recipe, a flower mold and deep-frying. When I saw a few ready-made pastry cups, I decided to use them to make a quick and easy appetizer for a new year’s party. After all I was looking for some auspicious dishes to share with my Thai friends at our new year’s day gathering to wish for a prosperous and healthy year – Sawasdee Pee mai – สวัสดีปีใหม่.

Golden Cup - กระทงทอง

Golden Cups – กระทงทอง

Before you start to prepare this appetizer, you will have to decide what to use for the golden cup. The traditional Thai method would be to prepare the cup from scratch by deep-frying the dough, but today there are many options that can be easier and healthier as well. I happened to find these golden pastry cups at Pasta & Co. during the pre-holiday season.

Pastry Cups

Pastry cups

If these pastry cups are not available, I typically use a wonton sheet, brushing it well with cooking oil and then placing it in a small muffin pan, arranging the sheets to fit in the pan in cup-like shape. Then I bake it until it becomes golden and crispy. If you wish to make a traditional golden cup, give this video a try.

Krathong Tong Filling

IMG_3974

I give a local twist to a traditional filling for Krathong Tong

Starting at 6 o’clock and moving clockwise, add ground turkey, diced sweet petite pepper, diced celery, diced apple, black pepper and garlic, and cilantro. Place soy sauce in the center.

IMG_3983

Place ground turkey and seasoning in a pan

Heat a wok on a high heat and pour in a high-heat cooking oil such as peanut oil or canola oil. Stir-fry ground meat with Thai basic seasoning paste – Kratiem Prik Thai – until it is fragrant almost cooked through, about one minute.

IMG_3986

Ground chicken, celery, sweet pepper and apple

Stir in diced celery, sweet pepper and apple, and cook until the pork is no longer pink, about three minutes. After this is done, set it aside.

IMG_3995

Prepare garnish of sliced sweet petite pepper and cilantro leaf

While waiting for the filling to cool down, prepare the garnish. To prepare the garnish we will use 24 mini bell pepper rings and 24 cilantro leaves with about an inch and a half of the stem attached.

Place the filling in the golden cups

Place the filling in the golden cups

 Before serving, spoon the filling into the cups.

IMG_4010

Garnish with cilantro and sweet pepper

Golden Cup – Kratong Tong – กระทงทอง

There are many options for the types of vegetables to cook in the filling; peas and corn kernels is one combination. For the meat, you can use pork and prawns or any minced meat combined with minced prawns. The most important part of this recipe is the Thai basic seasoning paste which is fundamental to all Thai appetizers and an authentic flavor profile.

Yield: 1 1/2  cups

24 golden cups
1 tablespoon sliced garlic
1 tablespoon black pepper
1 cilantro root or 1 tablespoon chopped cilantro stems
2 tablespoons soy sauce
1/4 to 1/2 teaspoon salt
1 cup ground turkey, chicken or pork
1/4 cup diced sweet pepper
1/4 cup diced celery
1/2 cup diced apple
Optional: 24 mini bell pepper ring and 24 cilantro leaves for garnish

To make basic Thai basic seasoning paste – Kratiem Prik Thai, place garlic, black pepper and cilantro root or stem in a mortar with pestle and pound until it becomes a fine paste. Gently stir in soy sauce and salt.

Heat a wok on a high heat and pour in a high-heat cooking oil such as peanut oil or canola oil. Stir-fry ground meat with Thai basic seasoning paste until it is fragrant and almost cooked through—about one minute.

Stir in diced celery, sweet pepper and apple and continue until the pork is cooked—about three minutes. Set aside.

While waiting for the filling to cool down, prepare garnish with 24 mini bell pepper rings and 24 cilantro leaves with some stem attached.

Before serving, spoon the filling into the cups and garnish with cilantro and sweet pepper.

Vegetarian Variation:

Substitute 1 1/2 cups sliced fresh shiitake mushrooms for 1 cup ground turkey.

I Love Thai cooking
Pranee teaches Thai Cooking classes in the Seattle area.
Her website is: I Love Thai cooking.com 
 

Read Full Post »

Amazing Fruit

Bael Fruit Tea-

Bael Fruit Tea-ชามะตูม

Bael fruit is not as mysterious as you might think. If you are one of the many people who have never heard of it, this recipe will provide you with a sweet and fragrant opportunity to learn about it. Its history is ancient, having been used long before the advent of Hinduism, and it carries religious significance. The bael fruit trees grow abundantly throughout the Indian subcontinent and southeastern Asia. In Thailand, we know bael fruit – matoom – มะตูม – both as a component of a popular cold drink during the summer, and for its leaves, which are used in religious ceremonies.

The Drink

Dry Bael Fruit มะตูม

มะตูม – Matoom – Bael Fruit aka Bengal Quince

For most Thais, bael fruit is a favorite that is instantly recognizable by its unique, sweet and aromatic flavor. It is also believed to be good for the digestion. Thais use the expression หอมเย็น ชื่นใจ to convey that the cold tea is fragrant, cool and refreshing. To my students it was a pleasantly delightful drink. They were even more surprised when they learned about the bael fruit. Now you can learn how to make hot or cold fruit drink from matoom.

Dry-Sliced Bael Fruit

Dry-Sliced Bael Fruit

Dry sliced bael fruit can be found at the Asian Market or an online grocery store. In a Thailand supermarket you can find matoom drink in a plastic bottle, or as an instant tea powder to which you simply add hot water. But there is nothing like making your own matoom drink.

IMG_3347

8 Pieces Dry Sliced Gael Fruit

In Thailand, a dry sliced matoom is heated over charcoal before making it into a drink. You may also put it in the toaster or place over a gas burner or gas grill. The direct heat will set off its sweet fragrance. In my kitchen in Seattle, I simply place 8 slices of sliced dry bael fruit on a baking sheet and put it under a preheated broiler for 1 minute or more on each side. You will smell a sweet, delightful fragrance.

Add 6 cups water and bring to a boil

Add 6 Cups Water and Bring to a Boil

Then place the slices in a medium sized pot, add 6 cups water, and bring it to a boil. Let it boil on medium heat for 20 to 30 minutes. The sliced bael fruits that remain in the pot will look pale and soft after all their essence is released into the tea.

Bael Fruit Tea - ชา

Bael Fruit Tea – ชามะตูม

Delightful Beverages

During the winter months in Seattle I serve it warm from the teapot just like any other tea. In the summer months in Seattle and Thailand, I love to serve it over ice as a cold drink just like iced tea. It is a very satisfying drink either way. The taste is less sweet than it smells, but it does the trick – I often don’t add any sugar. Serve it at any time and for any occasion. I received a lot of admiration from my students and Thai friends for introducing and reintroducing this drink to them.

Bael Fruit Tea – Cha Matoom – ชามะตูม 

Yield: 4 cups

8 to 10 pieces dry sliced bael fruit

6 cups water

Sugar to taste

Pre-heat the oven on  broil.

Place 8 slices of sliced dry bael fruit on the baking sheet and put under the preheated broiler for 1 minute on each side, until it is fragrant but not burnt. Place the heated bael fruit in a medium size pot and add 6 cups water. Cover.

Bring to a boil then, then continue to cook on medium heat until the tea is a nice brown color, about 15 to 20 minutes. The remaining dry fruit should be pale and soft after all the tea is extracted.

Discard the bael fruit and strain the tea through the fine sieve or cheese cloth. Serve warm like a tea; stir in sugar as desired. For a cold drink, simply pour over ice before serving.

I Love Thai cooking
Pranee teaches Thai Cooking classes in the Seattle area.
Her website is: I Love Thai cooking.com 
 

Related Link

http://matoomherb.blogspot.com/

Bilva or Bael Fruit and Hinduism (astropeep.com)


Read Full Post »

Happy as a Clam in a Lemongrass Broth

I am as happy as a clam in Seattle, where we have been having the best summer ever and a plentiful harvest from the land and the sea. The freshest of these local harvests bring the best flavors to our table. This recipe is an example of fresh local steamer clams from Washington State cooked in a simple Thai style: steamed clams with lemongrass. Many of you already have your own favorite recipe for cooking clams, but today I hope you can try my family’s favorite recipe. Often when we find fresh clams we prepare Hoi Tom Takrai in large pot so that we can each serve ourselves a bowl full of หอยต้มตะไคร้ – Hoi Tom Takrai – Steamed Clams with Lemongrass Broth.

Tom Takrai Hoy

Hoi Kao Tom Takrai – หอยขาวต้มตะไคร้ at Baan Keang Lay Seafood Restaurant

The photo above is of the หอยขาวต้มตะไคร้ – Hoi Kao Tom Takrai that I enjoyed when I was traveling in Thailand between Samui Island and Phuket. My route was on 4177 via Kanchanadit, Surat Thani. If you make this same trip, I would recommend that you stop for a meal at the Baan Keang Lay Seafood Restaurant. It is located at 124 Moo 7 Tumbol Kadae, Kanchanadit, Surat Thani in a fishing village of Kadae. Locals, as well as visitors from near and far, come here for fresh seafood and especially for Hoi Kao Tom Takrai, a local white clam cooked in a scented lemongrass broth. White clams – Hoi Kao – หอยขาว are only available in the gulf of Thailand and along the Pacific Ocean. (For more pictures, please view my photos from our trip and lunch experience at Baan Keang Lae Seafood.)

Baan Keang Lae Seafood

Baan Keang Lae Seafood

บ้านเคียงเลซีฟู้ด 124 หมู่ 7 ต.กะแดะ จ.สุราษฎร์ธานี, อ.กาญจนดิษฐ์

Baan Keang Lay Seafood Restaurant, 124 Moo 7 Tumbol Kadae, Kanchanadit, Surat Thani

ต้มตะไคร้ – Tom Takrai  

Tom Takrai is a traditional method of cooking fresh seafood in the southern region of Thailand, and it was a daily practice in our village. You may use the same recipe to cook any seafood. It is similar to steaming but uses just a small amount of water. It is a fast method that produces moist and tender meat. The broth is good as a soup, or can be kept to use in a recipe that requires clam juice or fish stock. It is a fresh tasting broth with a lemongrass aroma.

Lemongrass Clam Soup

Clam, lemongrass, Thai chili, garlic and fresh basil or lemon thyme

I made Tom Takrai recently at home. After cleaning the clams, I simply placed the cleaned clams, water, lemongrass, garlic, a lightly smashed chili, and fresh herbs like Thai basil or lemon thyme in the wok or pot. Then I covered and cooked them until almost all the clams were open, and discarded the ones that were not. I squeezed some lime juice over the top, stirred, and they were ready for the table. I didn’t have Thai basil, but I did have plenty of thyme, which was a good substitute in a clam dish.

Steamer Clam in Lemongrass Broth

Thai-style Steamed Clams with Lemongrass

Thai Steamed Clam with Lemongrass

Hoi Tom Takrai

หอยต้มตะไคร้

No salt or fish sauce is needed for this dish, just enough water to balance out the natural saltiness of the clams—about 1/4 cup to 1/2 cup for a pound of clams. I use a glass lid, so I can see when all the clams are open. Serve at once when the scents of the sweet clam juice and the lemongrass are at their highest point. You can slurp up the clam broth or save and bottle it if some is left. It is just the best marriage and the cleanest flavor: clam and lemongrass.

Serves: 1

Cooking time: 2 to 3 minutes after the water comes to a boil

1 pound clams, cleaned, then soaked in cold water for 15 minutes and rinsed
1 stalk lemongrass, trimmed and smashed (see Pranee’s video for step-by-step how to prepare lemongrass)
1 fresh Thai chili, smashed lightly
3 cloves garlic, peeled and crushed lightly
1 shallot, peeled, quartered and crushed
6 leaves Thai basil, or 3 kaffir lime leaves and 3 sprigs of lemon thyme
1 tablespoon lime juice, about 1 medium-size lime

Place clams, lemongrass, Thai chili, garlic, shallot, and Thai basil or thyme in a wok or sauté pan. Add 1/4 cup water and cover, using a see-through lid if you have one. Bring to a boil and cook until the clams are completely open, about 2 to 3 minutes. Stir in lime juice and serve immediately.

I Love Thai cooking
Pranee teaches Thai Cooking classes in the Seattle area.
Her website is: I Love Thai cooking.com 

Read Full Post »

East Meets West Salad Dressing

I have been gone from regularly writing in my blog and would like to thank you for your patience. I haven’t forgotten it. In fact, there are many posts with photos and recipes waiting in line! Finding time to focus on writing has been most challenging as I am thinking in two languages but must write it in only one. Here is the Sweet Chili Vinaigrette Recipe that I promised to recreate after the Thai Dinner at Dog Mountain Farm last fall. Finally last month I had a scrap of paper in my hand with my notes on the ingredients and quantities and all of the necessary ingredients in my kitchen. With a little fine tuning, Sweet Chili Vinaigrette is now ready to share with you to help you welcome summer. This delicious dressing has been enjoyed by my friends and family. It is good for easy entertaining as well as for an every day salad dressing. It is a Western dish with an Eastern twist!

Thai Flavor - Sweet Chili Vinaigrette

Mixed Salad with Sweet Chili Vinaigrette

Just two weeks ago I was lucky to have Sylvie, a French chef, caterer and the owner of Sylvie Cooks for lunch. While I prepared Asparagus & Lovage Soup, Sylvie helped me prepare the salad and sweet chili vinaigrette. Thirty minutes later we were enjoying the soup and salad in the warm sunlight on the deck. Thank you to Sylvie for a great presentation on plating the salad. In the photo I use an organic mixed green salad with a few fresh red sorrel leaves from my garden, a hard-boiled egg and a mandarin orange.

 
Mixed Salad Green, Hard-Boil Egg and Mandarin Orange with Sweet Chili Vinaigrette

Mixed Salad Green, Hard-Boil Egg and Mandarin Orange with Sweet Chili Vinaigrette

Having friends over for lunch should be fun and casual. In my case it is often spontaneous in time and cooking style as well.

Sweet Chili Vinaigrette

Sweet Chili Vinaigrette

My Thai take on a vinaigrette when cooking for friends and family is not constrained to just one tradition. In fact, this is not a traditional Thai recipe but a study of the tastes of Thai ingredients co-existing with Western cuisine. It illustrates for students and blog followers that often we can take one ingredient beyond where we usually find it. In this recipe I use the Thai sweet chili sauce, fish sauce and lime juice that I would use in traditional Thai salad dressing (nahm yum) and combine them with the ingredients for a classic vinaigrette such as olive oil, vinegar and mustard.

The forecast for Seattle promises a long week of sunshine and warm weather, so I will prepare hard-boiled eggs and sweet chili vinaigrette again tonight and keep them in the fridge. For dessert, I will prepare Yangon Almond Pancake to serve with strawberries and whipped cream.

Sweet Chili Vinaigrette

น้ำสลัด

Sweet Chili Vinaigrette is easy to love and easy to adapt. The flavor is great—you will hardly recognize the fish sauce or sweet chili flavor, just a nice balance of sweet and salty. The fish sauce is used here in much the same way as a French vinaigrette uses anchovy. The sweet chili sauce has complex ingredients like garlic and chili, but is also just a plain sweet contribution. I love the tangy flavors of the vinaigrette. I recommend adding toasted sesame seeds to the dressing or to the salad itself to bring out more flavors of sesame oil and an essential oriental flavor and texture.

Yield: 1/2 cup

2 tablespoons sweet chili sauce
2 tablespoons lime juice
1 tablespoon coconut vinegar or white wine vinegar
1 tablespoon fish sauce
1/8 teaspoon sea salt
1/4 teaspoon white or black pepper powder
2 teaspoons dijon mustard
2 tablespoons toasted sesame oil
2 tablespoons extra virgin olive oil

Whisk sweet chili sauce, lime juice, coconut vinegar, fish sauce, sea salt, white pepper powder, mustard in a medium size bowl until well blended, about 30 seconds. While whisking rapidly with one hand, use the other hand to pour in the sesame oil and olive oil. Continue whisking for 1 more minute to emulsify the dressing. An alternative method is to place all of the ingredients in a salad dressing bottle and shake well, then shake well again before serving with your choice of salad.

 
© 2012  Pranee Khruasanit Halvorsen
I Love Thai cooking
Pranee teaches Thai Cooking classes in the Seattle area.
Her website is: I Love Thai cooking.com 
 

Related Articles:

Read Full Post »

Quail Eggs, Please

ไข่นกกระทาครับ

Quail Egg - ไข่นกกระทา

Quail Egg – ไข่นกกระทา – Khai Nok Krata

When I was in Phuket last month, on my way to Talad nad – ตลาดนัด – an open air market, my friend’s son asked me to get him some hard-boiled quail eggs please: “Khai Nok Krata Krub” -ไข่นกกระทาครับ. He said it with such expectation, his simple request tickled my fond memory of this petite egg. I loved quail eggs when I was young, just like any Thai kid. On my way back from the Talad Nad, I gave him a bag of a dozen hard-boiled quail eggs. I was glad to find them, afraid that if I had not he might be disappointed. He rolled the egg on the table until its thin shell cracked all around, then pinched the shell to break it and remove it. He popped the whole egg in his mouth with delight. It is a healthy choice for a snack. I could not help but taste one myself when he asked to share with me. I enjoyed the delicious egg with its rich, creamy, mouthful of flavor. Welcome home!

Cook and learn

Cook and learn

Quail eggs are usually served in one of two basic ways: as a 3- to 4-minute hard-boiled egg, or as a sunny side up fried egg. And now you are about to learn to fry quail eggs Thai style. Please enjoy the photos showing a Thai cooking style from a southern Thai fishing village. They are from my trip to Surat Thani in 2011. This technique has a special name: “Khanom Krok Khai Nok Krata” – fried quail eggs in a Khanom Krok Pan, which is similar to a pancake puff or aebleskiver pan. This group of friends was preparing their own healthy snacks on the weekend from chicken eggs and quail eggs in a Khanom Krok pan. They were teaching and learning from each other. I hope this will inspire you to try it at home.

Quail egg cook in Khanom Krok Pan

Quail eggs cook in Khanom Krok Pan

Fried Quail Egg Thai Style

Khanom Krok Khai Nok Krata

ขนมครกไข่นกกระทา

Fried Quai eggs in Khanom Krok pan or ebleskiver

Fried quail eggs in Khanom Krok or aebleskiver pan.

Quail eggs are a delicacy in Western Europe and North America, but in Southeast Asia, quail eggs are abundant and inexpensive. At Talad Nad wet market, you can find fresh quail eggs at the egg vendors, and at the snack vendor you will often find fried or hard-boiled quail eggs ready for you to enjoy. In the Seattle area, fresh quail eggs are available at Asian markets such as Viet Wah or Uwajimaya for $2 a dozen. You can also find them at the Pike Place Market Creamery where a package of 1o eggs from California are $4.75. At University Seafood and Poultry, Washington quail eggs are $6.98 for a pack of 10 eggs.

Yield 10

1 tablespoon cooking oil
10 quail eggs
Maggi sauce and Sriracha sauce

Heat a Khanom Krok pan or Ebleskiver pan on medium-high heat. Use a heat-proof pastry brush to brush the pan with a generous amount of oil. When the pan is hot, crack quail eggs and drop one egg into each hemispherical indentation. Let it cook until the bottom of the egg is crispy, the egg white is cooked, and the egg york is slightly cooked, about 3 minutes. Cook longer if you wish the yolk cooked more. Remove the egg with a metal spoon that fits the size of the indentation. Repeat the cooking until all the eggs are done. Serve with Maggi or Sriracha sauce; use one or two drops of each per egg.

Pranee’s note:  In some cultures, slightly raw quail eggs are preferred. These basic fried quail eggs can be a snack, or incorporated into a fried egg salad, or a side dish to a meal.

© 2013  Pranee Khruasanit Halvorsen
I Love Thai cooking
Pranee teaches Thai Cooking classes in the Seattle area.
Her website is: I Love Thai cooking.com 
 
Follow Me on Pinterest

Read Full Post »

Gone Fishing – ไปตกปลา

Kamala beach early morning

Kamala Beach early morning

Once again I found myself along Kamala Beach taking a leisurely walk—Dern Kin Lom—เดินกินลม—in Thai this means “walk to eat the wind.” I loved watching what was happening on the beach and wasn’t sure if I was walking slower, or the beach was getting longer, or I was simply spending so much time talking to people along the way. I knew for sure that I took quite some time taking pictures and talking to the villagers who were fishing leisurely for a type of fish called sand whiting. At early morning, the whole family together, gone fishing – ไปตกปลา.

IMG_0186

Families enjoy the rays of sunrise and fishing for sand whiting.

While mom fishes and enjoys her solitude, the children are at play with the sand and the waves.

IMG_0191

A white sand beach makes a great playground.

Shrimp are used for bait for sand whiting fishing.

Sand Whiting

Andaman Ocean Sand Whiting – ปลาทราย

Sand Whiting -ปลาทราย – pla sai

Sand whiting – ปลาทราย – live in shallow areas along the coast in both the Pacific and Indian oceans. Kamala Beach has a nice sandy beach, a perfect habitat for sand whiting, which live on bugs and small shrimp. A full-grown sand whiting is about 6 to 8 inches long, with a thin, narrow body about 1-inch wide. It has a delightful sweet flavor and a firm texture. Kamala villagers have a passion for sand whiting fishing. It is a tradition as old as the village itself.

Pla Sai Kratiem Prik Thai

Pla Sai Kratiem Prik Thai

For a Thai culinary delight, look for fresh sand whiting on local restaurant menus. The most popular dishes are Kratiem Prik Thai (with garlic and pepper), tom som (sour soup), tod khamin (fried with salt and turmeric), gaeng som (sour curry) and my grandma’s  favorite, tod tao jeow (fried with salted soy bean). The photo above is of Kratiem Prik Thai Pla Sai from Tha Maprow Restaurant in Phuket.

IMG_0061

Phuket sand whiting fish soup – Tom Som Pla Sai

At Kan Eng Restaurant at Chalong Pier, our family ordered Tom Som Pla Sai – Sand Whiting Fish Soup – a simple soup to savor the freshest sand whiting.

I hope you will enjoy our family recipe. It is typical of the recipes that you will find in Phuket and other Southern Thai kitchens.

Phuket Sand Whiting Fish Soup

Tom Som Pla Sai

ต้มส้มปลาทราย

Tom Som is a basic sour soup with a hint of sweet from the freshest fish. It is a typical sour soup in the Southern region of Thailand where sour fruit is used to give the dish its sour flavor. Each province has it owns preference among the sour fruits, such as som khaek or Asam fruit,  salak, hibiscus or young leaves, and tamarind or young leaf.

The word “som” has two meanings: one is “orange,” or “sour taste.” We also use som to call or identify sour tastes such as som khaek or asam fruit for example. Most sour fruits contains citric acid; when they are added to soup or curry dishes there is no need for vinegar or lime juice. An important part of learning the art of Thai cooking is understanding the sophisticated use of sour fruits to balance the sour flavor in Thai soups and curries. In America, substitutions for the sour fruits include sorrel leaves, tamarind, and Jamaican hibiscus.

Yield: 3 cups broth

Serves: 4

2 cups water
1 teaspoon shrimp paste
3 pieces dried Asam fruit- Garcinia Atroviridis –ส้มแขก , or 1 tablespoon tamarind concentrate
3 stalks lemongrass, trimmed, smashed, and cut into 3 inch-pieces
2 shallots, peeled, smashed, and cut in half
8 sand whiting, or 2/3 pound halibut cut into chunks
¼ teaspoon salt

To make lemongrass and shrimp paste broth, bring water to a boil in a medium size pot on medium high heat. Add shrimp paste and Asam fruit or tamarind concentrate. Stir until shrimp paste is dissolved. Add lemongrass and shallots and let mixture boil for 5 minutes. Place fish in the boiling broth, which should be slightly covering the fish. Cook until the fish changes color and becomes opaque and the size is a bit smaller—about 3 minutes. Stir in salt. Remove from heat and serve.

© 2012  Pranee Khruasanit Halvorsen
I Love Thai cooking
Pranee teaches Thai Cooking classes in the Seattle area.
Her website is: I Love Thai cooking.com 
 
Sand Whiting Fishing Competition 2012

Sand Whiting Fishing Competition 2012

Kamala women love fishing.

Read Full Post »

My Candy

This is not a Halloween Pumpkin Candy, but it is the Thai kabocha candy I enjoyed when I was growing up in my village in Thailand. Kabocha pumpkin is a squash that Thais cook to make a variety of dishes, sweet or savory. It is my tradition for the blog to share a new kabocha recipe with you every year. (Past years’ recipes include Kabocha Pumpkin Soup, Thai Kabocha Pumpkin Custard, Spiced Rum Kabocha Pumpkin Mousse, Pumpkin Curry and my mom’s Stir-Fried Kabocha with Pork.) This year, many aspects led me to choose a recipe for Thai Kabocha Pumpkin Candy-น้ำเต้าเชื่อม–Namtao Chuam. It is easier than a pumpkin pie, with more pumpkin satisfaction as there are not many ingredients involved—just kabocha pumpkin and brown sugar. Thais are fond of cooking fruit or root vegetables such as bananas, kabocha, and sweet potatoes in brown sugar. The results comes out well-covered with caramelized sugar and taste like candy. This technique is called -Chuam – เชื่อม in Thai.

Thai Kabocha Pumpkin Candy

Another reason that I chose this recipe is that in Seattle, fall is the beginning of kabocha pumpkin season. My friend Pee Som Sawan brought Thai kabocha pumpkin candy to the potluck for the first time this year, as she has done every Sunday for the past 10 years. Then another day at a dinner party, I reconstructed my kabocha pumpkin custard with kabocha candy and the custard instead of following the regular recipe. This was because it can be hard to find the small kabocha pumpkin needed for that recipe and the timing was complicated. But most of all, I chose the Kabocha Pumplin Candy recipe for this year because it can be hard to compete with the many food bloggers out there to come with an exotic recipe and I thought what could be better than my Thai grandma’s recipe? So I hope you enjoy this old time, easy and simple recipe that you can prepare at home.

Kabocha Pumpkin Candy

I want to thank to my friend Pee Som Sawan who shared her easy tips for simplifying the cooking technique. She suggested that I cut and lay the kabocha pumpkin slices in a pan that has a glass lid, sprinkle them with brown sugar or any type of sugar, then add enough water to the bottom of the pan to create steam when they cook. My only tip to add is how to find the right kabocha pumpkin for the best results. (Please see Pranee’s tips on selecting a kabocha pumpkin.)

Kabocha Pumpkin Candy

Cover the pan with the glass lid and cook on medium heat until the kabocha is soft and tender when tested with a fork, but still holds its shape. Remove the lid. If there is too much water left, let it cook without the lid until the syrup has thickened. Serve for dessert or as a snack.

Thai Kabocha Pumpkin Candy

Namtao Chuam

น้ำเต้าเชื่อม

Serves: 4

The total time for this dish, including cutting and cleaning and cooking should be about 3o minutes. The cooking itself is about 20 minutes. It is delicious warm or cold, with whatever syrup is left behind in the pan or with salted coconut milk. It tastes so heavenly! Skin and flesh are all good together. It is like a cheesecake with a natural crust. This recipe has sugar to just the right amount. For a more decadent dessert, please add more sugar. Enjoy this any time of day!

3 to 4 wedges of Kabocha pumpkin (see instructions)
1/2 cup brown sugar
2 pinches salt
3/4 cup water
6 tablespoons coconut milk plus 2 pinches of salt, optional
 

Remove any bad skin from the kabocha squash but keep all of the green skin; wash and dry. Cut into wedges about 2 inches wide, then cut each wedge in half across the middle to get two pieces from each wedge. Lay the pumpkin in the bottom of the pan and add the water. Cover with a glass lid and cook on medium heat until the kabocha is soft and tender when tested with a fork, but still holds it shape—about 15 minutes. Remove the lid. If there is too much water left, let it cook some more until the syrup has thickened. Remove the kabocha pumpkin candy to a serving plate and pour the syrup on top. If desired, stir the salt into the coconut milk until combined, then pour it on the top of each kabocha candy as a garnish before serving.

I Love Thai cooking
Pranee teaches Thai Cooking classes in the Seattle area.
Her website is: I Love Thai cooking.com 
 
Related articles

Read Full Post »

Blue & Purple 

Dok Anchan – Butterfly Pea – Clitoria ternatea

What is that flower behind your ear? นั้นดอกอะไรอยู่หลังใบหูของคุณ. In a Thai village, the answer might be that it is a jasmine, hibiscus or butterfly pea flower. You often see women or men in Thai villages wearing flowers behind their ears on special occasions. For me personally, my answer would be that it is a blue butterfly pea flower.

In addition to wearing a blue butterfly pea flower – ดอกอัญชัน (dok anchan) or Clitoria ternatea – behind my ear while working in my garden, I would like to introduce you to its properties as a Thai culinary flower. Butterfly pea is an annual vine that is native to the land in southeast Asia near the equator. Thais love dok anchan for it beautiful unique looks and for its culinary uses as a food coloring and as an edible flower. My friend Somrak uses dok anchan in her Thai cooking at home, shredding it into a fine ribbon and adding it to rice salad, or for making a tea, or adding blue color extract to steamed jasmine rice. Many hotels in Thailand greet guests with a welcome drink made from dok anchan. But above and beyond all of these uses, our ancestors recognized it for its medicinal benefits, which include its anti-depression, anti-inflammatory, and anti-cancer properties. The blue concentrate added to hair products also promotes healthy hair growth (please see related links below).

In Thailand I grew butterfly pea plants on a trellis, but often enjoyed the harvest from friends’ gardens. In the Thai village lifestyle in the old days we shared or exchanged our surpluses with one another. The vines can produce many flowers a day, so often they went unused. This meant that at any  moment there were always flowers waiting for you in someone’s garden and we helped ourselves when needed. The pigment in the flowers comes from anthocyanins, and has long been widely used in Thai and Malaysian cuisines for blue or purple food coloring for butterfly pea sticky rice. In Thailand, any foods prepared with shades of blue, purple or pink come from dok anchan. In addition, southeast Asia uses the flowers in traditional Ayurvedic medicine.

Double pedals butterfly pea flower

Where can you get dried butterfly pea flowers? In the U.S. you can mail-order homegrown organic air-dried butterfly pea flowers from Etsy.com and Alibaba.com. If you wish to plant them next summer for your backyard vine, this may be the right time to purchase them. Check online for a few sources where you can purchase butterfly pea seedsThompson & Morgan has the seeds for Butterfly Pea Fabaceae

Thai desert with dok anchan blue color

Khanom Chan – ขนมชั้น – Thai one-layer cake with anchan flower food coloring gets pale purple when cooked.

Thai snack, a dumpling with purple rice flour dough

Chaw Muang – ช่อม่วง, steamed dumpling, a famous Thai appetizer ใช้สีทำขนมช่อม่วง, ขนมดอกอัญชัญ


Chaw Mueng – purple dough and filling

Chaw Muang is a traditional Thai snack that can have a sweet or savory filling. After preparing a butterfly pea purple water infusion, the water is added to the dough according to the amount required in the recipe.

Step-By-Step Instructions for Making Blue and Purple Butterfly Pea Color Extracts

ขั้นตอนการทำน้ำดอกอัญชัญผสีฟ้าและสีม่วง

Blue color from dried butterfly pea flowers

Nam dok anchan (น้ำดอกอัญชัน)

First, steep 12 dried or fresh butterfly flowers in 1 cup boiling water.

Dried butterfly peas after 15 minutes of soaking in boiling water

Fifteen minutes later, or when no color is left in the petal, strain the liquid and discard the flowers. You will get deep blue water.

Fifteen minutes later, deep blue color is ready to use as blue food coloring.

Add a little lime juice to get a purple-red color

Add a few drops of lime juice. This will change the ph level and you will get purple water.

Pranee’s Tom Yum Martini with Butterfly Pea Coloring

I made butterfly pea simple syrup a day before my dinner party in order to make my signature Tom Yum Martini. A friend requests that I make them each year when I visit home.

I Love Thai cooking
Pranee teaches Thai Cooking classes in the Seattle area.
Her website is: I Love Thai cooking.com  

Read Full Post »

Loner

When I left East Wenatchee, my Thai friend, Suprattra Pornprasit gave me a bag of fully ripe apricots from her tree. When I returned home, I immediately cooked them with sugar until it looked almost like jam. I chilled the mixture overnight and prepared the apricot ice cream the next days. Frozen dessert is great to have around. I didn’t add any spices as apricot flavor really shines by itself at the frozen stage. I tried serving the apricot ice cream in many different ways to accompany other desserts, but its flavor seemed pale and uninteresting by comparison. The best way, I learned, is to enjoy apricot ice cream by itself; the flavor is so bright and lively and right after a Thai meal. I would do exactly the same ice cream with local apricots next summer.

Apricot Ice Cream – ไอศครีมแอพริคอท

Apricot Ice Cream

ไอศครีมแอพริคอท

Serves: 12

3 cups apricot puree from fully ripe apricot flesh, skin and stones removed
1 cup sugar
1 cup heavy whipping cream
1 cup milk

Place apricot puree and sugar in a medium sauce pan and cook over medium heat until the fruit is translucent and has a jam-like texture, about 20 minutes. Chill or keep in the fridge overnight.

Place heavy whipping cream and milk in another medium saucepan and cook until it begins to steam, then let it cook on low for 2 minutes. Bring to room temperature and chill. Place in an ice cream maker and follow the manufacturer’s guidelines to make ice cream. Remove and keep in a freezer-proof container. It will keep in the freezer for up to 2 months.

I Love Thai cooking
Pranee teaches Thai Cooking classes in the Seattle area.
Her website is: I Love Thai cooking.com 


Read Full Post »

Add Zing to Your Limeade

Ginger Limeade

During August I try to slow down my summer activities and I enjoy staying home and working in the garden. After a hard-working day in the yard, I reward myself with a homemade ginger limeade. This recipe is used often in summer cooking classes for kids. This week it worked out perfectly for me to test the recipe one more time before sharing it with you and savor the results at the end my gardening day. I planned ahead to have the  freshest limes and ginger on hand, then I made the limeade in the morning so all the flavors would have a chance to blend and chill to the highest delight.

Lime – มะนาว

Thai cuisine depends on lime flavor. It is in almost in every dish. One should always have at least half a dozen limes on hand.

น้ำเชื่อมขิง – Ginger Simple Syrup

Crush the ginger until juicy and softened before adding it to the pot of sugar and water.

Ginger Limeade

Nam Manoa Khing

น้ำมะนาวขิง

Before you put together the ingredients to make ginger limeade, I would like you to follow closely my culinary insight on how to make ginger infused simple syrup. I didn’t make this technique up, it has been in my family for a long time. Infused fresh ginger provides a different flavor than dry powdered ginger or the fried ginger used in savory dishes. Crushing the ginger until the juice comes out helps break down the ginger’s cell walls. Thais use smashed ginger in a simple syrup for many dessert dishes. The aroma and taste of fresh ginger syrup is the first entry to sweet dishes such as Bua Loi Nam Khing (glutinous rice ball in sweet ginger syrup). I add ginger syrup to my limeade for a refreshing drink to enjoy in the hot summer or with a Thai meal.

Serves: 6

4 cups hot water
6 (1-inch) ginger pieces, peeled and smashed, about 3 ounces or 86 gram
1 cup brown sugar
3/4 to 1 cup lime juice, from 4 to 6  limes
10  slices of  limes, from one lime, for garnish
6 cups ice cubes

To make the brown sugar-ginger syrup, bring water, ginger and sugar to a boil in a medium-size pot. Let it boil on medium heat for 15 – 20 minutes. Remove ginger and strain. After it has cooled to room temperature, stir in lime juice.

Set aside enough lime slices for six glasses of limeade, then add remaining lime slices to a nice pitcher and pour in the limeade mix. Chill overnight, or for at least 6 hours. Before serving, add 2 cups ice cubes to the pitcher and stir. Fill six tall glasses with ice cubes and garnish each with a lime slice before adding the limeade.

Pranee’s note: 

To peel or not to peel? Peeling ginger is a personal option. I prefer to just peel off any tough skin or bruised parts. Ginger is abundant in Thailand. It is reasonably priced and I always had some at home, fresh and in the freezer.

© 2012 Pranee Khruasanit Halvorsen
I Love Thai cooking 
 Pranee teaches Thai Cooking classes in the Seattle area. Her website is: I Love Thai cooking.com .
Follow Me on Pinterest

Read Full Post »

The Holy Herbs

It has been a busy summer for me so far. This has kept me away from writing, but it doesn’t mean I didn’t cook up a delicious dish for my Thai Kitchen blog. I have a lot of photos and notes and testings that have been done but that are waiting for me to write them up. While waiting for those posts from my food experiences in July, I have a delicious, unpretentious and impromptu dish to share with you. From my garden and Thai kitchen to yours!

Oregano Buds

Why oregano? Ten years ago, oregano was widespread via self-sown seeds in my Seattle garden near Thai spirit house. That year, my niece was visiting from Thailand and I used oregano in place of Thai holy basil when I prepared Phad Kraprow Gai (stir-fried minced chicken with Thai holy basil). I didn’t tell her that I’d used oregano and she didn’t notice the difference. Later on, when I told her it was not Thai holy basil, but Greek holy oregano we laughed! Fresh oregano has a peppery and pungent taste that I love and which is similar to Thai holy basil. Try using oregano in place of Thai holy basil when oregano leaves and blossoms are abundant in your garden.

Oregano Blossoms

Yesterday was my day off from traveling on the road and I was hanging around home and working in my garden. My girlfriend and I were immersing ourselves in the sun, surrounded by flowers, herbs and weeds. All of a sudden I realized that most of my oregano plants were blossoming. As it got close to lunch time, I began to think about what I could cook with those blossoms. I decided to make Oregano Blossoms Fried Rice for lunch. I cut the stems down to six inches long so there were some leaves attached to yield more leaves until the end of the summer.

Oregano Blossoms Fried Rice

Does frozen cooked rice work for this dish? This is the first time that I have experimented with previously frozen rice from my fridge. I thawed the rice before using it to loosen up the cooked rice grains and it worked perfectly well for fried rice. Off course my passion is to share what is happening in my Thai Kitchen with you, so here is my recipe for oregano blossoms.

Oregano Blossoms Fried Rice with Tomato and Garlic

Khao Phad Dok Oregano Makrua Thet Kratiem

ข้าวผัดดอกออริกาโนกับมะเขือเทศและกระเทียม

Oregano is not a Thai herb, but it has long been a substitute ingredient for me in the absence of my beloved Thai holy basil. Both belong to the mint, or Lamiaceae, family. The flavor undertones of both herbs are alike, and as a gardener I love herbs that can grow wide and are easy to take care of. Now that I have discovered how great oregano blossoms taste in this recipe, I will enjoy the same dish often this summer! Cheers to the holy herbs!

Serves: 2 to 4

3 tablespoons canola oil
6 cloves garlic, peeled, crushed and chopped
1/2 onion, sliced
1 cayenne pepper, sliced (remove seeds if preferred)
1/2 cup oregano leaves and blossoms, stems removed
1 large tomato, cut into wedges
2 eggs
3 cups cooked rice, cooled or frozen
2 pinches of salt, optional
1 tablespoon soy sauce
1 tablespoon fish sauce
4 lime wedges
8 sting beans or cucumber or any fresh vegetable condiment, optional
 
Heat canola oil in a skillet or wok on high heat. Add garlic and stir until golden, then add onion, cayenne and oregano leaves and blossoms and blossoms. Stir until fragrant, about 30 seconds. Clear the center of the wok and scramble in eggs for two seconds before adding rice. Stir in soy sauce and  fish sauce. Serve with lime wedge, vegetable condiment and spicy fish sauce. (See recipe below).
 
© 2012 Pranee Khruasanit Halvorsen
I Love Thai cooking
Pranee teaches Thai Cooking classes in the Seattle area.
Her website is: I Love Thai cooking.com  
 
Follow Me on Pinterest
 

Read Full Post »

Monastery Banana Bread

Assorted desserts

My son and I were at the Atammayatarama Buddhist Monastery early in the morning one day last week. We had volunteered to water over 20 newly planted trees surrounding the new meditation hall. Later in the morning I also offered food to three Thai monks. They were Southern Thai dishes such as stir-fried spicy stinky been with beef, Thai chili dip, Thai yellow curry rice and fried eggs. Since I am familiar with the kitchen, I also became a temporary helper there for the day. I helped visitors to properly place foods they had brought from home and to properly present them to the monks. At the end of the day, there were more than a dozen fully ripe bananas that had not been eaten. Waste not, I offered to take them home and return them to the Monastery as banana bread.

My banana cake recipe

This is my banana cake recipe from Thailand. I modified it into a quick and easy recipe for banana bread.

My banana bread recipe has long been on my list to share with you, but it never seemed to work out to do so until now. First, I found my 28-year-old recipe notebook which is always misplaced and hard to find. Second, I had the free time to make banana bread as well as a good reason for making it. The next day I made 4 loaves with one single recipe. It is a perfect recipe to bake once and share with friends and families as hostess gifts or for a community event.

Banana Bread-Cake – ขนมปังเค้กกล้วยหอม

This recipe makes an oil-based cake or quick bread that is baked in a loaf pan like a bread. Since vanilla and butter taste so good with bananas, I kept them in my recipe. I used olive oil because it is a healthy fat, but you can use any vegetable oil. There are no nuts in this recipe because I prefer it without. This recipe is light, somewhere between banana bread and banana cake. If I wanted to make a banana cake, I would keep the recipe the same but add one more cup of sugar, bake it in a cake pan, and then frost it with my dreamy coconut frosting recipe. But since I baked it in a loaf pan, let’s call it banana bread.

Banana Bread

Khanom Cake Kluey Horm

ขนมเค้กกล้วยหอม

This recipe makes four loaves of banana bread with a cake-like texture. It is unbelievably easy. Just stir the ingredients together and bake with fun. Enjoy it plain or with the frosting. If you wish to have it plain but sweeter, you can add one more cup of sugar or garnish it with frosting.

Yield: 4 loaves

7 cups cake flour
1 tablespoon baking soda
2 tablespoons baking powder
1 ½ teaspoons salt
2 sticks butter, melted
¾ cup olive oil
10 to 12 ripe banana, peeled, sliced and chopped
3 1/4 cups white sugar
8 eggs
2 tablespoons vanilla

Preheat the oven to 350 degrees F. Prepare loaf pans with oil and coat with flour, then set aside.

Sift flour, baking soda, baking powder and salt twice.

In a large bowl or 6-quart pot, stir butter, olive oil, banana and sugar together until blended. Then stir in eggs and vanilla until creamy. Add flour mixture 1/2 cup at the time, stirring after each addition until mixed. It will yield about 16 cups of batter. Divide equally into 4 loaf pans. Baking time is about 50 to 60 minutes. Bake without disturbing the cake for 45 minutes and then check the cake with a toothpick or wooden skewer; when it comes out clean, remove the pans from the oven. Let them rest on a wire rack for 15 minutes, then remove banana bread from the pans.

© 2012 Pranee Khruasanit Halvorsen
I Love Thai cooking
Pranee teaches Thai Cooking classes in the Seattle area.
Her website is: I Love Thai cooking.com  
 
Follow Me on Pinterest

Related articles

Read Full Post »

Romancing with Lavender

Can you smell that? This time it is something familiar to us all: lavender. It is not an indigenous Thai ingredient, but it is one that is easily adapted to Thai kitchens, just like any fragrant flower. So here is my contemporary Thai dessert, Coconut-Lavender Ice Cream. It was born last week from romancing with lavender in my kitchen. It has been three years since I met my friend Kathy Gehrt, cookbook author and the founder of the website Discover Lavender. She opened my world. Like most of us, I wondered how could one eat perfume flowers? The more I learn about how to cook with lavender, the wilder I get. It is an amazing discovery. For a change this post is not directly related to Thai cuisine, but a study of taste as a food lover. One should never stop exploring.

Culinary Lavender

Two years ago my friend purchased a few varieties of culinary lavender plants from the Lavender Wind Farm. This summer the plants took off. They have yielded many flowers, so last Tuesday Barbara and I got together and celebrated our first harvest day. We prepared lunch together and added a lavender accent to everything we had for lunch. We got creative. First I made an avocado and nectarine salad with lavender as a fragrant herb and garnish. Then we added a sweet bread spread with lavender butter, followed by baked salmon with lavender salt, and a lovage and lavender earl grey tea. After lunch we made lavender sugar, lavender infused honey and lavender salt. How lucky am I to have then also returned home with two large bunches of fresh lavender? Please feel free to check out my photos on I Love Thai Cooking flicker.

Coconut-Lavender Ice Cream with mixed melon

 Coconut-Lavender Ice Cream is ideal to serve in a summer month with a chilled mixture of water melon, honey dew melon and cantaloupe.

For a summery dessert in July there is nothing better than coconut ice cream with a scent of lavender. I have made a few versions and love to keep the coconut with a custard texture as the main flavor followed by a hint of lavender. It is a simple, easy recipe but the trick is to heat the cream mixture above 175 degrees, then after tempering it with the egg, bring it back to the stove top again but do not let it get higher than 160 degrees. When churning the ice cream, I recommend starting with a cold batter then do not churn it more than needed—about 25 minutes or until it starts to form a solid ice cream consistency. Finish the process in the freezer. Follow these tips to get a custard-style ice cream with a soft silky texture. I hope you have a chance to share this coconut-lavender ice cream with your families and friends this summer. Let’s create a romantic flavor and the fragrance of lavender in the air.

coconut cream, half and half and lavender

Heavy whipping cream, coconut milk and lavender.

Coconut-Lavender Ice cream

Coconut Lavender Ice Cream

ไอศครีมมะพร้าวลาเวนเดอร์

Anyone can make ice cream today. All you need is a simple machine and a good recipe to follow. For a lactose-free recipe, simply replace the heavy whipping cream with the same amount of coconut milk.

2 cups heavy whipping cream
2 cups coconut milk
3 tablespoons culinary lavender
8 egg yolks
1 ¼ cup lavender sugar (please click to see recipe)
 

First you will need to freeze your ice cream churning bowl at least 24 hours beforehand.

Prepare an ice water bath in a container that is larger than the pot.

Bring heavy whipping cream, coconut milk and lavender to a gentle boil and cook on medium-low with a gentle boil for 5 minutes or until it reaches 175 degrees.

Whisk yolks and lavender sugar in a large bowl until they are creamy, light and puffy like ribbon, about 10 to 12 minutes.

While slowly pouring the cream mixture into the yolks and lavender sugar mixture, stir constantly with the other hand to prevent the egg from curdling. Strain the mixture to remove the lavender as you pour it back into the same pot; whisk constantly while cooking on medium-low heat. The setting should keep the temperature below 160 degrees and the mixture should be steaming but never boiling. Observe the texture; watch for it to begin to thicken, changing from creamy and beginning to take on the appearance of a soft custard. When it is thick enough to coat the back of the spoon, remove the pot from the heat and place it in the prepared ice water bath.

Cool it in the ice bath and and then pour it into the prepared ice cream machine. Turn on the machine and continue according to the machine instructions, usually about 20 to 25 minutes. It should have a texture of soft ice cream. Put it in the freezer for 4 hours before serving.

Pranee’s Note

For further study on making ice cream, please check out the science related to making ice cream by Harold McGee.

Where can you find culinary Lavender in Seattle?

I found culinary lavender at Pacific Food Importers, Inc. By chance you can sometime fine them at some Seattle Farmers Markets. But best of all is if you have sunny spot in your garden, plant your own culinary lavender. Kathy Gehrt recommends the Royal Velvet variety. Next I recommend that you immerse yourself in a lavender world by visiting the Sequim Lavender Festival in Sequim, Washington.

Lavender at a Hmong farmer’s stand at the Columbia City Farmer Market

© 2012 Pranee Khruasanit Halvorsen
I Love Thai cooking
Pranee teaches Thai Cooking classes in the Seattle area.
Her website is: I Love Thai cooking.com  
 
Follow Me on Pinterest

Read Full Post »

Three Best Friends

สามสหาย – Saam Saahai

To consider oneself a Thai cook, one should understand the fundamentals of  Kratiem Prik Thai—garlic-black pepper-cilantro root seasoning paste. Like Nam Prik or chili dip, it is a truly Thai invention without any influences from neighboring countries. Like the classic pesto sauce that originated in Genoa in the Liguria region of northern Italy, Kratiem Prik Thai is a classic Thai culinary seasoning that has been around for as long as the existence of Siam.

Garlic, black pepper and cilantro roots

Pounding a mortar and pestle to make a Kratiem Prik Thai paste is a classic Thai culinary technique, and this paste is prepared practically everyday in every Thai kitchen where it serves as a seasoning for any meat or seafood. There is no need for more herbs than just this awesome three: garlic, black pepper and cilantro root. I like to call them the “three best friends” or, in Thai, สามสหาย – Saam Saahai. They often appear together in Thai recipes. Like The Three Musketeers, they are”All for one, one for all.”

Garlic – Black Pepper – Cilantro Root

Kratiem – Prik Thai- Rark Puk Chee

กระเทียม – พริกไทยดำ – รากผักชี

The Kratiem Prik Thai paste is simply made with just the three main ingredients of garlic, black pepper and cilantro. When balanced with salty and sweet from soy sauce and brown sugar, they deepen the flavor of grilled meat, appetizers, meat patties for soup, or marinades for meat before deep-frying. Then sweet chili sauce and Sriracha hot sauce may be served alongside the meat with a vegetable condiment. I hope you have a chance to learn how to make the Kratiem Prik Thai paste below and experiment with it in your cooking at home, from marinating your steak to adding it into a meat patty or simply sauteing it with seafood for a quick and easy main dish.

Garlic – Black Pepper – Cilantro Root Kratiem – Prik Thai – กระเทียม – พริกไทยดำ – รากผักชี

Place garlic, black pepper and cilantro roots in a mortar.

Garlic – Black Pepper – Cilantro Root, the three ingredients in  Kratiem – Prik Thai – กระเทียม – พริกไทยดำ – รากผักชี

With pestle, pound garlic, black pepper and cilantro root in a medium-size mortar

Garlic – black pepper – cilantro root Kratiem – Prik Thai – กระเทียม – พริกไทยดำ – รากผักชี

until it forms a fine paste, about 2 to 3 minutes.

Garlic, black pepper and cilantro roots with brown sugar and soy sauce: Kratiem – Prik Thai – กระเทียม – พริกไทยดำ – รากผักชี

Add brown sugar and soy sauce and stir in circular motion with pestle until it is well-blended and smooth.

Thai Basic Seasoning Paste

กระเทียม – พริกไทยดำ – รากผักชี

This recipe makes a large quantity. You can store it in the refrigerator and use it as needed, or freeze it in convenient quantities in an ice cube tray. Use 2 tablespoons of the finished paste per pound of meat or seafood as a marinade before grilling or frying. You can also use it as a basic seasoning paste in ground meats cooked for Thai appetizers. Please click on the photo for a link to a recipe for using the paste with seafood or shrimp.

 
Yield: 1/2 cup
 
1 tablespoon black pepper corns, or more
10 cloves garlic, peeled and minced
8 cilantro roots or 4 tablespoons chopped cilantro stems
6 tablespoons soy sauce
1 to 2 tablespoons brown sugar
 
Place garlic, black pepper and cilantro roots in a medium size mortar. With pestle, pound the ingredients until they form a fine paste, about 2 to 3 minutes. Add brown sugar and soy sauce and stir in circular motion with the pestle until it well-blended and smooth. Store in a mason jar in the refrigerator for a week, or freeze for up to 6 months. Please see suggestion above on how to incorporate this seasoning paste in your cooking.
 
Alternative preparation method: Place garlic, black pepper, cilantro roots, soy sauce and sugar in a blender and blend until it reaches the desired texture. I like the consistency shown above which still maintains a little texture.
 
Note: Please wait to see my next post when I will discuss in depth how to incorporate Kratiem Prik Thai Rark Puk Chee seasoning in your daily cooking.
 
© 2012 Pranee Khruasanit Halvorsen
I Love Thai cooking
Pranee teaches Thai Cooking classes in the Seattle area.
Her website is: I Love Thai cooking.com  
 
Follow Me on Pinterest

Read Full Post »

From a Thai Village to the Big City

I grew up in a world full of lemongrass and could tell you thousands of stories that evolve around this fragrant herb, from planting and cooking it, to all things related. But I will keep this short and sweet so that you can go straight to my recipes and prepare them.

Lemongrass Paste & Lemongrass Tartar Sauce

Here in Seattle, I always have many lemongrass stalks in my refrigerator—not in the backyard like in Thailand, but both methods work for the Thai cook who wants to be able to add lemongrass to a recipe at a moment’s notice. When I do a hands-on class I make sure students learn how to prepare lemongrass three ways (please watch the video). This lesson results in a lot of leftover lemongrass, which I cook, freeze, or make into a powder. A few days ago my friend was visiting me and our discussion of this and that led us to the kitchen. I wanted to make a pesto-like paste for her to add to her marinade sauce. I decided to stop short of making the lemongrass paste and we wandered off to another topic. The idea for us today is to use up the lemongrass in my fridge and turn it into a versatile form ready to be incorporated into many dishes such as a wet rub for a marinade or a lemongrass tartar sauce to go with fried rock fish for a family dinner.

I wish you fun cooking this summer with the lemongrass paste recipe from my kitchen. First you have to start your lesson at home by learning how to prepare lemongrass for Thai cooking.

Lemongrass Cutting 101 – slicing it right

Click picture to view video on slicing lemongrass by Pranee

Slicing lemongrass properly is an important part of Thai cooking. I hope you spend some time learning the right way to do this and get enough experience to develop a solid technique. Don’t try to save time by slicing lemongrass into bigger pieces because you are using a food processor. The grain of this fibrous plant runs lengthwise of the stalk, so slicing it thinly against the grain is essential. Besides, it provides aroma therapy and a mindful moment in the kitchen!


Lemongrass Paste, Lemongrass Tartar Sauce

Lemongrass Paste 

Lemongrass has a citrus aroma that can blend into any dish. I make a lemongrass paste using extra light olive oil that you can use well beyond Thai cuisine. Like lime and lemon, it blends itself into any cuisine. I spread it out on toast like pesto, or add it to rice, curries, marinades, or just about anything. All become so delightfully fresh. Also, to my amazement, the fragrance of lemongrass and olive oil are divine together.

yield: 1/2 cup

5 lemongrass stalks, trimmed and sliced (please watch Pranee’s Demonstration on YouTube)
1/4 cup extra light olive oil
1/2 to 1 teaspoon salt

Place lemongrass, olive oil and salt in the blender or mini food processor and blend. Use spatula to clean the side to make sure it well mixed. Repeat the process repeat the process several times until getting a smooth texture. Store in a jar, keep in the fridge for a week or up to three months in the freezer.

Lemongrass Tartar Sauce with Dill

Lemongrass Tartar Sauce with Dill

The idea of creating a lemongrass tartar sauce came to me randomly. My son loves fish with tartar sauce and I have made tartar sauce for him many times. Many western chefs, such as Christine Keff from the Flying Fish in Seattle, have created an awesome lemongrass aoli, so I thought why not a tartar sauce? I use serrano peppers and dill as they go really well with fish and keep the color palate to just green. I love the results and would use this sauce in many ways, not just for fried fish.
Yield: 1/2 cup
 
1/4 cup mayonnaise (I used Best Foods mayonnaise with olive oil)
2 tablespoons lemongrass paste, from recipe above
1/2 -1 whole serrano pepper, grated with a microplane
1 clove garlic, grated with a microplane
1 tablespoon small diced pickled cucumber
3 tablespoons lemon juice (I used calamansi juice)
1 tablespoon dill, chopped
 

In a one-cup bowl, stir together mayonnaise, lemongrass paste, serrano pepper, pickled cucumber and lemon juice until well-mixed. Stir in dill until it is well-combined. For the best results, prepare the night before or at least 30 minutes before serving.

© 2012 Pranee Khruasanit Halvorsen
I Love Thai cooking
Pranee teaches Thai Cooking classes in the Seattle area.
Her website is: I Love Thai cooking.com  
 
Follow Me on Pinterest
 
Related articles

Read Full Post »

Older Posts »