My Candy
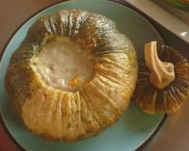
This is not a Halloween Pumpkin Candy, but it is the Thai kabocha candy I enjoyed when I was growing up in my village in Thailand. Kabocha pumpkin is a squash that Thais cook to make a variety of dishes, sweet or savory. It is my tradition for the blog to share a new kabocha recipe with you every year. (Past years’ recipes include Kabocha Pumpkin Soup, Thai Kabocha Pumpkin Custard, Spiced Rum Kabocha Pumpkin Mousse, Pumpkin Curry and my mom’s Stir-Fried Kabocha with Pork.) This year, many aspects led me to choose a recipe for Thai Kabocha Pumpkin Candy-น้ำเต้าเชื่อม–Namtao Chuam. It is easier than a pumpkin pie, with more pumpkin satisfaction as there are not many ingredients involved—just kabocha pumpkin and brown sugar. Thais are fond of cooking fruit or root vegetables such as bananas, kabocha, and sweet potatoes in brown sugar. The results comes out well-covered with caramelized sugar and taste like candy. This technique is called -Chuam – เชื่อม in Thai.

Thai Kabocha Pumpkin Candy
Another reason that I chose this recipe is that in Seattle, fall is the beginning of kabocha pumpkin season. My friend Pee Som Sawan brought Thai kabocha pumpkin candy to the potluck for the first time this year, as she has done every Sunday for the past 10 years. Then another day at a dinner party, I reconstructed my kabocha pumpkin custard with kabocha candy and the custard instead of following the regular recipe. This was because it can be hard to find the small kabocha pumpkin needed for that recipe and the timing was complicated. But most of all, I chose the Kabocha Pumplin Candy recipe for this year because it can be hard to compete with the many food bloggers out there to come with an exotic recipe and I thought what could be better than my Thai grandma’s recipe? So I hope you enjoy this old time, easy and simple recipe that you can prepare at home.

Kabocha Pumpkin Candy
I want to thank to my friend Pee Som Sawan who shared her easy tips for simplifying the cooking technique. She suggested that I cut and lay the kabocha pumpkin slices in a pan that has a glass lid, sprinkle them with brown sugar or any type of sugar, then add enough water to the bottom of the pan to create steam when they cook. My only tip to add is how to find the right kabocha pumpkin for the best results. (Please see Pranee’s tips on selecting a kabocha pumpkin.)

Kabocha Pumpkin Candy
Cover the pan with the glass lid and cook on medium heat until the kabocha is soft and tender when tested with a fork, but still holds its shape. Remove the lid. If there is too much water left, let it cook without the lid until the syrup has thickened. Serve for dessert or as a snack.
Thai Kabocha Pumpkin Candy
Namtao Chuam
น้ำเต้าเชื่อม
Serves: 4
The total time for this dish, including cutting and cleaning and cooking should be about 3o minutes. The cooking itself is about 20 minutes. It is delicious warm or cold, with whatever syrup is left behind in the pan or with salted coconut milk. It tastes so heavenly! Skin and flesh are all good together. It is like a cheesecake with a natural crust. This recipe has sugar to just the right amount. For a more decadent dessert, please add more sugar. Enjoy this any time of day!
3 to 4 wedges of Kabocha pumpkin (see instructions) 1/2 cup brown sugar 2 pinches salt 3/4 cup water 6 tablespoons coconut milk plus 2 pinches of salt, optionalRemove any bad skin from the kabocha squash but keep all of the green skin; wash and dry. Cut into wedges about 2 inches wide, then cut each wedge in half across the middle to get two pieces from each wedge. Lay the pumpkin in the bottom of the pan and add the water. Cover with a glass lid and cook on medium heat until the kabocha is soft and tender when tested with a fork, but still holds it shape—about 15 minutes. Remove the lid. If there is too much water left, let it cook some more until the syrup has thickened. Remove the kabocha pumpkin candy to a serving plate and pour the syrup on top. If desired, stir the salt into the coconut milk until combined, then pour it on the top of each kabocha candy as a garnish before serving.
- Stir-fried Kabocha Pumpking with Pork (lovethaicooking.wordpress.com)
- Thai Pumpkin Custard (ilovethaicooking.wordpress.com)
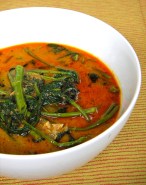
- Kabocha Pumpkin Soup (bastyrcenter.org)
- Spiced Rum Kabocha Pumpkin Mousse (ilovethaicooking.wordpress.com)
- What is Kaboch? (https://ilovethaicooking.wordpress.com)
- Kabocha Squash Soup (karistaskitchen.com)


 roots, the Taínos' main crop")