The Holy Herbs
It has been a busy summer for me so far. This has kept me away from writing, but it doesn’t mean I didn’t cook up a delicious dish for my Thai Kitchen blog. I have a lot of photos and notes and testings that have been done but that are waiting for me to write them up. While waiting for those posts from my food experiences in July, I have a delicious, unpretentious and impromptu dish to share with you. From my garden and Thai kitchen to yours!

Oregano Buds
Why oregano? Ten years ago, oregano was widespread via self-sown seeds in my Seattle garden near Thai spirit house. That year, my niece was visiting from Thailand and I used oregano in place of Thai holy basil when I prepared Phad Kraprow Gai (stir-fried minced chicken with Thai holy basil). I didn’t tell her that I’d used oregano and she didn’t notice the difference. Later on, when I told her it was not Thai holy basil, but Greek holy oregano we laughed! Fresh oregano has a peppery and pungent taste that I love and which is similar to Thai holy basil. Try using oregano in place of Thai holy basil when oregano leaves and blossoms are abundant in your garden.

Oregano Blossoms
Yesterday was my day off from traveling on the road and I was hanging around home and working in my garden. My girlfriend and I were immersing ourselves in the sun, surrounded by flowers, herbs and weeds. All of a sudden I realized that most of my oregano plants were blossoming. As it got close to lunch time, I began to think about what I could cook with those blossoms. I decided to make Oregano Blossoms Fried Rice for lunch. I cut the stems down to six inches long so there were some leaves attached to yield more leaves until the end of the summer.

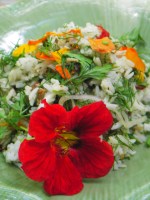
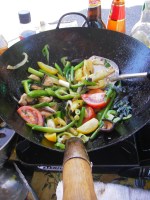
Oregano Blossoms Fried Rice
Does frozen cooked rice work for this dish? This is the first time that I have experimented with previously frozen rice from my fridge. I thawed the rice before using it to loosen up the cooked rice grains and it worked perfectly well for fried rice. Off course my passion is to share what is happening in my Thai Kitchen with you, so here is my recipe for oregano blossoms.
Oregano Blossoms Fried Rice with Tomato and Garlic
Khao Phad Dok Oregano Makrua Thet Kratiem
ข้าวผัดดอกออริกาโนกับมะเขือเทศและกระเทียม
Oregano is not a Thai herb, but it has long been a substitute ingredient for me in the absence of my beloved Thai holy basil. Both belong to the mint, or Lamiaceae, family. The flavor undertones of both herbs are alike, and as a gardener I love herbs that can grow wide and are easy to take care of. Now that I have discovered how great oregano blossoms taste in this recipe, I will enjoy the same dish often this summer! Cheers to the holy herbs!
Serves: 2 to 4
3 tablespoons canola oil 6 cloves garlic, peeled, crushed and chopped 1/2 onion, sliced 1 cayenne pepper, sliced (remove seeds if preferred) 1/2 cup oregano leaves and blossoms, stems removed 1 large tomato, cut into wedges 2 eggs 3 cups cooked rice, cooled or frozen 2 pinches of salt, optional 1 tablespoon soy sauce 1 tablespoon fish sauce 4 lime wedges 8 sting beans or cucumber or any fresh vegetable condiment, optional Heat canola oil in a skillet or wok on high heat. Add garlic and stir until golden, then add onion, cayenne and oregano leaves and blossoms and blossoms. Stir until fragrant, about 30 seconds. Clear the center of the wok and scramble in eggs for two seconds before adding rice. Stir in soy sauce and fish sauce. Serve with lime wedge, vegetable condiment and spicy fish sauce. (See recipe below). © 2012 Pranee Khruasanit Halvorsen I Love Thai cooking Pranee teaches Thai Cooking classes in the Seattle area. Her website is: I Love Thai cooking.comRelated articles
- Spicy Fish Sauce (ilovethaicooking.wordpress.com)
- Pork Cauliflower Fried Rice (livingcarroll.wordpress.com)


 roots, the Taínos' main crop")


