Feeds:
Posts
Comments

Posts Tagged ‘Traditional Thai Cooking’

Quick & Easy Spicy Thai Stir-fry for Summer Day 

I’m back from my road trip to Idaho and I miss eating Thai food. I don’t want to spend too much time cooking in the hot summer weather. Looking around I found some frozen Alaskan scallops in the freezer. I bought some fresh green beans at the market and got some fresh mixed basil leaves from the garden. A spicy stir-fry was the answer to fit all expectations–quick and easy, spicy to suit my soul and with cool Thai beer for the 95 degree Seattle weather.

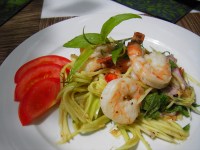
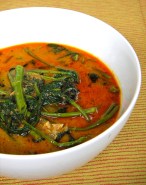
Stir-fried Scallop with Red Curry Paste and Greeen Bean

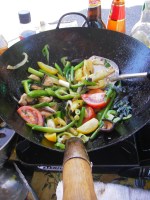
Twenty minutes before dinner, place the beer in the freezer, I turned on the rice cooker and then went into my garden to get some basil. The scallops were thawed.  The rest of ingredients are Thai staple ingredients from my kitchen such as red curry paste and roasted red chili paste. The remaining work was to stir-fry it in a wok for about 10 minutes.

This recipe is an impromptu creation and it may not have all the steps and ingredients like when I teach traditional Thai recipes. At home when the focus is to put everything together in a hurry. But all the ingredients I used for this recipe was sufficient to call it an authentic Thai. It was a very satisfying meal. I hope you get a chance to try the recipe. Jarean Arharn Kha — Bon Appétit!

Stir-fried Scallop with Red Curry Paste and Green Beans and Jasmine Rice

Stir-fried Scallop with Red Curry Paste and Basil 

Phad Phed Hoy Shell 

Serves: 2
2 tablespoons canola oil
1 tablespoon curry paste
1 tablespoon roasted red chili paste
3 Thai eggplants, cut into wedge
16 green beans, trimmed
6 large scallops
1/4 cup coconut milk
1/4 cup Thai basil or sweet basil leaves

Heat a wok or skillet on high heat until hot, stir in canola oil red curry and roasted red chili paste and stir until fragrant. Stir in Thai eggplants and green beans and cook for 30 seconds, and then add scallops. Stir well with one hand and add 1 tablespoon coconut milk at a time every 10 seconds. Keep an eye on scallops, when it starts to firm up and the flesh get opaque, it should be done. Then on high heat, stir in basil for 20 seconds. Serve right away with steamed jasmine rice. 

Please see similar stir-fried with instruction and vedio here: Stir-fried Catfish with Red Curry Paste
 
© 2010  Pranee Khruasanit Halvorsen
 I Love Thai cooking
 
Pranee teaches Thai Cooking class in Seattle areas, her website is: I Love Thai cooking.com

Read Full Post »

The Rustic Style Cooking of Thailand  

Unlike the morning  glory found elsewhere, in Thailand, this morning glory is a vegetable and it is called Pak Bung in Thai. It is also known to all Asian cuisines as Kangkung in Malaysia and Ong Choy in Chinese. It’s scientific name is Ipomoea aquatica. You may know it as Chinese Spinach or Swamp Cabbage. I want to call it morning glory because it is a beautiful name and it belongs in the same family with its leaf and flower. I remember having morning glory in my garden here in Seattle. 

 Thais love to eat Pak Boong fresh, stir-fried in the famous dish “Pak Boong Fai Daeng” and often in a curry as a classic Gaeng Tapo dish. In Seattle, I often teach students the stir-fry dish. Then the other day, I walked down the aisles and saw three dried salted croaker and right away, I was just craving for this dish that my grandma used to cook during the monsoon time when fresh fish and other proteins such as meat were hard to find and morning glory were abundant. That was because it is an aquatic plant that grows on the edges of swamps canals or any damp soil. I wrote this recipe to honor both of my grandmas.

Red Curry Morning Glory and salted Croaker — Gaeng Tapo Pla Kem

This recipe is easy to adapt. You may use pork, beef, or salted cod. I love the fact that this recipe require less coconut milk than most curry to reflect my grandma style of cooking. And it is truly delicious. I ate every drop of the curry broth.

Red Curry with Morning Glory and Salted Croaker   

Gaeng Pla Tapo Pla Kem   

Serves: 4

2 tablespoons canola oil
2 tablespoons red curry paste
1/2 cup coconut milk, divided
1 dried salted croaker, cut into a steak of 1/2 inch long, or 5 pieces salt anchovies
2 cups water
3 cups morning glory, tough stems removed and cut into 3 inches long, see note
1/2 tablespoon sugar

Heat canola oil and curry paste in a large pot on medium-high heat and stir constantly until fragrant, about 1 minute. Stir in 3 tablespoons coconut milk, and let it cook for 30 seconds. Pour in water in the pot and place in croaker and let it cook for 8 minutes on medium heat. Then you may strain to remove the bone and pour back into the same pot, add the rest of coconut milk; and then bring back to a boil. Stir in morning glory and sugar and cook for only 1 minute, just to cook morning glory.  Serve hot with steamed jasmine rice.  

This slideshow requires JavaScript.

© 2010  Pranee Khruasanit Halvorsen  
I Love Thai cooking 
  
Pranee teaches Thai Cooking class in Seattle areas, her website is: I Love Thai cooking.com  

Read Full Post »

A Romance in a Thai Granny’s Garden

Thai Country Style Soup with Lemon Basil    

Gaeng Leang Bai Meng Luck    

Every time I visit a Seattle Farmers’ Markets  and see Hmong-farmer stalls that have fresh lemon basil; I get excited and want to cook Gaeng Leang–a Thai country-style soup. It is our Thai ancestor’s creation and a classic soup that is known in every village in Thailand. Any vegetables that grow together in a Thai granny’s garden seem to go together in a pot with a finish touch of lemon basil — a romance of flavor is in the pot. Thais seem to keep it simple with three to five vegetables. If there are five kinds of vegetable with five-different hues of color then the classic name is “Gaeng Leang Benjarong” and one of the vegetables must be Kabocha pumpkin with its yellow-orange color.

Anchovy, red onion, watermelon rind, lemon basil

Thai food historians believe that the soup base or broth derives from the base of Nam Prik (Thai traditional Chili dip). Making Gaeng Leang Soup base typically it starts with pounding shallot, shrimp paste and chilli in a mortar with pestle to form a paste, and placing it in boiling water, similar to my recipe below. The alternative to a shrimp paste is dried salted shrimp, dried salted anchovy or dried grilled fish–think of it as Dashi, Japanese fish stock.

After making the soup base, the rest is simple. You may use any authentic Asian vegetable of your choice such as luffa, Kabocha pumpkin, young corn, melon, corn kernels or watermelon rind. The final touch is always lemon basil (Bai Maeng Luck).  Lemon basil is inseparable from this soup. In Seattle in the summer I always use lemon basil either from my garden or the farmers’ market.

Watermelon Rind Soup with Lemon Basil

I challenge myself to reconstruct a rustic Thai dish in a sophisticated way while keeping the original concept and authenticity. I cut anchovy fillets into small pieces and dice watermelon. The soup is gentle and not as hot and earthy as in Thailand with shrimp paste. Thais generally serve this soup warm. But my recipe is generous with the amount of watermelon rind so it is sweet and sophisticated enough that you can serve either warm or cold.  I love the simplicity of Gaeng Leang — a flavor of fresh seasonal vegetables  in a bowl.

Tomorrow my friend  will drop by for lunch. I want to prepare a summer soup for her, a country-style but elegant for girl lunch. I know she will like it. Our desert will be Yangon Almond Pancake with Berry and honeyed yogurt. All I hope for is a nice sunny day, so we can enjoy in my Thai garden here in Seattle.

Watermelon Rind Soup with Lemon Basil    

Gaeng Leang Pueak Tangmo Kub Bai Meng Luck

Serves: 2

1 tablespoon chopped dried anchovy fillets or dried salted shrimp, pounded
1/4 cup diced purple onion or shallot
1 cup diced watermelon rind or any mixed vegetable (please see list above)
1/4 teaspoon salt
1/8 teaspoon black pepper
Thai chili powder to taste
2 tablespoons lemon basil leaves,  plus 2 sprigs for garnish

Bring 1 1/2 cups water, anchovy and purple onion to a boil and keep it simmer on medium heat for 15 minute to develop the flavors for the soup.

If you don’t want to eat anchovy, you may strain to remove the anchovy and purple onion at this point.

Combine watermelon rind, salt, black pepper powder and chili powder with the soup and let it cook on medium-high heat for 5 minutes. Stir in lemon basil and serve right away. Garnish with lemon basil sprigs.

Note: When lemon basil is not available, I compromise with Thai purple basil and it will not be lemony flavor that finish the soup but licorice instead.     You may use any vegetables from farmer market or your garden such as zucchini, squash, pea leaf, corn and more.

 © 2010  Pranee Khruasanit Halvorsen
 I Love Thai cooking
Pranee teaches Thai Cooking class in Seattle areas, her website is: I Love Thai cooking.com

Read Full Post »

Thai Village Style Cooking    

Fried fish recipe from the Southern region of Thailand 

The other day, when I was at Pike Place Market, wandering around almost aimlessly like a tourist. I purchased a pound of sardines, I hadn’t tasted fresh sardines for the longest time perhaps since my grandma’s kitchen. I want to rediscover more Thai village style cooking with local ingredients here in Seattle. This was a good start.  

Thai Fried Sardines--Very Rustic Thai Cooking

The sardines are fresh from the Gulf of California and there is no need to worry about mercury because it is known to be very low. There are many good reasons to eat sardines, they are rich with Omega-3 fatty acids, Vitamin D, calcium and B 12. Perhaps that’s why both of my grandmother hardly saw any doctors in their life time. Every single day growing up, fried fish with turmeric and salt was on the table, besides other fish dishes. It was my grandma’s rule. The fish was the cheapest and healthiest protein that Phuket villagers could provide for their family way back then. I love fried sardines, they have a mouthful flavor and the aroma is unique.

If you are trying this for the first time, the challenge is how you will cook them, so you can eat everything including the soft bone and when crunchy enough, the back bone. It is a calcium intake time. As my rule goes, if it is chewable then it is edible! But trust your judgment and comfort zone also.


This slideshow requires JavaScript.

First I removed the fish guts. That was not fun. The problem is the sardines were so small and the belly was so relatively big. I tried the best I can to make sardines look good in the photos. After I gutted, cleaned and dried the fish, I followed my grandma’s old advice. I cut the flesh through the skin into tiny strips (the knife is perpendicular to the fish back bone) just enough to hit the backbone (please see the slide show). I repeated on the other side. I salted them and seasoned with turmeric. I placed 8 sardines in a food container and kept in the refrigerator for a day. I had something else planned for dinner that evening. When you want to keep the fish for a day in fridge, be generous with salt and turmeric. It is a way that we use to keep the fish fresh for the next day, back when we didn’t have electricity.

You may use the recipe below and cook sardines on the grill on medium heat on both sides until crispy. The problem with frying in your kitchen is the smell of the fish lingers for a day. I just want you to know that, but it tastes divine with hot steamed jasmine rice. Especially good if you eat it with your fingers, and easy way to remove the backbone then mix the fish by hand against the warm jasmine rice before eating,  just like Thais in the Thai village do.

 Thai Fried Sardines  

 Pla Sardine Tod

ปลาซาร์ดีนทอด 

 Serves: 4

 1 pound sardine, about 8 sardines, gutted and cleaned and dried with towels
2  teaspoons sea salt
1/2 teaspoon turmeric
3 to 5 tablespoons canola oil

 Lay the fish perpendicular to you on the cutting board, cut the flesh through the skin into tiny strips (the knife is perpendicular to the fish back bone) just enough to hit the backbone (please see the slide show), Repeated on the other side. Follow the same steps with the rest of the fish. Sprinkle salt all over the fish and follow by turmeric until the fish is evenly cover.

Heat the frying pan on medium heat, when the pan is hot add canola oil. Fry on both sides until they are crispy by the touch and a light brown color. Serve with warm jasmine rice.


 © 2010  Pranee Khruasanit Halvorsen  
I Love Thai cooking 
 Pranee teaches Thai Cooking class in Seattle areas, her website is: I Love Thai cooking.com  

Read Full Post »

Thai Rice Salad with Nasturtiums & Sardines Recipe

Kao Yum Pak Tai, Southern Thai rice salad with edible flower and sardine

Thai rice Salad with Nasturtiums

Photograph by Pranee

I grew up in the Southern region of Thailand, the origin of the Thai rice salad Kao Yum and my grandmother was a pro.  I have several versions for my classes. I am a gardener and I planted some nasturtium for Kao Yum. That was when I planned to write this recipe, and today is a perfect time. I have cooked rice, fried sardines, dill and cilantro in my fridge and the nasturtiums are at their peak in my garden. Quick and easy Thai dish I put together in the summer day. It is a cool dish, so there is no cooking require. This is a versatile recipe that you can adjust to your needs as there is no wrong way of making it. If the sardines are omitted, then I serve grilled salmon on top. There are so many creative ways to use this recipe.

First, the fish is very important part of this recipe, but you may use smoked salmon instead. In my grandmas kitchen we used anything from grilled fish, fried fish, dry anchovies and dried shrimp powder. Just use enough to give a mouthful of flavor to the dish. The second, an important element is fresh herbs, and you may use any herbs that pair well with the fish you choose. Last, for edible flowers, I chose nasturtium because it has a nice pungent and peppery flavor. It is easy to grow them here in Seattle.  Choose one edible flower that pair well with your fish.

Serves: 2

1 1/2 cup cooked rice, at room temperature
1/4 cup fried sardine or smoked salmon, bone removed and cut into chunk
8 nasturtiums, removed petals by hand into small pieces
6 nasturtiums leaves, thinly sliced
1/4 cup chiffonade fresh and tender Kaffir lime leaves or chopped cilantro
1/4 cup chopped dill
2 tablespoons sliced shallot
1 teaspoon chili powder
1 tablespoon fish sauce, or more as needed
1 tablespoon lime juice
2 lime wedges, for garnish

Place rice in the center of salad bowl. Place sardine, nasturtiums petals and leaves, cilantro, dill, shallot and chili powder along the side of salad bowl. When ready to serve, stir in fish sauce, lime juice and mix gently and serve right away with lime wedge on the side.

This slideshow requires JavaScript.

Thai Vegetarian Option: Saute shiitake mushroom with sea salt to substitute sardine, and sea salt instead of fish sauce.

Thai Cooking Recipe for Kids: add chili powder toward the end after kid serving portion is served.

Gluten-Free Recipe

© 2010  Pranee Khruasanit Halvorsen
I Love Thai cooking
 
Pranee teachs Thai Cooking class in Seattle areas, her website is: I Love Thai cooking.com

Read Full Post »

Pike Place Market

Travel and Eat Like a Tourist

Pranee at Pike Place Market, be a tourist

I wanted to enjoy the beautiful summer we are having and decided to visit Pike Place Market. I pretended to be a tourist for the day to taste foods and to enjoy the sites from a tourist perspective. I arrived around 10 am, when it was easy to find parking – two hours was just perfect.  First I walked around to see the farmers stalls and admired all of the fresh vegetables. Being early bird meant that there were not many people around, so I could ask a lot of questions and chat with the stall owners, which is how I got inspired and wanted to know about the source of ingredients. I always learned somthing new. The fish person said that the fresh sardines are from California and he like to grill the sardines until they are crispy, so you can eat the whole thing including the bones. I shared with him that my grandma would cut the skin into tiny stripe just enough to hit the backbone on both side before frying them. Then I asked the owner of a honey stall, to find the right kind of honey for my future recipe for almond pancakes. We talked and tasted and came up with the “Twin Peaks Wild Flovors” honey. I hanged out with the tourists and enjoyed the music played around the market. The color of flower bouquets was stunningly beautiful and the small doughnuts were so tempting but I passed for today. I stopped at the pig statue, and stood in line for photo opportunity with the famous pig. A kind tourist took a photo of me.

I started to get hungry and was debating where I should eat. I decided that today would be a French Day, so I decided to eat at Le Panier. I had a Pate French sandwich. It was perfect with a crusty baguette which had a crumbly  crust, and I didn’t mind being messy. I sat at the window bar table facing the street and watched the tourists go by. There is no rush, this was my French vacation after all. I was a tourist for two hours. Life is short, and there was no way I could have skipped dessert. In case you don’t know La Panier, it is a very French cafe and bakery. So I had palmiers with their house coffee (they used a Cafe Umbria dark roast, which is from a local roaster in Seattle).  I splited my La Pamier into perfect halves. I ate one half the french way with coffee and the other like Thais would do with Chinese doughnuts. That is, I soak it in coffee for 10 seconds before enjoying it slowly. Oh, life is good!

Before heading home I took a few more photos of places that I would recommend to tourists who are planning to visit Seattle. For the first time you will need to spend a good three to four hours there.

I got some sardines and a few herbs home. I will post a fried sardine recipe, which is my inspireational ingredient for the day.

I will cook, write and eat Thai locally this summer!

This slideshow requires JavaScript.

Read Full Post »

Thai Grandmother Cooking is a sustainable cooking

Pranee’s Grandmother Recipe

Watermelon rinds

My mom taught me many culinary skills but it was my grandmother who deepened my sense of sustainable cooking. We cooked virtually everything sustainably, just like the French. I have a habit of saving the rinds in a zip lock bag and cooking for myself because I am not sure if anyone else care for it. I would not miss this opportunity that only come once a year. I either incorporate them into a hearty soup or stir-fry. For stir-frying, I stir-fry it with either salted pork or dried anchovies. There is nothing more or less, just two ingredients. If you haven’t try to cook with watermelon rinds, you will love the flavor. I like it more than stir-fried cucumber, as it has light flavors of watermelon and cucumber.

how to remove the green skin from the water melon

A little light green on the rind has a nice little sour to it, where as the pink has sweet melon flavor. After stir-frying the fragrance and flavor are more like cucumber.  As my grandma always said, “sour, sweet, fat and salt” are neccessary in any main dish.  I tasted a similar combination once at the IACP international event  in New Orleans by renowned chefs combining fresh frozen cubed melon garnish with fried crunchy pork rind. (I will get the name and post it later)  

It takes 10 minutes to prep and 3 minutes to stir-fried and next it became my lunch. I enjoyed it on my patio in the sun recently. The aroma took me back to my grandma’s kitchen and a warm of sunshine of Thailand.

Note: I decided to add chive from my garden to make this Thai rustic cooking more appealing and also for photography purpose. However, the favor of chive does go well with the stir-fried watermelon rind and salted pork.

Pranee’s Grandma Cooking–Stir-fried Melon Rind with Salted Pork

Thai Stir-fried Watermelon Rind with Salted Pork

Phad  Puak Tang Mo Moo Kem

Serves: 1

2 tablespoons cured salted pork or sliced becon
1 teaspoon canola oil, optional
1 clove garlic, crushed and coarsely minced
1 cup melon rind, skin removed and sliced into 1/3 inch width and 2 inch length–please see slide show
2 tablespoons chives, for garnish
 

Heat a wok on medium-high heat, and stir in salted pork or bacon. Saute them until crisp and fat is rendered. Remove excess fat to allow only 1 teaspoon on the bottom of the wok. If no fat can be rendered, then add 1 teaspoon canola oil. Saute in garlic until yellow. Stir in sliced watermelon rind and cook for 1 minute, the aroma of garlic, bacon and melon like should  develop before adding 1 tablespoon water. Cook for one more minute and make sure to have about 1 or 2 tablespoon sauce, otherwise add more water. Stir in chives and serve right away. Or use chive for garnish. Serve with warm jasmine rice.

This slideshow requires JavaScript.

Thai Vegetarian Option: Saute shiitake mushroom with sea salt to substitute salted pork.   

Thai Cooking Recipe for Kids, Gluten-Free Recipe  

 © 2010  Pranee Khruasanit Halvorsen  
 I Love Thai cooking
 
Pranee teachs Thai Cooking class in Seattle areas, her website is:  I Love Thai cooking.com

Read Full Post »

The high point of my Forth of July celebration was having my friend and her family over for Thai Grilling. Our last Fourth of July celebration together was in 2008 on Phuket Island during the monsoon season.

Before noon, I marinated some Cinnamon Pork Tenderloin and Lemon-Lemongrass Chicken. Then I prepped for Cucumber-Pineapple-Tomato Salad. I made some “Coconut Water Vinegar Dressing” ahead of time and kept it pickled  in the fridge. Everything was done in about an hour.

For lunch before the party, my family and I went to Sunfish on Alki Avenue in Seattle and got Fish and Chips. I had my seafood combo as usual and enjoyed it with some chili flavored vinegar. I complimented their homemade vinegar and they shared a secret with me: they make the chili-infused vinegar with 6% Malt Vinegar.

I enjoyed organizing the house before the party but had to make sure I had one hour free before the party time. Half an hour later, I knew the rain would not stop, so I wore a rain jacket and did all the grilling on my patio.


Coconut Water Vinegar

Coconut Water Vinegar

Before sharing my recipe calling for coconut water vinegar in a salad dressing, I want to give you a quick lesson on coconut cream, coconut milk and coconut water.

When you remove the coconut husk (mesocarp) from a whole coconut, you can see the coconut shell (endocarp). After cracking the coconut shell, you get to the natural water inside the nut and this is called coconut water. The white meaty part inside the shell is the coconut meat (endosperm). Grating a chunk of white of coconut meat with a coconut grater gives you fresh wet grated coconut. To extract coconut milk, add a cup of water to 2 cups fresh grated coconut, then squeeze out the white milky liquid; this is concentrated coconut milk. (Thai call this the “head” of coconut milk). Add 1/2 cup water to the used grated coconut to extract  a thin coconut milk (Thai call this the “tail” of coconut milk). Let the coconut milk sit, and a fat creamy layer will form on the top; this is the coconut cream.

Back to the coconut water. Coconut water occurs naturally and has nothing to do with the process of making coconut milk. Nature provides the coconut meat and water as nutrients for shoots to grow near the three germination pores, or “eyes,” on the coconut. This coconut water inside the coconut shell is very good for the coconut plant, but it is also very good for you. It is full of vitamins and minerals. It is especially high in potassium and electrolytes, and has a neutral ph level. I strongly recommend that tourists traveling to paradise island drink this natural drink to help with rehydration, and it has the added benefit of being a sterile juice inside the shell.

In the Philippines, this natural water is used to make coconut water vinegar, but I don’t see it being made in Thailand where we use 5% distilled vinegar. I love the flavor of coconut water vinegar and felt inspired to use it in the cucumber-pineapple-tomato salad that I served with my grilled cinnamon pork tenderloin. Distilled vinegar will work for a substitution, but for this recipe, I strongly recommend that you try it at least once with coconut water vinegar.

I love the blend of cucumber, pineapple and tomato with a hint of coconut flavor. Brown sugar adds a nice touch to it. One of my students told me that the leftover dressing had such a great flavor that she ended up using it in a martini. In this case, I would recommend using mint instead of cilantro for the herb option.

Learn more about: Vinegar

Thai Cucumber-Pineapple-Tomato Salad

CucumberPineappleTomato Salad

Yum Sam Khler

4 tablespoons coconut water vinegar or distilled vinegar
4 tablespoons brown sugar
1 teaspoon salt
1 cup sliced cucumber, about 1/2 English cucumber
1 cup sliced pineapple, about 1/3 whole pineapple, or from a can
1 cup sliced tomatoes, about 2 medium size
1 shallot, peeled and sliced
1/4 cup snipped cilantro leaves

Heat vinegar, sugar and salt in a small pot over  low heat and stir until sugar and salt are dissolved. Set aside.

Place cucumber, pineapple, tomato, shallot, and cilantro in a medium-size salad bowl; when the dressing is cool, pour it over and stir. This recipe works best when the salad and dressing are mixed together from 1 to 8 hours before serving.

Thai Vegetarian Cooking

Thai Cooking for Kids

Gluten-Free Recipe

© 2010  Pranee Khruasanit Halvorsen
Pranee teachs Thai Cooking class in Seattle areas, her website is:  I Love Thai cooking.com

Read Full Post »

Thai Mixed Vegetable Stir-fry Recipe   

Phad Pak Ruam Mit   

ผัดผักรวมมิตร

Inspired recipe from June 24th cooking demo at Snohomish Farmer Market

There were many good reasons for me to cook Thai Mixed Vegetable Stir-fry at a cooking demo at the Snohomish Farmer Market. It is a simple dish to learn and an inspiring way to use fresh ingredients that are available right away. Most of the pantry items are available at any grocery store. It is the best and easiest way to learn cooking Thai dishes in 5 minutes. Both the shoppers and the farmers were happy and I was too, as a teacher. The shoppers walked pass my demo stand and showed me a bag of vegetable that they planned to stir-fry that evening. Mission accomplished.

I could not help but to share this recipe with you. It is very easy to apply Thai mixed vegetable stir-fry to your repertoire this summer. My secret ingredients in this dish are  flavored cooking oil with crushed garlic, and a little bit of ginger and green onion. The main  ingredients are mushroom and tomato and season with soy, and oyster mushroom with a dash of white pepper powder to finish.

Thai Mixed Vegetable Stir-fry Recipe   

Phad Pak Ruam Mit  

ผัดผักรวมมิตร

 Serves: 2-4

2 tablespoons canola oil
2 cloves garlic, minced
1 teaspoon ginger, minced
1 tablespoon green onion, chopped
4 shiitake mushrooms stem removed and sliced
1 large tomato, cut into wedge
2 cups mixed vegetables (garlic scape, Anaheim pepper and sweet peas)
1 1/2 tablespoons oyster sauce
1/2 tablespoon soy sauce
A pinch of brown sugar
A pinch of white pepper powder
2 tablespoons water or more as needed

Heat canola oil in a wok on high heat and stir in garlic, ginger and green onion. When garlic is light yellow, stir in shiitake mushroom and cook for 15 seconds. Then stir in all vegetables and stir for 30 seconds, then add oyster sauce, soy sauce, sugar and water. The vegetable should have a slight crunchy texture. Season with white pepper powder.  Serve hot as a side dish or a main dish with steamed jasmine rice.

Vegetarian option: use vegetarian oyster sauce
Gluten-Free option: use wheat free soy sauce, wheat free oyster sauce
  
© 2010  Pranee Khruasanit Halvorsen  
 I Love Thai cooking
 
Pranee teachs Thai Cooking class in Seattle areas
Her website is:  I Love Thai cooking.com
 

Read Full Post »

Thai Pumping Custard

Tomorrow, I will visit a friend on Vashon Island, and I want to surprise her with some Thai pumpkin custard for dessert. Yesterday I found the right size of Kabocha pumpkin and some fresh pandanus leaves (also known as pandan), two crucial ingredients for making this dish. Now it has been cooked and is sitting in my refrigerator.  All I have to do is to take it with me before catching the ferry.

Thai pumpkin custard is every Thai’s favorite dessert. We seldom make them at home but we always purchase from the artisans when available. Most of the time it is hard to find small-sized Kabocha pumpkins. I use duck egg but chicken eggs also work, so I would suggest that the freshness and availability should be considered key in making a decision. Pandanus leaf is an important part of making traditional Thai custard, you can find it fresh or frozen in various Asian markets. At home I always have a dozen in the freezer. If I don’t have the right size pumpkin and pandanus leaf, I prefer to prepare other custard dishes instead of using a substitution.

Below is a slide show of pictures taken in Khmer Cooking Class which is located in Siem Reap. To my surprise, the teacher didn’t use the pandanus leaf but instead used a whisk to mix the custard mixture instead. This could be another way for you to try at home when pandanus leaf is not available. The rest of the steps are very much the same.

This slideshow requires JavaScript.

Sangaya Namtao

Thai pumpkin Custard

Serves: 6

Preparing time: 15 minutes

Steaming time: 45 minutes

1 small Kabocha pumpkin, about 5  inches across and 4 inches tall
4 duck eggs, about 1 cup eggs or chicken eggs
½ cup evaporated cane sugar or palm sugar
½ cup coconut milk
½ teaspoon salt
2 pandanus leave, torn into 4 pieces lengthwise from each leaf

Clean outside of the pumpkin well and dry with towel. Insert the knife on the top pumpkin to make a lid of about 2 inches wide (please see photo from a slide show). Remove all seeds from the inside the pumpkin until completely clean.

Add water to a steamer to 1 ½ inches tall and bring to a boil while preparing the custard.

To make custard, place egg, sugar, coconut milk  into a medium-size bowl. Use torn pandanus leaves to massage and mix the custard mixture by hand constantly for 8 minutes. This is a Thai  tradition way to make a custard instead of whisking. Pandanus leaves helps the mixing process, at the same time pandanus flavor is infused into the custard mixture.

Strain and fill the custard into the pumpkin, make sure to leave a 2/3 inch free space from the top.

Steam the pumpkin custard in the steamer, also the lid but separately. Do not cover pumpkin with the lid. It should be done between 40 to 45 minutes. To tell the custard is cooked when shake the custard is not moving except 1 inch in the center. And that is when to turn off the steamer and remove the lid and let the pumpkin custard sit until cool down.

Cut into wedge and serve cold or at room temperature.

© 2010  Pranee Khruasanit Halvorsen  
 I Love Thai cooking
 
Pranee teachs Thai Cooking class in Seattle areas, her website is:  I Love Thai cooking.com

Read Full Post »

Last Wednesday I had a great dining experience at Sostanza Trattoria in Madison Park. What does Italian food has to do with Thai? Well, for me all foods are related somehow. When it comes to the way I cook, yes it does. I love risotto and chicken liver, and I was in luck. A special menu featured that night had a few choices but the risotto with White chicken liver appealed to me the most. It had an amazing flavor which was enhanced by a generous helping of chicken liver. I don’t have any photos to share, unfortunately.

Pranee's Chicken Live Fried Rice

At home I enjoy cooking fried rice, rice pilaf and risotto for my family. I love borrowing ingredient themes and cooking with any method that is suitable for the situation (including menus of all kinds, what ingredients are available, etc). When I have time in the kitchen, I cook risotto. And when I have a lot of left-over rice, I prefer to make fried rice.

This recipe for fried rice serves as main dish with fresh sliced cucumber and lime wedge as accompaniment.

 Kao Phad Tub Gai

Chicken Liver fried rice with garlic, ginger and red onion

Serves: 2

2 tablespoons canola oil
3 cloves garlic, minced
¼ cup finely shredded ginger
½ cup finely sliced red onion
6 ounce organic chicken liver cut each in half
1 tablespoons soy sauce
1½ cup cooked rice, room temperature
2 pinches salt
2 green onions, trimmed and chopped

Heat a wok on high heat, place hand 6 inches above the wok when hot adds canola oil. Add garlic and ginger, stir constantly to fry evenly until golden-yellow, about 30 seconds. Then stir in onion and cook until onion is translucent. Stir in chicken liver and ½ tablespoon soy sauce. When the liver is nice and brown on the outside, add water to cover, about 3 tablespoons water. Cover with lid and let it cook for 5 minutes or more until the liver is cooked. Stir in rice and the rest of soy sauce and salt. Stir until well mix and rice is heat up. Stir in green onion and mix well. Serve right away.

 © 2010  Pranee Khruasanit Halvorsen  
 I Love Thai cooking
 
Pranee teachs Thai Cooking class in Seattle areas, her website is:  I Love Thai cooking.com

This slideshow requires JavaScript.

Read Full Post »

Phuket Stir-fried Blue Crab with Black Pepper Recipe

Phoo Phad Prik Thai Dam

The world is just a finger tip away.

I would like to share with you my family cooking and recipes from Phuket, Thailand. These photos were taken by cell phone and then downloaded onto facebook. I called my niece Darunee Khruasanit in Phuket after seeing her food photography and asked for permission to show her photos and recipes on my blog. I would like to share this delicious dish from my home town Phuket where blue crab is very fresh and equally delicious. You can find blue crab in Seattle at Asian Markets such as Viet Wah and Uwajimaya.

Ingredients for Stir-fried Blue Crab with Black Pepper

You will need all the ingredients from the above picture.

4 blue crabs, 2 cloves garlic, 1 Anaheim chili pepper, 5 green onions and 1/2 onion

3 tablespoons canola oil

2 cloves garlic, peeled and minced

4 blue crabs, cleaned and cut in half

1 teaspoon ground black pepper

2 tablespoons light soy sauce

1 teaspoon brown sugar

1 Anaheim, cut into large dices

1/2 onion, sliced

5 green onions, cut into 1 inch length

Here is the final delicious result.

I am planning to cook up this same dish with some local Dungeness crab next week. I can’t wait to savor this dish again. It is the contrast of flavors that excited me. I remember the flavor so well, the spicy black pepper flavor that contrasts with sweet crab and green onion. I am so close to my home land, and can imagine eating this  black pepper blue crab on the beach~ I can feel the sea breeze right now; the one that would make a sweat on my forehead feel cool like air conditioning.

© 2010  Pranee Khruasanit Halvorsen   
 Love Thai cooking
 
Pranee teachs Thai Cooking class in Seattle areas, her website is:  I Love Thai cooking.com

Read Full Post »

Stir-fried Phuket Hokkien Mee with Choy Sum

PHUKET HOKKIEN MEE RECIPE
Stir-fried egg noodles Phuket style

Serving: 1
Prep Time: 15    Cook Time: 5 minutes

On Chinese New Year Day, I always enjoy Phuket Hokkien Mee – an egg noodle dish similar to stir-fried chow mien.

In America, I use Miki noodle or yakisoba. For this recipe you may use any fresh egg noodles but I prefer ones the size of spaghetti. For vegetable choices, select a combination of mixed vegetables that you like, personally I love Choy sum or Chinese broccoli. For meat choices, substitute pork and/or seafood combination for tofu and mushrooms.  To serve, I always enjoy eating it with chopsticks and a little kick of Sriracha hot sauce.

3 tablespoons cooking oil
1 garlic, minced
¼ cup sliced pork
¼ cup sliced pork liver, optional
3 shrimp, peeled and deveined
1 cup egg noodles, yakisoba or Miki noodles
1 cup cut Chinese kale or Choy Sum
2 teaspoons dark soy sauce
2 teaspoons light soy sauce
½ cup chicken broth
1 teaspoon sugar
A dash of white pepper powder

Heat a wok or cast iron pan over high heat; add canola oil. Stir in garlic, sliced pork, pork liver and shrimp. Continue to stir until the meat is almost completely cooked, then stir in egg noodles, Chinese broccoli, and dark soy and light soy sauces. Stir for 10 seconds, then add chicken broth. Stir and continue to cook until the broth is almost absorbed.  When the sauce has reduced to ¼ cup, add the white pepper powder. Place in a noodle bowl and serve with chopstick and spoon.

Vegetarian option: omit meat and substitute it with 1/4 cup cut extra firm tofu and 1/4 sliced brown button mushroom

Gluten-Free option: use wheat free soy sauce and rice stick or rice vermicelli instead of egg noodles.

© 2009  Pranee Khruasanit Halvorsen
I Love Thai cooking

Read Full Post »

When I visited my mom in Phuket in March 2009, I  dropped by to see her everyday for her home cooked meal. I didn’t plan to tape this video with Kabocha and pork, but at that moment, I wanted to record her cooking and share it with my students. My mom loves to surprise me with my favorite childhood dish. And she knew best. I love her recipe with shrimp paste but you can omit it and use fish sauce and soy sauce instead to give it a flavorful salty flavor.  Shrimp paste, soy sauce and fish sauce are Thai umami.  http://en.wikipedia.org/wiki/Umami.

Phad Namtao Moo
Stir-fried Kabocha Pumpkin with Pork

This recipe combines pumpkin with pork – and it may not seem like one that appeals to you at first.  Think of it as mashed potato with chicken broth next to pork chop gravy. The Kabocha melts in your mouth with a sweet taste and creamy texture. The shrimp paste leaves a hint of  saltiness to contrast the sweetness of Kabocha, and the fried garlic enhances the flavor. Be adventuresome  and try this as a side dish with steamed jasmine rice and curry dishes.

3 tablespoons canola oil
3 cloves garlic, peeled and sliced
2 teaspoons shrimp paste or 2 tablespoons fish sauce
¼ cup minced pork
3 cups Kabocha pumpkin chunks, seeds and skin removed
½ cup water or more as needed

Heat a wok on high heat, pour in canola oil and stir in garlic. When garlic is yellow, stir in shrimp paste and pork and cook until fragrant. Stir in Kabocha and add water to reach the top. Stir well, cover and let it cook until Kabocha is cooked in the center. Test by pressing a fork against Kabocha; it should break easily. You should taste a balance of salty and sweet from Kabocha.

Vegetarian option: omit pork, egg also popular instead of pork

Gluten-Free option: use wheat free soy sauce

© 2009  Pranee Khruasanit Halvorsen
I Love Thai cooking

Read Full Post »

PHAD PHED PLA DOOK

Thai stir-fried catfish with red curry paste

Recipe & Video
Servings: 1
Prep Time: 15   Cook Time: 5 minutes
 

Thai stir-fried catfish with red curry paste is a typical fast food wok-frying dish served over steamed rice. My sister’s recipe is a southern-rustic version that is very pungent. But at home and cooking school in Seattle, I prefer coconut milk instead of chicken stock. Then I recommend to omit oyster sauce when coconut milk is used. This is a great quick and easy Thai cooking for anyone who tries out Thai cooking for the first time.

1 cup steamed jasmine rice
1 fried egg
5 sliced cucumber
2 tablespoons canola oil
1 to 1 ½ tablespoons red curry paste
¼ cup chicken stock or coconut milk (see note)
2 tablespoons oyster sauce
1 teaspoon sugar
1 spur chili or Anaheim chili
¼ cup basil leaves
4 pieces fried catfish steaks (see note)

Place steamed jasmine rice on a serving plate and fried egg on top of the rice. Garnish with sliced cucumber on the side.

Heat a wok on high heat, when it is hot add curry paste and stir well until fragrant. Stir in chicken stock, oyster sauce, sugar and salt. Mix well. Stir in chili, basil and fried catfish and cook until the fish absorb the flavors and moisture from the sauce.

Pour the hot catfish curry next to steamed rice and serve right away.

Cooknote: My sister coated her catfish with corn starch before frying. She likes it crunchy.

Thai Vegetarian Recipe Option: omit catfish and substitute it with 1/4 cup cut extra firm tofu and 1/4 sliced brown button mushroom. Use coconut milk instead of chicken stock

© 2010  Pranee Khruasanit Halvorsen
I Love Thai cooking

Read Full Post »

Thai Cooking with Wok

As far back as I can remember, my family kitchen contained only a few cooking utensils and cookware. The most versatile cookware was a wok. We use woks for all tasks, from stir-frying, steaming and blanching vegetables to making cooking oil from lard and coconut milk. It is possible that every household in Thailand will have an average of 3 woks in various sizes. For a community kitchen, the wok can be as wide as three to five feet wide. This wok is used for cooking curry, frying and steaming rice for a function with more than 300 people. A wok allows you to have total control to stir and mix a large quantity of foods with a large shovel. Owning a new wok is a new beginning of your culinary adventure in your kitchen.

A wok made of mild steel will rust; therefore a well-seasoned wok will protect it and make it easy to cook foods and prevent them from sticking.

Ladle & Shovel (Spatula)

Depending on the style of your wok, a ladle or spatula can be used. A ladle fits well in a deep bowl shaped wok and a shovel can be used for either a flat bottom or deep bowl wok.

How to Season a Wok

This is the summary on how to season a wok according to the “The Breath of a Wok” by Grace Young. 

First step to handling your new wok is to clean it with hot soapy water to remove the protector. Then season it by using a few tips below.

~ Cook pork in a bone in boiling water.

~ Pan fried tofu to absorb metallic taste, and then stir-fry chives.

~ Use scallions, garlic chives, pork and ginger to remove the metallic taste.

~ Use high heat with salt.

This is a recipe for seasoning a wok for the first time before cooking a meal for serving:

2 to 3 tablespoons pork fat

1 cup garlic chives

½ cup ginger, shredded

Clean the new wok according to instructions. In general, clean and rinse well with hot water. Dry with a paper towel. Open all of the windows and turn the range hood on high. Bring the wok to a high heat, when it starts to make a layer of smoke, add in a pork fat, ginger and chives, and with a shovel or spatula stir-fry the ginger/chive mixture to cover the entire surface area of the wok. Reduce the heat to medium-high and keep stirring until the wok darkens. Discard the ginger/chives. Rinse the wok with hot water and bring back to high heat to dry the wok. Your wok is now ready.

The best way to season and to develop the wok patina is to constantly use it. I like to use the wok for deep frying, and the shape of the wok also helps to use less cooking oil.

Read Full Post »

Pranee with her mom and sister

Three Women Cook


I spent a good week with my mom and sister in March 2009. We would like to share with you our rustic style cooking. My mom was a chef of the village. Today my sister owns a fast-food wok restaurant in Thalang, Phuket.

I only have one sister and her name is Rudee. Her nick name is Kleuy which means “banana”. I love my sister cooking and you will also. She will contribute a lot of her recipes for my Thai cooking blog and also a basic Thai cooking video.

 Here are my sister’s cooking demonstration and recipe on how to make Thai omelette.


How to Cook Thai omelette

Thai Omelette Recipe 

Kai Jeow

Servings: 2
 
1/2 cup canola or peanut oil
3 eggs
3 drops fish sauce
1 tablespoon Sriracha hot sauce or Thai Kitchen spicy sauce
 
Place three eggs into medium size bowl, use fork or whisk to beat the egg for 30 seconds. Heat a wok until hot and pour in canola oil. Pour the eggs mixture to the wok steady 12 inches above the wok, the omellet will puff, let it cook until golden. Flip over and cook another side until golden. Drain with slot spatula and serve right away with hot sauce and steamed jasmine rice.
 

© 2010  Pranee Khruasanit Halvorsen
 I Love Thai cooking
 
Pranee teaches Thai Cooking class in Seattle areas, her website is: I Love Thai cooking.com

Read Full Post »

KAO TOM GOONG
Rice Soup with Prawn, Ginger and Garlic Recipe
 
Servings: 2-4
Preparation: 10 minutes.
Cooking time: 15 minutes
 
Rice soup is a real comfort food for every occasion. Nothing is as satisfying as rice soup on a cold day or when one’s body needs gentle food. The meat for this dish is ground chicken or ground pork. Shrimp adds a great touch, too. For extra protein, add one egg to the boiling soup just before serving.
 
16 ounces chicken broth, vegetable broth or water
1 cup water or more as needed
1-2 cups steamed rice (left over rice is fine)
2 tablespoons cooking oil
5 cloves garlic, chopped
2 tablespoons ginger, chopped
½ cup shitake mushroom, sliced
½ cup ground chicken or pork
½ teaspoon salt
1 tablespoon soy sauce
9 shrimp, peeled and deveined
1 cup spinach, chopped
1 egg (optional)
White pepper powder as needed
1 green onion, sliced
2 tablespoons cilantro, chopped
 
Bring chicken broth, water and rice to boil in a medium saucepan and keep on cooking. Heat cooking oil in a pan over medium-high heat, then fry garlic and ginger until light golden. Remove half of the fried garlic and ginger to use later as a garnish. In the same pan with remaining cooking oil, garlic and ginger, stir in shitake mushroom and cook until soft. Then add ground chicken (or ground pork, if you prefer). Keep stirring until the chicken is cooked. Add chicken, mushroom and remaining garlic and ginger to the saucepan with the rice soup. 
 
Continue to cook the soup over medium heat until the texture is neither too soupy nor too thick. Stir in salt, soy sauce, shrimp and spinach. When the shrimp turn pink, add egg and stir until egg is cooked. Before serving, season with white pepper and garnish with green onion, cilantro and reserved garlic and ginger.
 
Rice Soup Condiments

Rice Soup Condiments


Vegetarian option: omit chicken and prawn, use 1 cup chopped oyster mushroom to supstitute chicken

Gluten Free option: use wheat free soy sauce

© 2009  Pranee Khruasanit Halvorsen
I Love Thai cooking

Read Full Post »

By now, you have a handle on how useful lemongrass is when you prepare Thai foods. This herb is easy to grow in Thailand and luckily it is now a staple in American supermarkets as well.


I hope you enjoy my grandmother’s recipe for steamed trout with lemongrass. I have a fond memory of her cooking this in a clay pot.

Rainbow trout steamed on the bed of lemongrass

Pla Nueng Takrai

Grandma’s Steamed Fish with Lemongrass Recipe

My grandmother, Kimsue, used lemongrass to line the clay pot before placing the fish on top. Lemongrass helps prevent the fish from sticking to the pot while it adds scent and flavor to the fish and a wonderful aroma to the kitchen. You will have fragrant steamed fish for a healthy dinner.

Servings: 4
Preparation time: 15 minutes
Cooking time: 15 minutes

4 lemongrass stalks
2 whole trout, cleaned (see Village Note)
1-2 teaspoons salt
¼ cup water, or more as needed

To prepare lemongrass, remove about 1½ inches of the hard root end and enough of the leaf end to keep 6 inches of the center part. Save the leaf end for cleaning the trout (see Village Note). With a meat pounder, smash lemongrass to release its essential oil. Lay all 4 smashed lemongrass stalks on the bottom of large pan and lay trout on top. Sprinkle salt and water over the fish, cover and bring to a boil, then simmer over medium heat until the fish is cooked, about 10 to 15 minutes. Add more water if the pan is low on water and insert a knife in the thickest part of the fish to see if fish separates from the bone. If it does, the fish is cooked. If not, keep steaming just until fish can be removed easily from the bone.

Village Note: To clean trout, sprinkle 2 teaspoons salt on both sides of the fish and use discarded lemongrass to rub salt onto the surface of the fish; rinse off and pat dry. This cleaning technique is also used to prep casings for sausage. The salt helps to remove impurities and the lemongrass acts like a brush and eliminates fish odors.

© 2010  Pranee Khruasanit Halvorsen
I Love Thai cooking
 
 
Pranee teachs Thai Cooking class in Seattle areas, her website is: I Love Thai cooking.com
 

Read Full Post »

Cilantro, also known as coriander, is a key ingredient in Thai and Southeast Asian cooking, especially the cilantro root.Thai cooks treasure the roots and in Thailand cilantro is always sold with its roots.The root is very aromatic and has lots of flavor when cooked. It’s a precious ingredient—a treat among herbs—and an important ingredient in curry paste, marinades and meat stir-frys. When the root is not available, substitute four stems for one root. Try the recipe featured below for an opportunity to experience the unique flavor and fragrance of cilantro root.

Kratiem Prik Thai Goong – กระเทียมพริกไทยกุ้ง

Goong Kratiem PrikThai
Sautéed Garlic Prawn Recipe
Servings: 8
Preparation Time: 15 minutes   
Cooking Time: 5 minutes

These garlic prawns have a peppery accent and are an astonishingly easy-to-prepare crowd pleaser. The first six ingredients in this recipe make a classic spicy Thai marinade paste. You can use it to create many simple dishes by using it as a marinade for chicken or a spicy paste for chicken or pork patties. For best results, grind the marinade paste using a mortar and pestle. Otherwise, use a small food processor.

½-1 tablespoon black peppercorns
¼-½ teaspoon salt
10 cloves garlic, finely minced
3 cilantro roots or 5 cilantro stems
3 tablespoons light soy sauce
1 teaspoon brown sugar
32 prawns, peeled and deveined
5 tablespoons cooking oil
Cilantro and lime wedges for garnish

In mortar, place black peppercorns, salt, 5 cloves of garlic and cilantro roots; pound with pestle until it becomes a paste. Stir in light soy sauce and brown sugar to make marinade sauce. Pour the marinade sauce over prawns and mix well. Set aside. In a frying pan, fry remaining garlic until golden yellow; remove and set aside. In the same frying pan, fry prawns until cooked. Place prawns on a serving plate and garnish with fried garlic and cilantro leaves. Serve lime wedges on the side.

 
© 2009  Pranee Khruasanit Halvorsen
I Love Thai cooking
 

Read Full Post »

« Newer Posts