Feeds:
Posts
Comments

Archive for August, 2011

Eat Like a Local

Papa Seafood Restaurant, Laem Sing, Phuket, Thailand

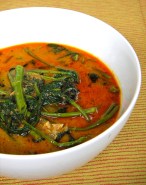
Stir-fried Blue Crab with Black Pepper – ผัดปูม้ากับพริกไทยดำ

It was less than a month ago that I was at Laem Sing, Phuket, soaking up the warm sunshine before leaving for Seattle. Laem Sing is my favorite beach for getting away for a half day—or all day—to just hang out on the beach with nature and good Phuket seafood. Typically one should visit early enough to choose the best location among the sun loungers that are lined up along the beach. The sun lounger will cost 50 to 100 baht ($2 to $3), which is paid to the owner of the restaurant in front of which the sun lounger sets. It also means that you should order food and drink from that restaurant as well. That’s how I came to know Papa Seafood Restaurant, as I make sure to visit Laem Sing each year. This is a private beach but it is open to the public. It is located on the northwest coast of Phuket on Millionaire Road between Kamala and Surin Beaches.

Pay for parking (40 baht) near the road, then walk down the hill to this quiet beach.

Laem Sing Beach

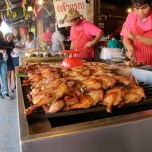
At Papa Seafood Restaurant, the seafood is purchased fresh each day and the menu is full of mouth-watering dishes—from local Thai seafood favorites to a few western dishes for those who prefer western comfort food such as sandwiches. The drink menu has a long list of tropical smoothies and other beverages that can keep you hydrated throughout the day.

As my eye glanced over the menu, I began to wonder about the possibility of taping the cooking at the restaurant to share with my students and Thai foods fans. Never afraid to ask, I found that the cook didn’t mind me taking photographs and video. I hope that you will enjoy the video on Stir-fried Blue Crab with Black Pepper recipe and that it will help you to duplicate this dish at home. If you get a chance to visit Phuket, please check out Laem Sing Beach and stop by Papa Seafood Restaurant. From Laem Sing Beach to your kitchen!

Stir-Fried Blue Crab with Black Pepper Recipe

Phad Phu Ma Kub Prik Thai Dum

ผัดปูม้ากับพริกไทยดำ

I grew up in the southern region of Thailand eating two kinds of crab: a rice-field crab (Phu Dum) and blue crab (Phu Ma), which is the most common crab caught in the Indian ocean. My family’s favorite ways to prepare the blue crab are either to steam it and serve it with a lime-garlic dipping sauce, or to stir-fry the crab with black pepper and green onion. Blue crab is so sweet and delicate in flavor, the cooking is best when it is simple with few ingredients. I love stir-fried blue crab with black pepper and the contrast of the sweet, juicy, fresh crab and the excitement of crushed black pepper. Kin Hai Aroy! Bon Appetite!

Serves: 2

Cooking Time: 5 to 7 minutes

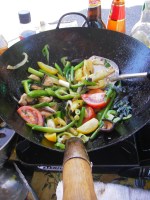
3 tablespoons cooking oil
2 tablespoons garlic 
1/2 onion, sliced
4 Thai chilies, cut in half
2 blue crabs, cleaned and cut into large pieces
2 tablespoons black peppercorns, crushed
2 teaspoons oyster sauce
1 teaspoon sugar
2 teaspoons soy sauce
1/2 cup water or more as needed
1/2 tomato, sliced
1/2 cup Chinese celery and green onions cut into one inch length 
 
Heat the wok on high heat and stir in onion and chili; stir back and forth until fragrant, about 30 seconds. Then stir in blue crab and let it cook for 2 minutes. Stir in black pepper, oyster sauce, sugar and soy sauce. Stir well, then add water and let it cook until the crab is completely pink in color and the crab meat is opaque, not translucent. It takes about  3 to 5 minutes for the crab meat to cook.  Add more water in between to make a good amount of sauce but not too watery. Last, stir in tomato, Chinese celery and green onion and continue stirring for 30 seconds. Serve right away with steamed jasmine rice.

Credit: Papa Seafood Restaurant

Laem Sing, Phuket, Thailand

© 2011 Pranee Khruasanit Halvorsen  
I Love Thai cooking 
 Pranee teaches Thai Cooking classes in the Seattle area. Her website is: I Love Thai cooking.com . 
 
Related articles

Read Full Post »

Are Winter Squash Leaves Edible?

I enjoyed the Seattle sun last Wednesday at the Columbia City Farmers Market along with the delicious food from the stalls. I purchased a few fresh vegetables from various farmers and, like always, a bunch of winter squash leaves from a Hmong farmer’s stall. This time the squash leaves prompted me to cook and share with you a recipe from my Thai kitchen: how to cook winter squash leaves –Yod Namtao – ยอดน้ำเต้า.

Winter squash leaves are edible. In fact, all parts of squash family plants are edible, from leaves to stems, flowers, fruit, skin and seeds. The young leaves and stems are shown in the photos above and below. These edible greens become available when a farmer cuts back the leaves on a plant in order to encourage it to produce fewer but larger fruits. Winter squash leaves are popular in rustic-style cooking in Southeast Asia and they are great sources of fiber and other nutritional benefits.

Winter Squash Leaves and Blossoms - my visit to Hoi An Market 2009

Though they may feel a little rough to the touch, the young leaves from winter squash have amazing flavors when cooked. They have a  spinach-like texture, but are richer and denser with a bite to it in flavor. Like any leafy green vegetable, you can stir-fry, steam or stew them. In my kitchen, I either blanch them in salted coconut milk or saute them with butter, then add water and chicken stock and cook them down until the leaves are softened but not mushy, about 5 minutes. Last year I made a winter melon leaves stew with dried fish and shallots using a Hmong farmer’s verbal recipe. It was similar to my Watermelon Rind Soup and made a delicious vegetable stew.           

Winter squash leaves are only available in the summer and only at the Hmong farmers’ stalls. Because of this limitation, I never fail to purchase a bunch of winter squash leaves each visit to the market. Supporting the Hmong farmers also helps me to ensure that there will be a continuing supply due to the demand. When you get a chance, please pick up some winter squash leaves at a Seattle Farmer Markets near you and give them a try.

This slideshow requires JavaScript.

Winter Squash Leaves Boiled in Salted Coconut Milk

Yod Namtao Luak Kati

ยอดน้ำเต้าลวกกะทิ

Winter Squash Leaves in Salted Coconut Milk

One bunch of winter squash leaves weighs about a pound. After removing all of the twine holding them together and the hard stems, the soft edible part weighs about six ounces; the rest goes into a compost. If I have time, I use a peeler to remove the rough skin on the stems then cook the stems down until they are soft, about 8 minutes.

There are many ways to prepare winter squash leaves, but blanching or boiling them in salted coconut milk produces my favorite quick and easy side dish. This same method can also be used with many other leafy green vegetables, which can then be served with Thai Chili Dip. You will be surprised how the flavor of winter squash leaves and leafy green vegetables are complimented by just a little coconut milk and salt.

 
Serves: 4
Cooking Time: 5 minutes
 
6 ounces winter squash leaves (see preparation above)
1/4 cup coconut milk
1 cup water
1/2 teaspoon plus 2 pinches salt

Bring coconut milk, water and salt to a boil on medium-high heat. Then add the squash leaves, using tongs to turn them around to make sure they are all cooked in the liquid—like blanching the leaves in a coconut broth. Cook from 3 to 5 minutes until the greens reach your desired degree of tenderness. Serve with the broth as a side dish, or with warm jasmine rice as a main dish.

© 2011 Pranee Khruasanit Halvorsen  
I Love Thai cooking 
 Pranee teaches Thai Cooking classes in the Seattle area. Her website is: I Love Thai cooking.com . 

Related articles

Read Full Post »

The Sweet is a Faintness and the Bitter is a Medicine

I often hear the old Thai saying  หวานเป็นลม ขมเป็นยา: kwan pen lom kom pen yah. This culinary wisdom literally says “the sweet is a faintness and the bitter is a medicine.” Growing up in a village in Thailand with my grandma and her friends, I acquired a taste for the bitter and exotic vegetables from their gardens and the wilderness around us.

Bitter melon or Bitter Gourd is called มะระ—Mara—in Thai. Its scientific name is Momordica charantia and it is native to Asia and Africa. It is a climbing annual plant that one can grow anytime, anywhere in Southeast Asia and South Asia regardless of the season.

Bitter Melon – Photo from my morning walk in Hoi An, Vietnam

In most Thai or Asian villages, where there is a fence or an arbor there will be a climbing plant next to it. There just needs to be a space large enough for seeds to grow.

Chinese Bitter Melon – the China phenotype is common in Thailand

Bitter melon is best eaten when it is green and young. When the fruit grows older, the taste gets more bitter. It is not common to eat the older fruit when it turns yellow-orange and the seeds become red; at this later stage the plant is mainly used for growing the seeds for future new plants.

Indian variety of bitter melon – photo from my visit to a market in Hue, Vietnam

Bitter melon is widely cooked in many ways in Southeast Asia. In Thailand, I often enjoy it in stir-fried dishes with soy sauce and with or without egg. It is also popular with mara yad sai—stuffed with pork in a soup. Fresh green or boiled bitter melon can be served in a Thai crudites platter with Thai chili dip, or it can accompany pickled cabbage in a pork-bone soup or stewed bitter melon and pork-bone soup. It can also be cooked in a curry dish as well. In Myanmar and Bangladeshi, bitter melon is often stir-fried with garlic and turmeric powder.

How to prepare bitter melon

All parts of the fruit are edible after you remove the seeds and stem. For stir-fries, thin-slice the melon as shown above. Then I often take steps to reduce some of the bitterness. There are two ways to do this: put the sliced melon in boiling water for a few minutes and then strain out the melon and discard the water. Or sprinkle some salt on the melon, mix it in well and let it sit for a few minutes before rinsing them in water. You may squeeze to dry. I personally like to use this latter method before making my stir-fries as some of the bitter flavor is left behind.

Why should you eat bitter melon? For much the same reason that you eat broccoli or spinach: for their health benefits. Bitter melon is an aid to diabetes control. It lowers blood sugar and promotes healthy insulin levels; besides that it also has Vitamin C, B1 and B2. While more studies need to be done, it is time to learn about new vegetables like bitter melon or get back to eating them routinely and celebrating the sweet truth about bitter melon. Cheers to a bitter melon!

Stir-fried Bitter Melon with Egg

Stir-fried Bitter Melon with Egg

Phad Mara Kub Khai 

ผัดมะระกับไข่

Serves: 4

Cooking Time: 4 minutes

When one has acquired a taste for bitter melon, stir-fried bitter melon with egg is a delightful dish. Personally, it makes me happy like after eating bitter-sweet chocolate. A bite of sliced bitter melon contrasts with the sweet, cooked egg and the hint of salty-soy flavor,  making this three-flavor combination very memorable and it lingers on my palate. When trying this dish for the first time, don’t be afraid of the bitter that you will taste at first. Wait a little while and you will taste the sweet from the egg, then the salty from the soy sauce. Serve the stir-fried bitter melon as a side with a curry dish and warm steamed jasmine rice.

Serves: 2

3 to 5 tablespoons canola oil
3 cloves garlic, peeled and chopped
2 eggs
1½ cups sliced bitter melon, about 1 large bitter melon
2 tablespoons soy sauce
1 teaspoon sugar
½ cup water or chicken broth
 
Heat a wok on high heat until it is hot. Pour in 3 tablespoons canola oil and stir in garlic. When garlic is golden, stir in one egg and stir a few times. When the egg is cooked, stir in bitter melon. Stir for 1 minute, then add another egg and stir a few times before adding soy sauce and sugar. Add water or chicken broth and let it cook 1 minute. Depending on one’s liking, the melon should be not too soft or to firm; it should still have some crunch. Serve warm with steamed jasmine rice.
 
© 2011 Pranee Khruasanit Halvorsen  
I Love Thai cooking 
 Pranee teaches Thai Cooking classes in the Seattle area. Her website is: I Love Thai cooking.com .
 

This slideshow requires JavaScript.

 
Related articles

Read Full Post »